MIDI recording Grid Sequence function
39
turn
off
the
Grid
Sequence
function
and
use
SEQ
EDIT:
Track
Edit
‐
Edit
Time
Sig,
or
press
the
REC
button
and
use
the
“TS”
field
to
change
the
time
signature
for
recording.
4. Press
the
Start/Stop
button
to
start
playback.
At
this
point,
all
grid
notes
are
off,
so
you
won’t
hear
anything,
but
you’ll
notice
that
the
function
LEDs
will
be
lit
‐
up.
During
playback,
function
01–08
LEDs
indicate
the
location,
and
function
09–16
LEDs
indicate
the
status
of
each
grid
note.
These
LEDs
will
blink
in
time
with
the
playback
tempo
and
quantize
settings.
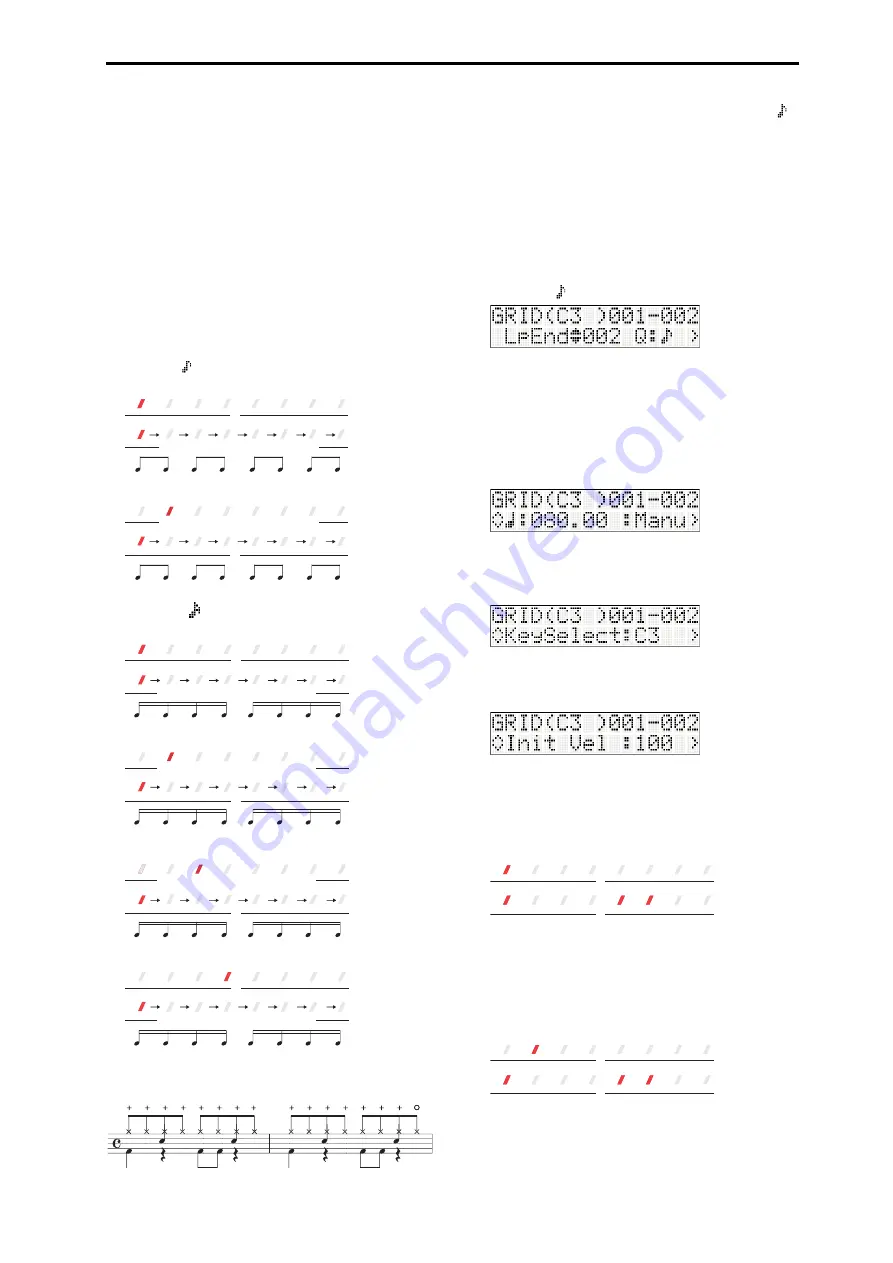
Example
1)
Loop:
01–002
(two
measures),
“TS”:
4/4,
“Q”:
8th
( )
Example
2)
Loop:
001–002
(two
measure),
“TS”:
4/4,
“Q”:
16th
( )
5. Press
the
Start/Stop
button
to
stop.
Now
let’s
create
the
drum
pattern
shown
below.
Loop:
001–002
(two
measures),
“TS”:
4/4,
“Q”:
8th
( )
6. Specify
the
looped
measures
and
the
quantization
as
follows.
•“LpEnd”:
2
•“Q”:
8th
( )
Note:
Use
the
buttons
to
move
between
pages.
Use
the
buttons
to
select
parameters.
7. Set
the
tempo
and
tempo
mode
as
follows.
•Tempo:
080.00
•Tempo
mode:
Manu
8. First,
enter
the
kick.
Hold
down
the
KEY
button,
and
press
the
C3
key.
You
can
also
use
“KeySelect”
to
specify
the
note
to
enter.
The
velocity
used
when
you
strike
the
key
is
used
as
the
velocity
value
of
the
note
that’s
entered.
You
can
also
use
“Init
Vel”
to
specify
the
velocity.
9. Now
you
can
enter
the
desired
grid
notes.
Press
the
function
01
button
to
choose
the
first
location,
and
then
press
the
function
09,
13,
and
14
buttons
to
turn
on
the
corresponding
grid
notes.
The
function
09,
13,
and
14
LEDs
will
light
‐
up.
The
function
09–16
buttons
will
turn
on
or
off
each
time
you
press
them.
10.Press
the
function
09
button
to
specify
the
second
location,
and
then
press
buttons
09,
13,
and
14
buttons
to
turn
on
the
corresponding
grid
notes.
The
function
09,
13,
and
14
LEDs
will
light
‐
up.
First measure
Successively lit from left to right
Second measure
Successively lit from left to right
First measure - Beat 1–2
Successively lit from left to right
Successively lit from left to right
First measure - Beat 3–4
Second measure - Beat 1–2
Second measure - Beat 3–4
Successively lit from left to right
Successively lit from left to right
Open hi-hat (A
#
3)
+ + + + + + + + + + + + + + +
Close hi-hat (F
#
3)
+
Snare (D3)
+ +
+ + +
+ + +
+ + +
+
Kick (C3)
+ + +
+ +
+ + +
+ +
Содержание microSTATION
Страница 1: ...2 E Operation guide ...
Страница 79: ...MIDI Implementation Chart Operating requirements 75 ...


