background image

6

Operation

1. Turning on the power

1. Connect your equipment as described in the

connection examples, and plug the AC
adaptor into an AC outlet.

2. Press the [STANDBY] switch to turn on the

power. The [PROGRAM/BPM] display will
light.
An image will appear on the connected TV
monitor.

To turn off the power

Press the [STANDBY] switch once again.

2. Checking the video input 

1. Output a video signal from a connected device.
2. Use the [VIDEO SELECT] switch to select the

input jack that is receiving the video signal
you want to process.

1:

 The effect will apply to video input 1.

2:

 The effect will apply to video input 2 (or

S-video input 2). The [VIDEO 2] indicator
will light.
If no signal is being input to video input 2,
the [VIDEO 2] indicator will blink.
S-video input 2 takes priority for video input
2.

3. Adjusting the volume 

1. Output audio from a connected device.
2. Adjust the audio input level.

Use the [LINE INPUT VOLUME] knob to
adjust the input level so that the peak
indicator does not light red.

If you are using headphones

Use the [PHONES VOLUME] knob to adjust
the volume.

4. Selecting a program

1. Use the [CONTROL SELECT] switch to select

the signal (video, audio) that you want to
process with the effect.
Use the left position to apply effects to the
audio, or the right position to apply effects to
the video. If you select 

COMBI

 (center

position), effects will be applied to both
audio and video.

 Refer to “Creating a COMBI program”

2. The [PROGRAM/BPM] display shows the

number of the currently selected program.
Use the [PROGRAM/BPM] knob to select a
program (00–99).

3. Use the [FX BALANCE] knob to adjust the

effect depth.
Turning this knob to the far left will lessen
the effect; turning it to the far right will
produce the maximum effect.

The result will depend on the effect you
select.
If this knob is set to the far left, no effect will
be applied to the sound (“dry”); if the knob
is set to the far right, the maximum effect
will be applied (“wet”).
If you want to use the [FX BALANCE] knob
to adjust the effect depth, set the
[CONNECTION] switch to 

DIRECT

.

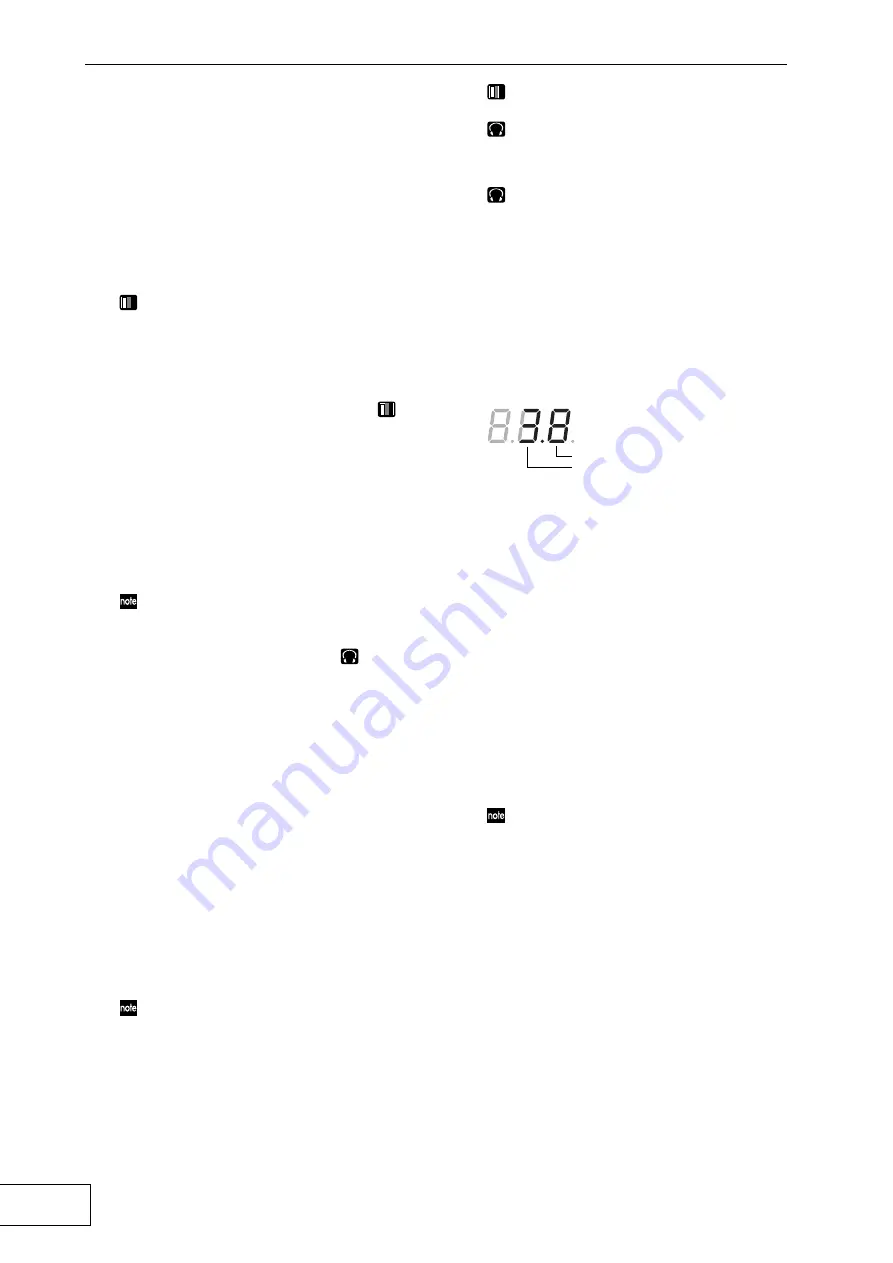
About the [PROGRAM/BPM] display

This shows the number of the currently
selected program, the specified BPM, and the
position of the point at which you touch the
touch-pad.

When you touch the touch-pad:

 The position

you touched (1.1–9.9; 5.5 is center) is
displayed.

Horizontal position (1–9)

Vertical position (1–9)

When you switch programs:

 The display shows

the program number (00–99). In Combination
mode, this may indicate (--) for some settings
when you use the program memory keys to
recall a program.

When you set the BPM:

 When you use the

[TAP/BPM] key to set the BPM, the display
shows the BPM value. In Auto BPM mode,
three dots will light.

In Pattern Select mode:

 The display shows the

number of the currently selected pattern.

In MIDI Edit mode:

 The display shows

information such as the MIDI channel or
control number.

5. Using the touch-pad

1. Rub your finger over the touch-pad or tap

(lightly strike) it to control the effect (sound).

 Affix the included protective sheet to the pad

to help protect it.

2. If you turn on the [HOLD] key, the effect

(sound) for the position immediately before
you removed your finger from the touch pad
will be maintained.

Содержание KAOSS PAD Entrancer

Страница 1: ...OWNER S MANUAL MANUEL D UTILISATION BEDIENUNGSANLEITUNG...

Страница 2: ...with the limits for a Class B digital device pursuant to Part 15 of the FCC Rules These limits are designed to provide reasonable protection against harmful interference in a residential installation...

Страница 3: ...image or an input phrase a six second motion video sample plus a still image and six second phrase for each of the two sample keys Pad Motion function and Mute Freeze function for realtime operation...

Страница 4: ...ey 12 FUNCTION key 13 SAMPLE 1 SAMPLE 2 keys 14 REC STOP key 15 VIDEO 2 indicator Care of the touch pad Never apply excessive force to the touch pad or place heavy objects on it Rough handling may cra...

Страница 5: ...itch 1 Power switch 2 Power connector 3 MIDI IN MIDI OUT connectors 4 CONNECTION switch 5 NTSC PAL switch 1 2 3 4 5 1 2 3 4 5 8 6 7 10 9 4 INPUT 2 S video jack 5 INPUT 2 video jack 6 OUTPUT S video ja...

Страница 6: ...rancer will not operate correctly if the incorrect video signal format is selected The KAOSS PAD Entrancer will not operate correctly with non interlaced signals NTSC is the standard format used withi...

Страница 7: ...LOW CUT 75Hz 18dB OCT TRIM 10dB 40dB 10 60 U 10dBV MIC GAIN 60 U 15 U 15 AUX 1 MON EFX 2 EFX U 15 U 12 15 12 U 15 15 PAN SOLO 1 MUTE ALT 3 4 EQ HI 12kHz MID 2 5kHz LOW 80Hz L R dB 10 5 U 5 10 20 30 40...

Страница 8: ...selected program Use the PROGRAM BPM knob to select a program 00 99 3 Use the FX BALANCE knob to adjust the effect depth Turning this knob to the far left will lessen the effect turning it to the far...

Страница 9: ...at is synchronized to the BPM For details on the relevant effect parameters refer to the Effect Program List separate sheet What is BPM BPM Beats Per Minute indicates the tempo of a song in terms of t...

Страница 10: ...By setting the CONTROL SELECT switch to COMBI and operating the touch pad you can simultaneously control video effects and audio effects To store a COMBI 1 Set the CONTROL SELECT switch to AUDIO and s...

Страница 11: ...l be cancelled Pattern display will be cancelled if you play back a motion video sample while a pattern is displayed You cannot display a pattern during sample playback 13 Sampling and playing a phras...

Страница 12: ...top When you play back the sample once again pattern display mode will be cancelled and the sample will play back Exiting Pattern Display mode To return to normal operation either touch the touch pad...

Страница 13: ...I Edit mode the PROGRAM BPM display shows the MIDI channel In this state you can use the PROGRAM BPM knob to change the MIDI channel About MIDI channels MIDI uses sixteen channels 1 16 to independentl...

Страница 14: ...an be transmitted refer to the separate MIDI Implementation Transmitted and received messages With the factory settings the KAOSS PAD Entrancer will transmit and receive the following MIDI messages Op...

Страница 15: ...c pattern playback together in the PROGRAM MEMORY 1 8 keys Q6 The graphic pattern disappears when I change the video effect A Graphic pattern playback will stop when you re select the effect program I...

Страница 16: ...k 1 or 2 Line input jacks stereo RCA jacks Outputs Video output jack RCA jack S video output jack S jack Line output jacks stereo RCA jacks Headphone jack stereo 1 4 phone jack Audio sampling frequenc...

Страница 17: ...15...

Страница 18: ...mmables Conservez ce manuel Apr s avoir lu ce manuel veuillez le conserver soigneusement pour toute r f rence ult rieure Evitez toute intrusion d objets ou de liquide Ne placez jamais de r cipient con...

Страница 19: ...ante un clip vid o de six secondes plus une image fixe et une phrase de six secondes pour chacune des deux touches d chantillonnage Fonction Pad Motion et fonction Mute Freeze pour un travail en temps...

Страница 20: ...AMPLE 2 14 Touche REC STOP 15 Indicateur VIDEO 2 Entretien du pav tactile N appliquez jamais de force excessive sur le pav tactile et ne posez pas d objet lourd sa surface Une utilisation brutale peut...

Страница 21: ...e mise sous hors tension 2 Prise d alimentation 3 Prises MIDI IN MIDI OUT 4 Commutateur CONNECTION 5 Commutateur NTSC PAL 1 2 3 4 5 1 2 3 4 5 8 6 7 10 9 4 Entr e S vid o INPUT 2 5 Entr e vid o INPUT 2...

Страница 22: ...utiliserez Le KAOSS PAD Entrancer ne fonctionnera pas correctement si le format de signal vid o incorrect est s lectionn Le KAOSS PAD Entrancer ne fonctionnera pas correctement avec des signaux non en...

Страница 23: ...INE IN 6 LOW CUT 75Hz 18dB OCT TRIM 10dB 40dB 10 60 U 10dBV MIC GAIN 60 U 15 U 15 AUX 1 MON EFX 2 EFX U 15 U 12 15 12 U 15 15 PAN SOLO 1 MUTE ALT 3 4 EQ HI 12kHz MID 2 5kHz LOW 80Hz L R dB 10 5 U 5 10...

Страница 24: ...r la profondeur de l effet Tournez ce bouton vers la gauche pour limiter l effet tournez le vers la droite pour renforcer l effet Le r sultat d pendra de l effet s lectionn Si ce bouton est tourn comp...

Страница 25: ...effets concern s reportez vous la liste Programmes d effets feuille s par e Qu est ce que le BPM Le BPM Beats Per Minute indique le tempo d un morceau en termes de nombre de notes de battement croche...

Страница 26: ...enregistrer un COMBI 1 R glez le commutateur CONTROL SELECT sur AUDIO et s lectionnez un programme 2 R glez le commutateur CONTROL SELECT sur VIDEO et s lectionnez un programme 3 R glez le commutateu...

Страница 27: ...s du groupe SAMPLE PLAY une pression sur la touche SAMPLE 1 ou SAMPLE 2 reproduira la phrase enregistr e sous chaque touche Vous pouvez enregistrer environ six secondes de son monophonique sous chaque...

Страница 28: ...de Pattern Display appuyez sur une des touches PROGRAM MEMORY 1 8 pour rappeler le motif pr s lectionn pour cette touche Vous pouvez appuyer sur la touche SAMPLE 1 pour activer d sactiver le dernier m...

Страница 29: ...I En mode MIDI Edit l cran PROGRAM BPM indique le canal MIDI Vous pouvez alors utiliser le bouton PROGRAM BPM bouton pour changer le canal MIDI A propos des canaux MIDI MIDI utilise seize canaux 1 16...

Страница 30: ...e transmis reportez vous l impl mentation MIDI s par e Signaux transmis et re us Avec les r glages d usine le KAOSS PAD Entrancer transmettra et recevra les signaux MIDI suivants Op ration transmise M...

Страница 31: ...phique dispara t quand je modifie l effet vid o A La reproduction du motif graphique s arr tera si vous re s lectionnez le programme d effets Si vous souhaitez afficher de nouveau le motif vous devez...

Страница 32: ...gne Prises RCA st r o Sorties Prise de sortie vid o Prise RCA Prise de sortie S vid o Prise S vid o Prises de sortie ligne Prises RCA st r o Prise de casque Jack st r o 1 4 Fr quence d chantillonnage...

Страница 33: ...15...

Страница 34: ...s oder Sp lmittel Verwenden Sie niemals brennbare Reiniger Bedienungsanleitung Bewahren Sie diese Bedienungsanleitung gut auf falls Sie sie sp ter noch einmal ben tigen Fl ssigkeiten und Fremdk rper S...

Страница 35: ...Sampling von Videoclips Standbildern und Audiodaten freien Lauf lassen Sie k nnen das Ausgabebild oder Eingangs S tze ein 6 Sekunden Filmsample ein Standbild und ein 6 Sekunden Satz f r jede der beide...

Страница 36: ...D Taste Halten 12 FUNCTION Taste 13 SAMPLE 1 SAMPLE 2 Taste 14 REC STOP Taste Aufnahme Wiedergabe 15 VIDEO 2 Anzeige Umgang mit dem Touch Pad Setzen Sie das Touch Pad keinen starken Belastungen aus un...

Страница 37: ...wahl 1 Netzschalter 2 Netzanschluss 3 MIDI IN MIDI OUT Anschluss 4 CONNECTION Schalter Verbindung 5 NTSC PAL Schalter 1 2 3 4 5 1 2 3 4 5 8 6 7 10 9 4 INPUT 2 S Video Eingang 5 INPUT 2 Video Eingang 6...

Страница 38: ...pfangsformat einstellen arbeite der KAOSS PAD Entrancer nicht ordnungsgem Der KAOSS PAD Entrancer unterst tzt keine Non Interlaced Signale Anm NTSC ist das Standardformat in den USA Kanada und Japan B...

Страница 39: ...B OCT TRIM 10dB 40dB 10 60 U 10dBV MIC GAIN MIC6 BAL OR UNBAL LINE IN 6 LOW CUT 75Hz 18dB OCT TRIM 10dB 40dB 10 60 U 10dBV MIC GAIN 60 U 15 U 15 AUX 1 MON EFX 2 EFX U 15 U 12 15 12 U 15 15 PAN SOLO 1...

Страница 40: ...Knopf die Effekttiefe an Je mehr Sie diesen Knopf nach links drehen desto mehr l sst der Effekt nach Durch Drehen nach rechts steigern Sie den Effekt Das Ergebnis h ngt vom ausgew hlten Effekt ab Wen...

Страница 41: ...eats per Minute dr ckt das Tempo eines St cks als Anzahl der Takte Viertelnoten pro Minute aus Je mehr BPM desto schneller das Tempo So legen Sie die Taktzahl fest Wenn Sie einen bestimmten BPM Wert v...

Страница 42: ...ein Programm aus 2 Bringen Sie den CONTROL SELECT Schalter in die Stellung VIDEO und w hlen Sie ein Programm aus 3 Bringen Sie den CONTROL SELECT Schalter in die Stellung COMBI und halten Sie bei ged...

Страница 43: ...LE 2 Taste den jeweilig gespeicherten Satz wiedergegeben Sie k nnen f r die Tasten jeweils einen 6 Sekunden Satz aufzeichnen Die aufgezeichneten S tze gehen beim Ausschalten des Ger ts verloren Die au...

Страница 44: ...fach f r ca 10 Sekunden keine Eingabe am KAOSS PAD Entrancer vor Anzeigen von Strukturen W hlen Sie im Pattern Display Modus eine der Tasten PROGRAM MEMORY 1 8 um die f r die entsprechende Taste progr...

Страница 45: ...ROGRAM BPM Display den MIDI Kanal an Wenn dies der Fall ist k nnen Sie mit dem PROGRAM BPM Knopf den MIDI Kanal wechseln Informationen zu MIDI Kan len MIDI verwendet 16 Kan le 1 16 um verschiedene Dat...

Страница 46: ...nes MIDI Ger t bertragen werden Weitere Informationen zur bertragung von exklusiven Meldungen finden Sie im separaten Dokument MIDI Implementierung bertragbare und empfangbare Meldungen Mit den Standa...

Страница 47: ...8 zugewiesen werden Q6 Die Grafikstruktur verschwindet wenn der Video Effekt ge ndert wird A Wenn Sie das Effekt Programm w hlen endet die Wiedergabe der Grafik Struktur automatisch Um die Grafik Stru...

Страница 48: ...ing nge Line Stereo RCA Eing nge Ausg nge Video Ausgang RCA Ausgang S Video Ausgang S Ausgang Cinch Ausg nge Line Stereo RCA Ausg nge Kopfh rerausgang Stereo 1 4 Telefonausgang Audio Abtastrate 44 1 K...

Страница 49: ...15...

Страница 50: ...2 AC AC100V AC AC AC AC AC AC AC AC MIDI AMEI...

Страница 51: ...1 AUDIO VIDEO PROCESSOR KAOSS PAD entrancer 100 100 DJ 100 VJ DJ BPM BPM BPM LFO BPM 20 BPM AUTO BPM BPM MIDI BPM SAMPLE PLAY 6 1 2 1 6 PAD MOTION MUTE FREEZE PAD MOTION MUTE FREEZE VJ VJ MIDI VJ p...

Страница 52: ...EAK 3 LINE INPUT VOLUME 4 FX BALANCE 5 PROGRAM BPM 6 PROGRAM BPM 7 PROGRAM MEMORY1 8 8 TAP BPM 9 3 2 1 7 4 5 8 6 10 14 13 12 11 15 9 10 PAD MOTION MUTE FREEZE 11 HOLD 12 FUNCTION 13 SAMPLE 1 SAMPLE 2...

Страница 53: ...3 1 PHONES 2 PHONES VOLUME 3 VIDEO SELECT 1 2 3 MIDI IN MIDI OUT 4 CONNECTION 5 NTSC PAL 1 2 3 4 5 1 2 3 4 5 8 6 7 10 9 4 INPUT 2 S 5 INPUT 2 6 OUTPUT S 7 OUTPUT 8 OUTPUT 9 INPUT 10 INPUT...

Страница 54: ...4 OUTPUT VIDEO INPUT VIDEO INPUT 2 VIDEO DC7V VIDEO MONITOR AC AC ADAPTER Video camera DVD Player NTSC PAL NTSC NTSC PAL S...

Страница 55: ...LT 3 4 EQ HI 12kHz MID 2 5kHz LOW 80Hz L R dB 10 5 U 5 10 20 30 40 50 60 U 15 U 15 AUX 1 MON EFX 2 EFX U 15 U 12 15 12 U 15 15 PAN SOLO 4 MUTE ALT 3 4 EQ HI 12kHz MID 2 5kHz LOW 80Hz L R dB 10 5 U 5 1...

Страница 56: ...IDEO 2 2 VIDEO 2 2 2 3 1 2 LINE INPUT VOLUME PHONES VOLUME 4 1 CONTROL SELECT COMBI COMBI p 8 2 PROGRAM BPM PROGRAM BPM 00 99 3 FX BALANCE FX BALANCE CONNECTION DIRECT PROGRAM BPM BPM 1 1 9 9 5 5 1 9...

Страница 57: ...D MOTION MUTE FREEZE PAD MOTION PAD MOTION MUTE FREEZE PAD MOTION FUNCTION PAD MO TION MUTE FREEZE PAD MO TION 8 BPM BPM BPM FX BPM PTN BPM BPM BPM Beats Per Minute 1 4 BPM BPM BPM TAP BPM PROGRAM BPM...

Страница 58: ...D MOTION MUTE FREEZE PAD MOTION 1 PROGRAM MEMORY1 8 PAD MOTION MUTE FREEZE PAD MOTION 10 COMBI COMBI CONTROL SELECT COMBI COMBI 1 CONTROL SELECT AUDIO 2 CONTROL SELECT VIDEO 3 CONTROL SELECT COMBI FUN...

Страница 59: ...OP REC STOP HOLD REC STOP SAMPLE 13 SAMPLE 1 SAMPLE 2 SAMPLE PLAY 90 99 SAMPLE PLAY SAMPLE 1 SAMPLE 2 2 6 1 REC STOP REC STOP LED 2 SAMPLE 1 SAMPLE 2 3 REC STOP REC STOP LED REC STOP SAMPLE PLAY AUTO...

Страница 60: ...LE 2 SAMPLE 1 SAMPLE 2 FX BALANCE SAMPLE 1 SAMPLE 2 HOLD SAMPLE 1 SAMPLE 2 14 FUNCTION SAMPLE1 PROGRAM BPM FUNCTION 10 PROGRAM MEMORY 1 8 SAMPLE1 PROGRAM MEMORY 1 8 FUNCTION 40 59 PROGRAM MEMORY 1 8 P...

Страница 61: ...SAMPLE2 MIDI PROGRAM BPM MIDI MIDI MIDI PROGRAM BPM MIDI PROGRAM BPM MIDI MIDI MIDI MIDI 1 MIDI MIDI 1 16 MIDI 1 MIDI 1 MIDI MIDI MIDI MIDI Musical Instrument Digital Interface MIDI MIDI MIDI MIDI MID...

Страница 62: ...3 1 2 PROGRAM MEMORY5 X Y 3 CC 93 1 PROGRAM MEMORY3 ON OFF 2 CC 92 1 2 PROGRAM MEMORY6 FX BALANCE 4 CC 94 1 2 PROGRAM MEMORY7 MUTE 5 CC 95 1 2 PROGRAM MEMORY8 0 99 2 HOLD SAMPLE2 MIDI X 1 CC 12 1 2 PR...

Страница 63: ...IDEO 3 PAL NTSC Q2 A VIDEO VIDEO MUTE FREEZE FREEZE SAMPLE 1or2 Q3 COMBI VIDEO A VIDEO SAMPLE Q4 COMBI FX BALANCE VIDEO A FX BALANCE COMBI Q5 A 1 8 PROGRAM MEMORY Q6 A Q7 VIDEO1 VIDEO2 2 A VIDEO1 VIDE...

Страница 64: ...14 100 100 100 1 2 1 2 S S 44 1 AD DA 20bit MIDI IN OUT DC7V AC AC 240 247 83 mm 2 0kg...

Страница 65: ...Hex H D H Bn cc dd Control Change C Bn 79 121 00 Reset All Controllers A Cn pp Program Change P En bb bb Pitch Bender C n MIDI Channel Number 0 15 cc Control Number 1 31 64 95 dd Control Data 0 127 pp...

Страница 66: ...ALL DATA DUMP R T Byte Description F0 42 3c 6x EXCLUSIVE HEADER KPE1 x F or KP2 x 7 0101 0000 50 ALL DATA DUMP 50H 0ddd dddd dd Data NOTE 5 TABLE 1 TABLE 2 1111 0111 F7 EOX When this message is receiv...

Страница 67: ...VIDEO FX SAMPLE 2 OFF ON 0 OFF 1 ON bit2 6 RESERVED bit7 VIDEO FX HOLD OFF ON 0 OFF 1 ON 14 VIDEO FX DEPTH 15 VIDEO FX HOLD X 16 VIDEO FX HOLD Y 17 VIDEO FX HOLD X2 18 VIDEO FX HOLD Y2 19 VIDEO FX HO...

Страница 68: ...e Sensing System Reset Aux Messages Memorized MIDI Implementation Chart Remarks Transmitted received when control numbers or pitch bend are selected and are enabled Transmitted received when program c...

Страница 69: ...product if purchased elsewhere Any unauthorised modification or removal of original serial number will disqualify this product from warranty protection TEL 03 3799 9086 143 0001 5 4 1 5 TEL 03 3799 90...

Страница 70: ...t ce produit via l internet par vente par correspondance ou et vente par t l phone vous devez v rifier que ce produit est bien utilisable dans le pays o vous r sidez ATTENTION L utilisation de ce prod...

Отзывы: