background image

2

THE FCC REGULATION WARNING  

(for USA)

This equipment has been tested and found 

to comply with the limits for a Class B digital 

device, pursuant to Part 15 of the FCC Rules. 

These limits are designed to provide reason-

able protection against harmful interference 

in a residential installation. This equipment 

generates, uses, and can radiate radio fre-

quency energy and, if not installed and used 

in accordance with the instructions, may cause 

harmful interference to radio communications. 

However, there is no guarantee that interfer-

ence will not occur in a particular installation. 

If this equipment does cause harmful interfer-

ence to radio or television reception, which can 

be determined by turning the equipment off 

and on, the user is encouraged to try to correct 

the interference by one or more of the follow-

ing measures:

•  Reorient or relocate the receiving antenna.
•  Increase the separation between the equip-

ment and receiver.

•  Connect the equipment into an outlet on 

a circuit different from that to which the 

receiver is connected.

•  Consult the dealer or an experienced radio/

TV technician for help.

Unauthorized changes or modification to this 

system can void the user’s authority to operate 

this equipment.

Precautions

Location

Using the unit in the following locations can re-

sult in a malfunction.

•  In direct sunlight
•  Locations of extreme temperature or humidity
•  Excessively dusty or dirty locations
•  Locations of excessive vibration
•  Close to magnetic fields

Power supply

Please connect the designated AC adapter to an 

AC outlet of the correct voltage. Do not connect 

it to an AC outlet of voltage other than that for 

which your unit is intended.

Interference with other electrical de-

vices

Radios and televisions placed nearby may experi-

ence reception interference. Operate this unit at a 

suitable distance from radios and televisions.

Handling

To avoid breakage, do not apply excessive force to 

the switches or controls.

Care

If the exterior becomes dirty, wipe it with a clean, 

dry cloth. Do not use liquid cleaners such as ben-

zene or thinner, or cleaning compounds or flam-

mable polishes.

Keep this manual

After reading this manual, please keep it for later 

reference.

Keeping foreign matter out of your 

equipment

Never set any container with liquid in it near this 

equipment. If liquid gets into the equipment, it 

could cause a breakdown, fire, or electrical shock.

Be careful not to let metal objects get into the 

equipment. If something does slip into the equip-

ment, unplug the AC adapter from the wall out-

let. Then contact your dealer or qualified installa-

tion technician for assistance.

*  All product names and company names are the 

trademarks or registered trademarks of their 

respective owners.

Notice regarding disposal  

(EU only)

When this “crossed-out wheeled bin” 

symbol is displayed on the product, 

owner’s manual, battery, or battery 

package, it signifies that when you wish 

to dispose of this product, manual, 

package or battery you must do so in an 

approved manner. Do not discard this 

product, manual, package or battery along with 

ordinary household waste. Disposing in the 

correct manner will prevent harm to human 

health and potential damage to the environ-

ment. Since the correct method of disposal will 

depend on the applicable laws and regulations 

in your locality, please contact your local ad-

ministrative body for details. If the battery con-

tains heavy metals in excess of the regulated 

amount, a chemical symbol is displayed below 

the “crossed-out wheeled bin” symbol on the 

battery or battery package.

Содержание HT-10

Страница 1: ...Piano Sound Module HT 10 Hybrid Piano E F G 1 Owner s manual Manuel d utilisation Bedienungsanleitung ...

Страница 2: ...rference with other electrical de vices Radios and televisions placed nearby may experi ence reception interference Operate this unit at a suitable distance from radios and televisions Handling To avoid breakage do not apply excessive force to the switches or controls Care If the exterior becomes dirty wipe it with a clean dry cloth Do not use liquid cleaners such as ben zene or thinner or cleanin...

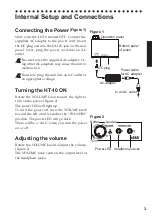
Страница 3: ...e voltage Turning the HT 10 ON Rotate the VOLUME knob toward the right to turn on the power Figure 2 The power LED will light up To turn the power off turn the VOLUME knob toward the left until it reaches the STANDBY position The power LED will go dark There will be a click when you turn the power on or off Adjusting the volume Rotate the VOLUME knob to adjust the volume Figure 2 The VOLUME knob c...

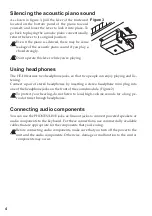
Страница 4: ... playing and lis tening Connect a pair of stereo headphones by inserting a stereo headphone mini plug into one of the headphone jacks on the front of the sound module Figure 2 To protect your hearing do not listen to loud high volume sounds for a long pe riod of time through headphones Connecting audio components You can use the PHONES LINE jacks as line out jacks to connect powered speakers or au...

Страница 5: ...reset sound Piano 1 will be recalled List of Sounds Piano 1 C7 Elegant and warm grand piano Piano 2 C 7 Clear and bright grand piano E Piano 1 D7 Smooth authentic electric piano E Piano 2 D 7 Modern percussive electric piano Harpsi E7 Classical harpsichord Clav F7 Expressive electric clavichord Vibraphone F 7 Smooth vibraphone P Organ G7 Pipe organ E Organ G 7 Drawbar electronic organ Strings A7 E...

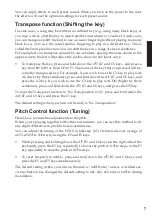
Страница 6: ... unexpected result may occur About the confirmation sound When you press and hold down the A 7 B7 and C8 keys simultaneously on the right side of the keyboard or when you press a key where a function has been assigned you will hear the confirmation sound You can turn this sound off as described below While simultaneously pressing and holding down the A 7 B7 and C8 keys press the A 0 to turn off th...

Страница 7: ...s and hold down the A 7 B7 and C8 keys and press the A2 key If you wish to use the C3 key to play note D 3 higher by three semitones press and hold down the A 7 B7 and C8 keys and press the D 3 key To reset the Transpose function to No Transposition 0 press and hold down the A 7 B7 and C8 keys and press the C3 key The default setting when you turn on the unit is No Transposition Pitch Control func...

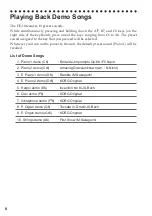
Страница 8: ... on the power to the unit the default preset sound Piano 1 will be recalled List of Demo Songs 1 Piano 1 demo C6 Fantaisie Impromptu Op 66 F Chopin 2 Piano 2 demo C 6 Amazing Grace unknown arr N Nishi 3 E Piano 1 demo D6 Ramble M Sakaguchi 4 E Piano 2 demo D 6 KORG Original 5 Harpsi demo E6 Invention No 8 J S Bach 6 Clav demo F6 KORG Original 7 Vibraphone demo F 6 KORG Original 8 P Organ demo G6 T...

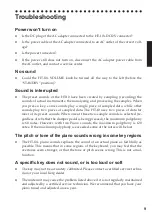
Страница 9: ...st of its preset sounds When one of these two sample sounds is selected re gardless of whether the damper pedal is being pressed the maximum polyphony is 60 notes However with two Piano sounds the maximum polyphony is 120 notes If the maximum polyphony is exceeded some of the notes will be lost The pitch or tone of the piano sounds wrong in some key regions The HT 10 s piano sounds replicate the s...

Страница 10: ... and adjusted once a year The pitch is different than the acoustic piano The mute unit may cause the problem listed above if it is not regularly maintained and adjusted by a certified service technician We recommend that you have your piano tuned and adjusted once a year The keyboard does not produce sound when played as a piano If the mute unit lever does not move contact a certified service tech...

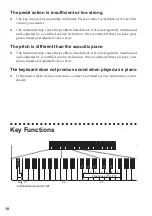
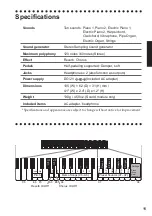
Страница 11: ... function as outputs Power supply DC12V Included AC adapter Dimensions 105 W 62 D 31 H mm 4 1 W x 2 4 D x 1 2 H Weight 130g 4 59oz Sound module only Included items AC adapter headphone Specifications and appearance are subject to change without notice for improvement C7 C8 C5 E5 F5 C6 B5 A5 16 2 4 5 7 9 10 8 6 3 1 Piano 1 E Piano 1 Clav Vibraphone P Organ E Organ Strings Piano 2 E Piano 2 Harpsi D...

Страница 12: ...vitez de brancher l adaptateur à une prise de courant dont la tension ne correspond pas à celle pour la quelle l appareil est conçu Interférences avec d autres appareils électriques Les postes de radio et de télévision situés à proximité peuvent par conséquent souffrir d interfé rences à la réception Veuillez dès lors faire fonctionner cet appareil à une distance raisonnable de postes de radio et ...

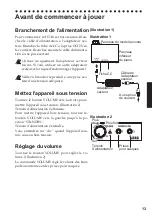
Страница 13: ...ournez le bouton VOLUME vers la droite pour mettre l appareil sous tension Illustration 2 Témoin d alimentation s allumera Pour mettre l appareil hors tension tournez le bouton VOLUME vers la gauche jusqu à la po sition STANDBY Témoin d alimentation s éteindra Vous entendrez un clic quand l appareil sera mis sous ou hors tension Réglage du volume Tournez le bouton VOLUME pour régler le vo lume Ill...

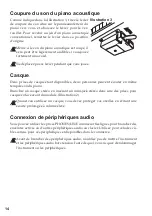
Страница 14: ... en même tempsle son du piano Branchez un casque stéréo en insérant un mini jack stéréo dans une des prises pour casque en face avant du module Illustration 2 Quand vous utilisez un casque vous devez protéger vos oreilles en évitant une écoute prolon gée à volume élevé Connexion de périphériques audio Vous pouvez utiliser les prises PHONES LINE comme sorties lignes pour brancher des enceintes acti...

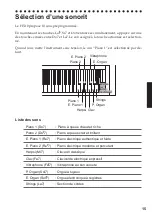
Страница 15: ...des sons Piano 1 Do7 Piano à queue chaud et riche Piano 2 Do 7 Piano à queue clair et brillant E Piano 1 Re7 Piano électrique authentique et fuide E Piano 2 Re 7 Piano électrique moderne et percutant Harpsi Mi7 Clavecin classique Clav Fa7 Clavicorde électrique expressif Vibraphone Fa 7 Vibraphone au son velouté P Organ Sol7 Orgue à tuyaux E Organ Sol 7 Orgue électronique à registres Strings La7 Se...

Страница 16: ... que vous maintenez les touches La 7 Si7 et Do8 enfoncées ne jouez pas sur le clavier Vous risquez d obtenir un résultat inattndu Sonorité de confrmation Quand vous enfoncez simultané ment les touches La 7 Si7 et Do8 à l extrémité droite du clavier ou quand vous actionnez une touche à laquelle une fonction est assignée vous entendez une sonorité de confirmation Vous pouvez couper cette sonorité en...

Страница 17: ... la note La2 transposition vers le bas de trois demi tons maintenez les touches La 7 Si7 et Do8 enfoncées et appuyez sur la touche La2 Si vous souhaitez une transposition telle que la touche Do3 référence produise la note Ré 3 transposition vers le haut de trois demi tons maintenez les touches La 7 Si7 et Do8 enfoncées et appuyez sur la touche Ré 3 Pour annuler la transposition 0 maintenez les tou...

Страница 18: ... démonstration commence à partir du morceau sélectionné et se poursuit par ordre ascendant jusqu à ce que vous l arrêtiez Pour arrêter la lecture des morceaux de démonstration appuyez simultanément sur les touches La 7 Si7 et Do8 Liste des sons de démonstration 1 Piano 1 Do6 Fantaisie Impromptu Op 66 F Chopin 2 Piano 2 Do 6 Amazing Grace unknown arr N Nishi 3 E Piano 1 Re6 Ramble M Sakaguchi 4 E P...

Страница 19: ...ernes du HT 10 utilise deux échantillons par note Quand vous sélectionnez un son à deux échantillons par note la polypho nie maxi mum est de 60 notes que la pédale forte soit actionnée ou non Parmi les sons inter nes deux sons de piano autorisent une polyphonie de 120 notes Si vous dépassez la polyphonie maximum des notes excédentaires sont perdues La hauteur tonale ou tonalité du piano sembleinco...

Страница 20: ...ente de celled un piano acoustique L unité de sourdine peut provoquer les problèmes expo sés ci dessus si elle n est pas régulièrement entretenue etréglée par un installateur certifié Nous vous conseillons de faire accorder et régler votrepiano une fois par an Le clavier ne produit aucun son lorsqu il est utilisé en tantque piano Si le levier du dispositif de sourdine ne bouge pas Contactez votre ...

Страница 21: ...n DC12V adaptateur secteur inclus Dimensions 105 L 62 P 31 H mm Weight 130g nur Soundmodul Accessoires fournis Adaptateur secteur casques Les caractéristiques et l aspect du produit sont susceptibles d être modifiés sans avis préalable en vue d une amélioration Do7 Do8 Do5 Mi5 Fa5 Do6 Si6 La6 16 2 4 5 7 9 10 8 6 3 1 Piano 1 E Piano 1 Clav Vibraphone P Organ E Organ Strings Piano 2 E Piano 2 Harpsi...

Страница 22: ... für Blei und Hg für Quecksilber Vorsichtsmaßnahmen Aufstellungsort Vermeiden Sie das Aufstellen des Geräts an Orten an denen es direkter Sonneneinstrahlung ausgesetzt ist hohe Feuchtigkeit oder Extremtemperaturen auftreten können Staub oder Schmutz in großen Mengen vorhanden sind das Gerät Erschütterungen ausgesetzt sein kann in der Nähe eines Magnetfeldes Stromversorgung Schließen Sie das option...

Страница 23: ...HT 10 Drehen Sie den VOLUME Knopf nach rechts zu mEinschalten Das Netzanzeige leuchtet auf Abbidung 2 Zum Ausschalten drehen Sie den VOLUME Knopfnach links bis zur Stellung STANDBY Das Netzanzeige erlischt Beim Ein und Ausschalten kommt ein Klick Ton Einschalten des Geräts Drehen Sie den VOLUME Knopf zur Einstellung der Lautstärke Abbidung 2 Dies steuert die Lautstärke die von den Kopf hörerbuchse...

Страница 24: ...ei Personen können den Klang des Klaviers genie ßen Schließen Sie einen Stereo Kopfhörer mit Miniklinke an eine der beiden Kopfhörer buchsen auf der Vorderseite des Moduls an Abbildung 2 Bei Verwendung von Kopfhörern müssen Sie Ihre Ohren schonen indem Sie lan ges Hörenmit sehr hoher Lautstärke vermeiden Anschließen anderer Audiogeräte Die PHONES LINE Buchsen lassen sich auch als Audio Ausgänge fü...

Страница 25: ...Klang Liste der Klänge Piano 1 C7 Wunderschöner Flügelklang Piano 2 C 7 Heller und klarer Flügelklang E Piano 1 D7 Runder authentischer E Pianoklang E Piano 2 D 7 Modernes sehr perkussives E Piano Harpsi E7 Klassisches Cembalo Clav F7 Expressives elektrisches Cembalo Vibraphone F 7 Runder Vibraphonklang P Organ G7 Pfeifenorgel E Organ G 7 Elektrische Zugriegelorgel Strings A7 Klang einer Streicher...

Страница 26: ...tehen nochweitere Funktionen zur Verfügung Spielen Sie keine Noten während Sie die Tasten A 7 H7 und C8 gedrüct halten weil sonst eventuell etwas Unvorhergesehenes passiert Über den Bestätigungston Wenn Sie die Tasten A 7 H7 und C8 ganz rechts gedrückt halten und die Taste der ge wünscten Funktion betätigen erklingt ein kurzer Bestäti gungston Diese Bestätigung kann man folgendermaßen ausscalten H...

Страница 27: ... bei Drücen der Taste C3 die Note A2 drei Halbtöne tiefer erklingen soll müssen Sie die Tasten A 7 H7 und C8 gedrüct halten während Sie das A2 betätigen Wenn bei Drücen der Taste C3 die Note D 3 drei Halbtöne höher erklingen soll müs sen Sie die Tasten A 7 H7 und C8 gedrüct halten während Sie das D 3 betätigen Um wieder die normalen Notentonhöhen zu verwenden 0 müssen Sie die Tasten A 7 H7 und C8 ...

Страница 28: ...d wird mit den nacfolgenden Stü cen fortgesetzt und in einer Scleife abgespielt bis Sie sie wieder anhalten Um die Demowiedergabe anzuhalten müssen Sie die Tasten A 7 H7 und C8 gleiczei tig drücen Liste der Klänge Demosongs 1 Piano 1 C6 Fantaisie Impromptu Op 66 F Chopin 2 Piano 2 C 6 Amazing Grace unknown arr N Nishi 3 E Piano 1 D6 Ramble M Sakaguchi 4 E Piano 2 D 6 KORG Original 5 Harpsi E6 Inve...

Страница 29: ...e nochbearbeitet wurden Bestimmte Klänge beruhen auf einem Sample das beim Drücen der Tasten angesteuert wird Andere Klänge steuern dagegen zwei Samples an Die meisten Klangfarben des HT 10 be ruhen auf jeweils zwei Samples Bei Anwahl eines solcen Klangs und unabhängig davon ob das Dämpferpedal gedrüct wird beträgt die Polyphonie noch 60 Noten Bei zwei Klavierklängen beträgt die Polyphonie dagegen...

Страница 30: ...er Fachhändler Die Schalldämpfungseinheit kann die obigen Problemehervorrufen wenn sie nicht regelmäßig von einen quali fizierten Installationstechniker gewartet und jus tiert wird Wir empfehlen das Klavier einmal im Jahr stimmen undeinstellen zu lassen Die Tonlage ist anders als beim akustischen Klavier Die Schalldämpfungseinheit kann die obigen Problemehervorrufen wenn sie nicht regelmäßig von e...

Страница 31: ...hörer x 2 fungieren auch ls Audio Ausgänge Stromversorgung DC12V Netzteil mitgeliefert Abmessungen 105 B 62 T 31 H mm Gewicht 130g nur Soundmodul Lieferumfang Netzteil Kopfhörer Änderungen der technischen Daten und des Designs ohne vorherige Ankündi gung vorbehalten C7 C8 C5 E5 F5 C6 A5 H5 16 2 4 5 7 9 10 8 6 3 1 Piano 1 E Piano 1 Clav Vibraphone P Organ E Organ Strings Piano 2 E Piano 2 Harpsi Ti...

Страница 32: ... par correspondance ou et vente par téléphone vous devez vérifier que ce produit est bien utilisable dans le pays où vous résidez ATTENTION L utilisation de ce produit dans un pays autre que celui pour lequel il a été conçu peut être dangereuse et annulera la garantie du fabricant ou du distributeur Conservez bien votre récé pissé qui est la preuve de votre achat faute de quoi votre produit ne ris...

Отзывы: