17
5.2 Motor cables
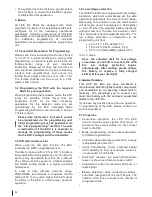
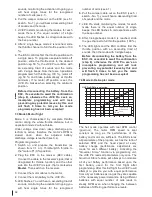
You may connect the 3 yellow motor cables in any
order you wish, as exchanging any of the two
cables will change motor rotation direction.
Alternatively, the direction of motor r
otation can
be changed via the programming unit. If the motor
used in your model has sensor cables, they are
not needed and will remain un
plugged.
5.3 Sensor ports
The sensor ports are to be used with external
modules such as the Bluetooth module.
6. Getting started
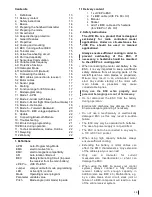
Always use polarized connectors for the
b
attery cables! Connecting the battery with
reverse polarity will destroy the ESC
!
Preparing the JIVE Pro for
operation.
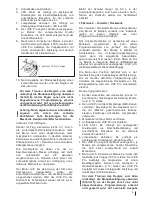
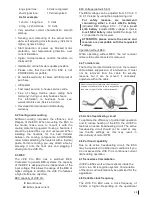
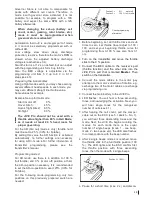
Attach a yellow motor cable to each of the three
attachment points on the esc.
Positive pole
() with the red cable.
Negative pole
(marked–) with the black cable
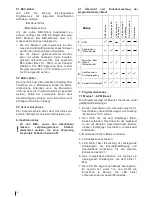
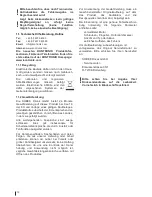
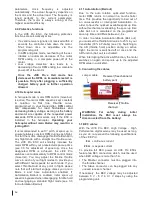
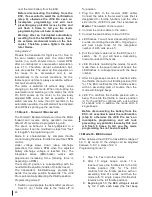
6.1 Table of function range for the
programmable
modes
7. Mode programming
7.1 Mode 1- APM (Reset)
When programming the APM mode, all
previously
made settings will be
deleted.
Mode 1: Resets all Factory Parameters
1.
Switch on and prepare the transmitter
(as
shown from 3.1
on). Place the throttle stick in
the "motor off"
(0 %) position.
2.
Plug the ESC to the receiver
(with a BEC
cable). Connect the cable to the receiver’s port
(that is designated for throttle function) and the
other side into the JIVE Pro’s BEC port, that is
marked as
Master
. Then switch on the
receiver.
3.
Connect the main battery to the
JIVE Pro.
4.
LED
flashes. You will hear ascending tones,
monitoring the activation. Next, you will hear
single
tones for the recognized number of
battery
cells (see 4.1).
5.
After hearing the cell count, pull the Jumper
cable out of
the ESC (see 5 / sketch - No. 7),
you will then hear three descending tones and
the
mode.
6.
JIVE Pro starts counting the modes,
for each
mode there is the equal number of single
beeps (mode 1 - one beep, mode 2 - two
beeps, etc), the LED
flashes in corres-
pondence with the beep number.
7.
After the first single tone mode 1 is
reached,
move the throttle channel to full throttle
position (100 %). The LED lights and the ESC
confirms first the throttle
position with three
ascending tones, then
the mode with a single
beep.
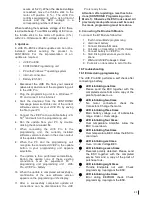
Before disconnecting the battery from
the
ESC, it's essential to await the
confirmation
(step 8), otherwise the JIVE Pro see's an
incomplete programming and will lock
preventing any potential issues by this and
will flash 9 times to tell you the mode
programming has not been accepted
!
7.2 Mode 2 - Glider mode
Mode 2 is characterized by complete
throttle
control during the whole throttle
distance.
The active (EMK) brake is adjustable via the
programming unit, in steps beginning from “0“ =
off up to “10“ = maximum.
Low voltage shut off
(deep discharge protection)
is active, therefore the motor is shu
t off, when the
adjusted battery low voltage is reached.
Programming mode 2
:
1.
Switch on and prepare the transmitter
(as
shown from 3.1 on). Throttle stick to the "motor
off"
(0 %) position.
2.
Plug the ESC to the receiver (BEC cable).
Connect the cable to the receiver’s jack
(that is
designated for throttle
function) and the other
side into the JIVE Pro’s port, that is marked as
Master
. Then switch on the receiver.
3.
Connect the motor cables to the
motor.
4.
Connect the main battery to the
JIVE Pro.
5.
LED flashes. You will hear a ascending triad of
Modus
B
re
ak
T
hr
ot
tle
p
o
si
tio
n
fix
ed
U
n
de
rv
ol
ta
g
e
sl
ow
do
w
n
U
n
de
rv
ol
ta
g
e
sh
ut
o
ff
R
P
M
C
on
tr
ol
A
ut
or
ot
at
io
n
1
APM
2
Glider mode
(manual throttle)
3
Motor flight /Boat Mode
(manual throttle)
4
Heli Modus mit
Drehzahlregelung
6
Forward / Backward
!
!

