Accessing Internal Components
V Box Express – User’s Manual
23
Installing/Removing the Expansion Cards
The expansion cards for performance extension of your computer can be installed
into the slots of the riser card. Please consider following instruction when you
install (or remove) expansion cards.
To install (or remove) an expansion card, follow these steps:
1.
Turn off your system and disconnect the power cord from the power source.
2.
The V Box Express should lie on a flat, clean surface with the top side
downwards
3.
Drill out the screws on the cover plate of the unit, to get access to the internal
connectors.
4.
To remove/install an expansion card, you have to remove the corresponding
expansion card/slot bracket. Loosen the corresponding fastening screw on the
internal side, which secures the slot bracket and remove it. Retain the screws
for later use
5.
Insert/remove the expansion card into/from the slot of the riser card.
6.
If you have removed an expansion card, re-insert a slot bracket.
7.
Secure the bracket (slot bracket or card bracket) to the chassis with the
fastening screw.
8.
Close the access door and secure it with the knurled screw.
1
3
2
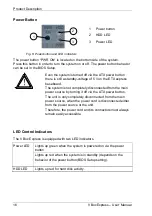
Fig. 9: V Box Express view opened expansion cards
1 Screws to secure the expansion
cards/slot brackets
2 Installed SATA Drives (OPTION)
3 Free PCI slots (32bit@32 MHz)


