


10
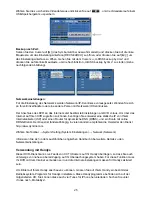
Live view:
On-screen information during live view are real time images, names and states of each channel. The
icons indicate the following:
Icon indicates that the channel has detected motion in the motion detection mode.
Red dot indicates that the channel is running in recording mode.
Status and toolbar:
In live view, press
once or click the right key of the mouse to display the status bar.
System time
Estimated remaining time of
hard disk recording
In live view, press
twice or double-click the right key of the mouse to display the toolbar if the
password is disabled. When the password is available, you can see the toolbar only after login.
1. System settings (menu)
6. E (electronic) Zoom
2. Play (playback menu)
7. VGA/BNC switch
3. Manual recording
8. PIP 1x1
4. Key lock
9. PIP 1x2
5. Auto sequence
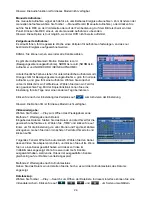
Record setting:
Select Toolbar
→
System settings
→
Record to enter the record menu. You can set quality, resolution,
frame rate, pack time and record mode. There are three record modes: Manual Record, Always and
Schedule. Always record mode will record with every channel all the time.
Frame rate: It is possible to adjust each channel frame rate
independently. Real-time recording is 25 frames per second (fps) for
PAL.
Please note that the recording frame rate limit varies depending on
the recording resolution selected. Even though you may set the
recording frame rate here, the system will automatically downgrade
the recording frame rate if it exceeds DVR limitations.
Resolution: the recording resolution has three options: D1, HD1 and CIF resolution. Standard Quality
TV is equivalent to D1 quality. The resolution of each channel for recording can be adjusted
independently.
Note: the audio function is not applicable for this model.
1
2
3
4
5
6
7
8
9