KÖNIG & MEYER
GmbH & Co. KG
Kiesweg 2, 97877 Wertheim, www.k-m.de
17620-000-55 Rev.01 9/16
USAGE NOTES / FUNCTION
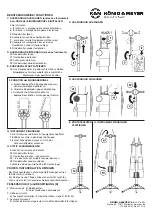
C. EXTEND THE EXTENSION TUBE (always without the
C.
Instrument) i.e. ADJUST THE HEIGHT OF THE
C.
SUPPORT ARMS
C.
Two Options:
C.
a. for guitars - primarily the lower setting
C.
b. for base guitars - primarily for the upper setting
C.
5
Loosen the knurled nut,
C.
6
Pull the extension tube upwards until the...
C.
7
...the first or second locking pin can be seen.
C.
8
Let the extension tube retract until the locking pin
C. 8
locks into the bracket.
C.
9
Re-tighten the knurled nut
D. RETRACT EXTENSION TUBE (always without the
Instrument)
D.
10
Loosen the knurled nut,
D.
11
Press the locking pin
D.
12
Retract the extension tube
D.
13
Re-tighten the knurled nut
E. PLACEMENT OF THE BODY CUSHION
E.
14
Place the instrument body cushion in the desired
E. 14
position.
Note:
the cushion stays in the desired
E. 14
position without having to attach it otherwise
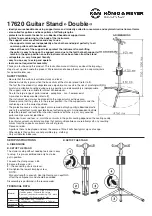
G. PLACEMENT of the INSTRUMENT
G.
For electric/acoustic guitars and base guitars with the
G.
suited headstock
G.
15
Place the neck of the guitar in the support arms,
G.
16
then carefully lean the guitar against the cushioning.
H. COLLAPSE THE STAND
H.
First remove the instrument
H.
10
Loosen the knurled nut,
H.
11
Press the locking pin - if needed twice...
H.
12
...until the extension tube retracts into the outer tube.
H.
13
Re-tighten the lower knurled nut
H.
Retract the legs (refer to Section
B
: Disassembly)
F. SUPPORT ARM FUNCTION
F.
a. Each of the movable support arms adjust to
F.
a.
the respective headstock.
F.
b. Keeps thick headstocks in position.
F.
c. Support arms are automatically open for user
F.
c.
friendly placement of the guitar into the support
F.
c.
arms.
- In the event of workstation maintenance pay attention to
-
possible risks (wedging, knocking over)
- To care for the product use a damp cloth and a non-
-
abrasive cleaning agent
CHECK, MAINTENANCE, CLEANING
F: Stand is not stable B: Check the surface
B: Check the screws
F: Height of the stand needs to be adjusted
F:
B: Adjust the extension tube and cushion (2 possible heights >
C
,
D
,
E
,
G
)
F: Extension tube is not stable
F:
B: Check if the locking pin has clicked into position and tighten the knurled nut
9
FAULT-FINDING (F) and REPAIR (R)
C. EXTEND THE EXTENSION TUBE
D. RETRACT EXTENSION TUBE
E. PLACEMENT OF
E.
THE BODY
E.
CUSHION
G. PLACEMENT of the INSTRUMENT


