background image

8 Automatically Checking for and Downloading Update Files

69

8.1 Specifying Settings for Automatically 

Checking for Update Files

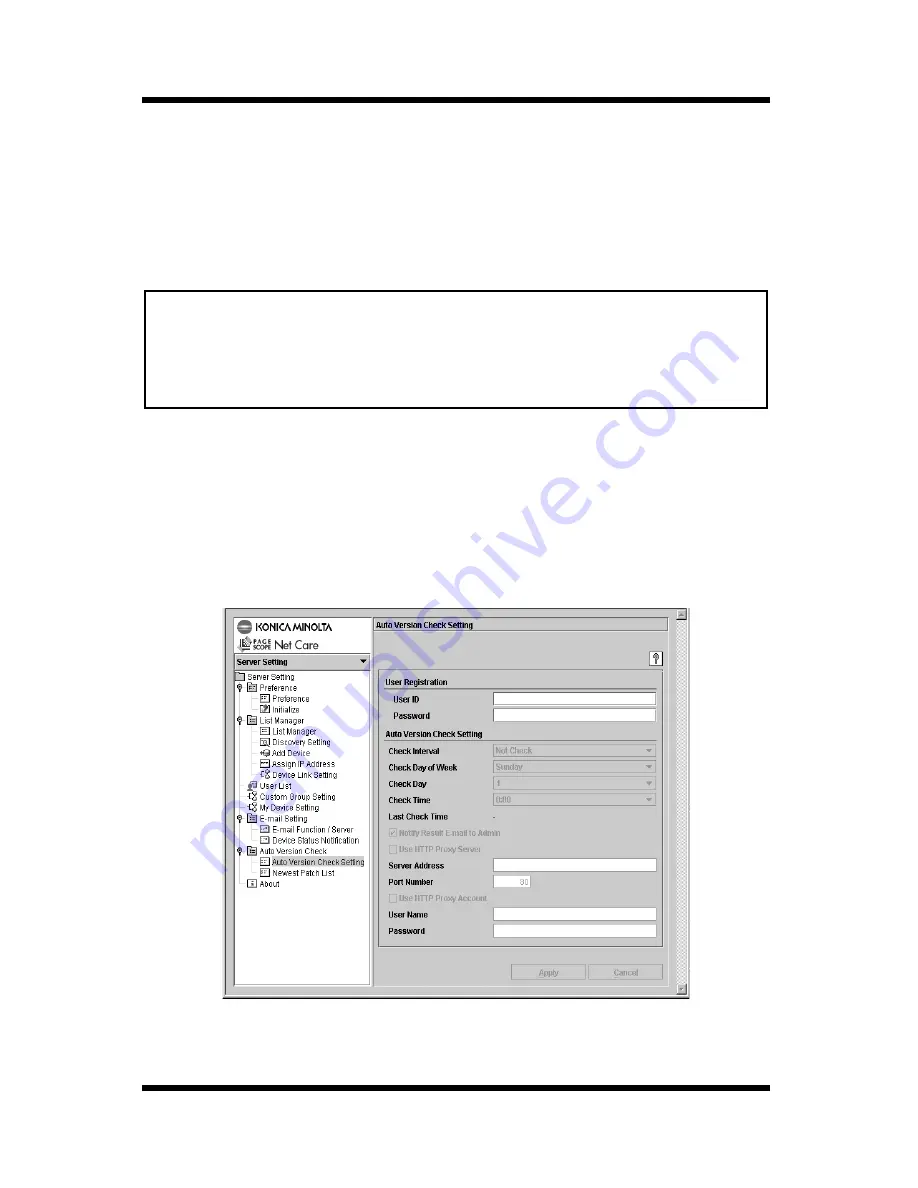
In order to automatically check for update files, the following settings 
must be specified.

Note

1.

Click the down arrow button above the pane along the left side of 
the window, and then select 

Server Setting

 in the list that 

appeared. If you are using the HTML mode, select 

Server Setting


in the list, and then click the 

Go

 button.

2.

Double-click the 

Auto Version Check Setting

 icon (single-click 

in HTML mode) to display the settings screen.

• Before using the auto version check function, you need to go to 

http://www.pagescope.com/

 and register as a download 

user. You will be issued a user ID and password when you 
register.

Содержание PageScope

Страница 1: ...PageScope Net Care Quick Guide konicaminolta net ...

Страница 2: ...ible with the screen reader software IBM JAWS version 3 7 Important Trademark Acknowledgements KONICA MINOLTA and KONICA MINOLTA logo are trademarks or registered trademarks of KONICA MINOLTA HOLDINGS INC PageScope is a trademark or a registered trademark of KONICA MINOLTA BUSINESS TECHNOLOGIES INC Apple and Macintosh are registered trademarks of Apple Computer Inc Ethernet is a registered tradema...

Страница 3: ...ape Communications Corporation and may be registered outside the U S Java and Solaris are trademarks of Sun Microsystems Inc IBM is a trademark of IBM Corporation All other product names are trademarks or registered trademarks of their respective holders Copyright 2003 KONICA MINOLTA BUSINESS TECHNOLOGIES INC All rights reserved The information contained in this manual is subject to change without...

Страница 4: ...ting Up the Server 6 Windows 98 or Me platform 6 Windows NT 4 0 or 2000 platform 6 Windows XP platform 6 SuSE Linux 7 0 or earlier platform 7 Other Linux and Solaris platforms 7 2 4 Starting Up Console Tools 8 HTML Version 8 Application Version 8 2 5 Shutting Down the Server 10 Windows 98 or Me platform 10 Windows NT 4 0 or 2000 platform 10 Windows XP platform 10 SuSE Linux 7 0 or earlier platform...

Страница 5: ...elp 15 To display the help information from the login screen 15 To display the help information from any of the screens for specifying settings 15 3 3 Logging In 16 3 4 Specifying the Discovery Range 18 4 Device Management 20 4 1 Displaying the Device Management Screen 20 4 2 Device Panel Window 22 4 3 Functions 23 5 Using Multi Setting 24 Displaying the Multi Setting menu 24 5 1 Creating a Templa...

Страница 6: ...nager screen 32 To select managed devices 32 6 4 Removing a Managed Device 33 Displaying the List Manager screen 33 To remove a device 33 6 5 Specifying the Device Discovery Range 34 Displaying the Discovery Setting screen 34 To add a network to the discovery range 35 To remove a network from the discovery range 36 When automatic device discovery fails 36 6 6 Adding a Device Manually 37 Displaying...

Страница 7: ...44 6 10 Configuring Custom Group Settings 46 Displaying the Custom Group Setting screen 46 To create a custom group 46 To view custom group settings 47 To modify custom group settings 47 To copy a custom group 48 To delete a custom group 48 6 11 Registering Usable Devices for Each User 49 Displaying the My Device Setting screen 49 To configure device settings 49 To remove a device from My Device 5...

Страница 8: ...Scope Net Care Version 59 Displaying the Version screen 59 7 Centralized Management for Controlling Multiple Servers 60 7 1 Linking With Other PageScope Net Care Servers 62 7 2 Specifying PageScope Net Care Server Information 64 7 3 Viewing Device Information From a PageScope Net Care Client 66 7 4 Unlinking a Server 67 8 Automatically Checking for and Download ing Update Files 68 8 1 Specifying S...

Страница 9: ...tings for Using Job History Data Send 79 9 4 Viewing Job History Data 82 9 5 Changing the Job History Data List View 85 10Obtaining Counter Information by E Mail and Viewing It 86 10 1 Configuring E Mail Transmission and Reception Settings for Devices This procedure is performed from the device 89 10 2 Enabling the Copy Track Function on the Device This procedure is performed from the device 90 10...

Страница 10: ...for Using This Function 2 This procedure is performed from the PageScope Net Care server 92 10 5 Registering Devices Using This Function With the PageScope Net Care Server This procedure is performed from the PageScope Net Care server 94 10 6 Viewing Counter Information 95 ...

Страница 11: ...x Contents ...

Страница 12: ...igher RAM 128 MB minimum Solaris 2 6 7 8 SPARC Station RAM 128 MB minimum Linux x86 kernel 2 2 12 and glibc 2 1 2 11 or higher CPU Pentium 300 MHz or higher RAM 128 MB minimum Linux Operating Environment KONICA MINOLTA has confirmed operation under SuSE 6 4 8 and Redhat 7 1 9 Operation on an Intel Pentium platform is supported under Linux kernel v2 2 12 and glibc v2 1 2 11 or greater 16 bit color ...

Страница 13: ...igher Do not downgrade from the Web browser that comes installed with your operating system Operating System Web Browser Windows 98 Me 2000 NT 4 0 SP3 XP Microsoft Internet Explorer 4 x or higher Netscape Communicator 4 x or higher Netscape 6 x or higher Solaris 2 6 7 8 Netscape Communicator 4 x or higher Netscape 6 x or higher Linux x86 kernel 2 2 12 and glibc 2 1 2 11 or higher MacOS 8 9 X Micro...

Страница 14: ...cated in the PageScope_Net_Care directory Important 3 If you agree to be bound to the terms and conditions of the license agreement input Y to proceed with the installation If you don t agree input N to terminate installation To use PageScope Net Care you must agree to be bound to the terms and conditions of its License Agreement Though the installation script is available in English only the Lice...

Страница 15: ...ectory for that version appears first You can leave the directory the way it is or change it to something else 5 Installation in the specified directory starts A message asking if you want to restart your computer will appear after installation is complete Input Y 6 After completing installation delete the temporary PageScope_Net_Care directory which was created at the beginning of this procedure ...

Страница 16: ...he older version you will be able to access the data created with the older version Important If you are using the PageScope Net Care 4 x Account Management module The PageScope Net Care 5 0 Account Management module comes with standard functions for obtaining device job history data and for obtaining counter data For more information see 9 Obtaining Device Job History Data by E mail and Viewing I...

Страница 17: ...e the Administrative Tools folder 3 Select KONICA MINOLTA PageScope Net Care on the list of services and then click the Start button In the case of Windows 2000 select KONICA MINOLTA PageScope Net Care and then select Start on the Action menu Windows XP platform 1 Click Start Control Panel 2 In the case of Windows XP Professional click the Performance and Maintenance icon On the Performance and Ma...

Страница 18: ...nt to momentarily shut it down and restart it sbin init d nmu restart Other Linux and Solaris platforms Important 1 PageScope Net Care starts up automatically after you install it You can use the following command to start it up manually when necessary etc init d nmu start Execute the following command when PageScope Net Care is already running and you want to momentarily shut it down and restart ...

Страница 19: ...TTP server Database initialization backup restore Download and installation of update files Update of PageScope Net Care Display a list of supported languages Display a list of supported devices Manual installation of update files application version only HTML Version 1 On the log in screen select the Console Tools link This displays the HTML version Console Tools screen Application Version Import...

Страница 20: ...CA MINOLTA PageScope Net Care Console Tools SuSE Linux 7 0 or earlier platform Important 1 Execute the following command sbin init d nmu console Other Linux and Solaris platforms 1 Execute the following command etc init d nmu console Perform the following operation under root privileges ...

Страница 21: ...n the list of services and then click the Stop button In the case of Windows 2000 select KONICA MINOLTA PageScope Net Care and then select Stop on the Action menu 4 In the case of Windows NT 4 0 click Yes on the confirmation dialog box that appears Windows XP platform 1 Click start Control Panel 2 In the case of Windows XP Professional click the Performance and Maintenance icon On the Performance ...

Страница 22: ...form Important 1 Execute the command shown below sbin init d nmu stop Other Linux and Solaris platforms Important 1 Execute the command shown below etc init d nmu stop Perform the following operation under root privileges Perform the following operation under root privileges ...

Страница 23: ...Control Panel 2 Double click the Add Remove Programs icon 3 What you should do next depends on the Windows operating system the computer is running Windows NT 4 0 On the Add Remove Programs Properties dialog box select KONICA MINOLTA PageScope Net Care in the program list and then click Add Remove Windows 2000 On the Add Remove Programs dialog box select KONICA MINOLTA PageScope Net Care in the pr...

Страница 24: ...n the PageScope Net Care server sbin init d nmu stop 2 Run the uninstall sh script which is located in the PageScope_Net_Care directory 3 The installation directory files are automatically deleted and the uninstall operation ends Other Linux and Solaris platforms Important 1 Execute the command below to shut down the PageScope Net Care server etc init d nmu stop 2 Run the uninstall sh script which...

Страница 25: ...tp server_name port_number In place of server_name in the above URL type in the name or IP address of the host that is running the PageScope Net Care server Example When the IP address of the PageScope Net Care server is 192 9 200 200 and the port number is 9090 the default port number is 9090 http 192 9 200 200 9090 This accesses the PageScope Net Care server and displays the PageScope Net Care l...

Страница 26: ...d 3 3 Logging In p 16 2 In the Help screen click the topic from those listed below that you wish to display Introduction Selecting this option displays a summary about PageScope Net Care Login Selecting this option displays explanations on the login screen Display Structure Selecting this option displays explanations on the Web browser screen used by PageScope Net Care clients 3 Help information f...

Страница 27: ...e plug in When a language is selected the login screen appears in that language The screens in the following descriptions assume that English has been selected 2 In the Login section select the appropriate login type privileges Guest A Guest can view the status and settings of each device Input of a password is not required when logging in as Guest Registered User A Registered User can change some...

Страница 28: ... mode or the HTML mode Important 4 After all the settings are the way you want click the Login button Logging in a client in the Java mode where the Java plug in is not installed displays a message asking if you want to install the Java plug in What happens after you agree depends on the Web browser you are using as described below Internet Explorer The Java plug in is downloaded automatically fro...

Страница 29: ...ry Setting single click in the HTML mode This causes the Discovery Setting screen to appear on the right side of the window If you are using a Java mode and the Server Setting menu tree is not expanded double click the following icons Server Setting List Manager Discovery Setting 4 The Discovery Network Range list shows the local network associated with the PageScope Net Care server Whenever the P...

Страница 30: ...rmation dialog box appears click OK 7 If you also want discovery to find other maker s RFC 1759 Printer MIB compatible devices select the check box next to the Enable Generic Device Discovery option in the Device Discovery section Then click the Apply button The local network may not be discovered when PageScope Net Care is started up while an SNMP agent is running on the server where PageScope Ne...

Страница 31: ...Care online help for details about the functions described here The following operation is explained using the Java mode 4 1 Displaying the Device Management Screen 1 Click the down arrow button above the pane along the left side of the window and then select Device Management on the list that appears In the HTML mode select Device Management and then click the Go button This displays a Device Man...

Страница 32: ...according to custom group See 6 10 Configuring Custom Group Settings p 46 for more information My Device View Shows the devices configured as My Device for the current registered user See 6 11 Registering Usable Devices for Each User p 49 for more information 3 In the Device List double click the device you want to select single click in the HTML mode This displays a device panel in the pane on th...

Страница 33: ...licking a button displays in the area below the buttons tabs for the functions associated with the applicable category See 4 3 Functions p 23 for information about each button Tabs The tabs provide sub groupings of the functions that belong to the category selected with the category buttons The appearance of each tab depends on the device type Information and Setup Area This area shows details abo...

Страница 34: ...Print Displays print settings Scan Displays the status and settings of a scanner device Count Displays printing scanning and error counter values These values represent counts for up to the past one year Device Server Opens a new Web browser window and accesses the device s built in Web setting page Device Link A Device Link button is shown only during display of a device panel of device linked by...

Страница 35: ...and then select Multi Setting on the list that appears If you are using the HTML mode select Multi Setting in the list and then click the Go button The devices that appear in the Multi Setting menu depend on whether an administrator or registered user is logged in Administrator An administrator can retrieve a template and perform Multi Setting from any device that is under the control of the PageS...

Страница 36: ...tton 3 In the Template Name box type the name you want for the template 4 The tree under the Template Items icon shows settings that can be modified Select the check boxes next to the settings that you want to include in the template you are creating 5 After everything is the way you want click the Apply button To cancel your settings click the Cancel button instead of Apply 6 You can use the foll...

Страница 37: ... you want click the OK button To apply the settings of a retrieved template 1 On the displayed device list select the template of the device whose settings you want to apply for Multi Setting when using the HTML mode select the template s radio button Important 2 After everything is the way you want click the Restore button 3 Select the Group radio buttons of the devices for to which you want to a...

Страница 38: ...on above the pane along the left side of the window and then select Server Setting on the list that appears If you are using the HTML mode select Server Setting in the list and then click the Go button The setting items that appear in the Server Setting menu depend on the privileges of your current log in The settings that can be configured depend on whether an administrator a registered user or a...

Страница 39: ...ol how PageScope Net Care communicates with the devices on the network Displaying the setting screen Double click the Preference icon single click in the HTML mode If you are using a Java mode and the Server Setting menu tree is not expanded double click the following icons Server Setting Preference Preference ...

Страница 40: ...ing Section Timeout sec Input the time in seconds that should be allowed until the PageScope Net Care server obtains information from a device following an information request when there is an update of information of a device displayed in the device list Retries Input the number of retries that should be attempted when an attempt to obtain information from a device fails 2 After everything is the...

Страница 41: ...cope Net Care settings configured by an administrator or registered user Displaying the Initialize screen Double click the Initialize icon single click in the HTML mode If you are using a Java mode and the Server Setting menu tree is not expanded double click the following icons Server Setting Preference Initialize ...

Страница 42: ...he User List screen See 6 9 Registering Users and Unregistering Users p 42 for more information Custom Group Setting Initialize Selecting this option deletes all group information configured on the Custom Group Setting screen See 6 10 Configuring Custom Group Settings p 46 for more information Remove All Devices Selecting this option deletes all device information entered in the list on the List M...

Страница 43: ...If you are using a Java mode and the Server Setting menu tree is not expanded double click the following icons Server Setting List Manager List Manager To select managed devices 1 The devices discovered on the network are displayed on the List Manager screen To refresh the device information on the list click the button 2 All discovered devices are initially selected as managed devices To deselect...

Страница 44: ... is not expanded double click the following icons Server Setting List Manager List Manager To remove a device 1 Click the down arrow button above the pane along the left side of the screen and then select Remove Device on the list that appears If you are using the HTML mode select Remove Device in the control menu and then click the Go button 2 On the list that appears select the check box in the ...

Страница 45: ...e If you are using a Java mode and the Server Setting menu tree is not expanded double click the following icons Server Setting List Manager Discovery Setting Device Discovery section Auto Discovery Select this check box to enable automatic rediscovery of devices on the network Auto Discovery Interval hour When Auto Discovery above is checked enter the auto discovery interval time in hours Last Di...

Страница 46: ...k to the discovery range 1 On the Discovery Setting screen click the Add button in the Discovery Network Range section Network setting items are shown in the Input Network Range section 2 Type the IP address of the network you want to add into the Network Address boxes 3 Type the subnet mask value of the network you want to add into the Subnet Mask box 4 If you want to change the host address disc...

Страница 47: ...to find other maker s RFC 1759 Printer MIB compatible devices select the check box next to the Enable Generic Device Discovery option and then click the Apply button To remove a network from the discovery range 1 In the Discovery Network Range list click the network you want to remove from the discovery range and then click the Remove button 2 In the Java mode click the Finish button in the confir...

Страница 48: ...s on the Add Device screen Displaying the Add Device screen Double click the Add Device icon single click in the HTML mode If you are using a Java mode and the Server Setting menu tree is not expanded double click the following icons Server Setting List Manager Add Device To add a device manually 1 On the Add Device screen type the IP address of the device you want to add into the IP Address boxes...

Страница 49: ... can take to 20 or 30 seconds after you click the Apply button until the device is added Wait until the procedure ends In the Java mode a dialog box appears to show the results of address assignment In the HTML mode the results appear on the Add Device screen ...

Страница 50: ...reen Double click the Assign IP Address icon single click in the HTML mode If you are using a Java mode and the Server Setting menu tree is not expanded double click the following icons Server Setting List Manager Assign IP Address To assign an IP address to a device 1 Type the IP address you want to assign to the device into the IP Address boxes 2 Type the MAC address of the device network interf...

Страница 51: ...splaying the Device Link Setting screen Double click the Device Link Setting icon single click in the HTML mode If you are using a Java mode and the Server Setting menu tree is not expanded double click the following icons Server Setting List Manager Device Link Setting It takes some time after you click the Apply button for the IP address assignment to go into effect In the Java mode a dialog box...

Страница 52: ...settings click the Cancel button instead of Apply To unlink devices 1 Click the down arrow of the box at the top of the Device Link Setting Screen and select Unlink Devices on the list that appears If you are using the HTML mode select Unlink Devices from the list and then click the Go button 2 On the device list select the check boxes in the Unlink column next to the devices you want to unlink 3 ...

Страница 53: ...ing menu tree is not expanded double click the following icons Server Setting User List A registered user can configure the settings described below Device Settings A registered user can change the settings of devices that are associated with the custom group to which the register user belongs When logged in as a registered user the user can change the settings of a device whose custom group name ...

Страница 54: ...to register a new user 2 Configure settings for the items described below User Name Type in the user name Password Type in the user password Retype Password Re input the password to confirm it Custom Group Select the custom group to be used by the user E mail Address Type in the user e mail address E mail Notification display only This setting is turned on automatically whenever the Receive Device...

Страница 55: ...the HTML mode select the check box to the left of the name of the user 2 Click the Edit button This displays a User Setting section on the User List screen which shows the user s current settings 3 Make the changes you want See To register a user p 43 for information about each of the items 4 After everything is the way you want click the Apply button To cancel your settings click the Cancel butto...

Страница 56: ...geScope Net Care Settings 45 2 Click the Remove button 3 If a confirmation dialog box appears click the OK button to delete the user you selected To cancel the delete operation click the Cancel button instead of Apply ...

Страница 57: ...Setting menu tree is not expanded double click the following icons Server Setting Custom Group Setting To create a custom group 1 On the Custom Group Setting screen click the New button The Group Name box and the managed devices in the List Manager are displayed 2 Type the group name into the Group Name box 3 On the device list select the check boxes in the Group column of the devices you want to ...

Страница 58: ...box and the managed devices in the List Manager are displayed 2 Make the changes you want To rename a custom group Type the new group name into the Group Name box To remove a device from the group Clear the check box in the Group column of the device you want to remove To add a device to the group Select the check box in the Group column of the device you want to add 3 After everything is the way ...

Страница 59: ...ancel the operation click the Cancel button instead of Apply To delete a custom group 1 On the Custom Group Setting screen select the name of group you want to delete in the HTML mode select the check box to the left of the group name and then click the Remove button 2 If a confirmation dialog box appears click the OK button to delete the custom group To cancel the operation click the Cancel butto...

Страница 60: ...My Device Setting icon single click in the HTML mode If you are using a Java mode and the Server Setting menu tree is not expanded double click the following icons Server Setting My Device Setting To configure device settings 1 On device list in the My Device Setting screen select the check boxes in the My Device column of the devices you want to register to My Device 2 After everything is the way...

Страница 61: ...e 1 On device list in the My Device Setting screen select the check boxes in the My Device column of the devices you want to remove from My Device View 2 After everything is the way you want click the Apply button To cancel the operation click the Cancel button instead of Apply ...

Страница 62: ...n Server Information Notification and Command Mail Support p 54 Function for notifying the administrator by e mail when a new update files are released 8 Automatically Checking for and Downloading Update Files p 68 Function that allows the PageScope Net Care server to obtain job history data 9 Obtaining Device Job History Data by E mail and Viewing It p 74 and counter data 10 Obtaining Counter Inf...

Страница 63: ...erver screen If you are using a Java mode and the Server Setting menu tree is not expanded double click the following icons Server Setting E mail Setting E mail Function Server 1 Configure the E mail Function Setting section settings as below SMTP Server Address Type in the SMTP server host name or IP address SMTP Port Number Type in the SMTP server port number The default port number is 25 ...

Страница 64: ...e in the POP3 server port number The default port number is 110 E mail Address From Type in the PageScope Net Care server mail address POP Account Type in the PageScope Net Care server POP account name POP Password Type in the PageScope Net Care server POP account password POP Interval min Type in the POP server mail check interval in minutes The default interval is 10 minutes 2 After everything i...

Страница 65: ...ication server information notification and command mail support settings Double click the E Mail Function Server icon single click in HTML mode If you are using a Java mode and the Server Setting menu tree is not expanded double click the following icons Server Setting E Mail Setting E Mail Function Server Specify settings for the following in the E mail Function Setting section Note that you nee...

Страница 66: ...n When this option is selected the PageScope Net Care server sends the administrator and user e mail whenever a device error or warning occurs or when the copier recovers from an error or warning Server Information Notification Selecting this option enables e mail receipt of the following information by the administrator Notification when the total number of devices being managed exceeds 250 Notif...

Страница 67: ...ead of Apply Configuring device status notification settings Use the procedure below to specify whether or not the currently logged in user should receive device status notification mail from the PageScope Net Care server To configure device status notification settings Double click the Device Status Notification icon single click in the HTML mode If you are using a Java mode and the Server Settin...

Страница 68: ...il address of the currently logged in user See To register a user p 43 for more information E mail Language Click the E mail Language down arrow and then select the e mail language from the list that appears The languages you can select here are those that are supported by the PageScope Net Care server The selection of languages can be expanded by adding plug ins An administrator can receive statu...

Страница 69: ... Status Notification check box of the Notification Section must be selected before you can change the settings of the Status to Notify section 3 After everything is the way you want click the Apply button To cancel the operation click the Cancel button instead of Apply Command Mail Syntax To PageScope Net Care server mail address Subject get option device IP address Body Text blank Error Warning F...

Страница 70: ...le click the following icons Server Setting About 2 After reading the contents of the window close it Information Obtained by Mail Command Example Subject Device Status get s 192 9 200 100 Device Network Configuration Information get n 192 9 200 100 System Information get y 192 9 200 100 Device Detailed Information get d 192 9 200 100 Scanner Information get c 192 9 200 100 Jam Count get j12 192 9...

Страница 71: ...the operating efficiency Therefore in this case by linking all PageScope Net Care servers all device information can be viewed by accessing just one of the servers Note A single PageScope Net Care server can manage up to 250 devices In order to manage 251 or more devices two or more servers are required which demonstrates the effectiveness of the server linking function Centralized management is p...

Страница 72: ...re just by accessing any one of the linked PageScope Net Care servers from a PageScope Net Care client all device information can be viewed Group of linked PageScope Net Care servers PageScope Net Care v5 0 server Device A Device B Device C Device D Device E Device F Device G Device H Device I PageScope Net Care v5 0 server Device A Device B Device C Device D Device E Device F PageScope Net Care v...

Страница 73: ...the PageScope Net Care server that you are currently logged into 1 Click the down arrow button above the pane along the left side of the window and then select Associated Server in the list that appeared If you are using the HTML mode select Associated Server in the list and then click the Go button 2 Double click the Associated Server icon single click in HTML mode ...

Страница 74: ...g servers Specify the necessary settings IP Address Type in the IP address of the PageScope Net Care server to be linked Port Number Type in the port number of the PageScope Net Care server to be linked The default port number is 9090 4 Click the Apply button To cancel the operation click the Cancel button instead ...

Страница 75: ...ck the This Server Information icon single click in the HTML mode in the Associated Server menu tree to display the settings screen 2 Type in the information Server Nickname Type in the name of the PageScope Net Care server where you are currently logged in Server Location Type in the location of the PageScope Net Care server where you are currently logged in IP Address display only This box shows...

Страница 76: ...server where you are currently logged in For details on specifying the discovery network range refer to 3 4 Specifying the Discovery Range p 18 Administrator E mail Address display only This box shows the e mail address of the administrator of the PageScope Net Care server where you are currently logged in This box shows the administrator e mail address specified in 6 9 Registering Users and Unreg...

Страница 77: ...to display the Associated Server List screen 2 From the list of linked servers in the Associated Server List screen that appeared select the check box next to each server whose device list you wish to view 3 Click the Device List button 4 Click the View Setting button to select the items that you wish to view 5 Click the Filter button to filter the devices to be displayed Note Double click a PageS...

Страница 78: ...nk to another PageScope Net Care server can be removed 1 Double click the Associated Server List icon single click in the HTML mode in the Associated Server menu tree to display the Associated Server List screen 2 Select the PageScope Net Care server to be unlinked 3 Click the Remove button ...

Страница 79: ... in the server exist If new versions are available from http www pagescope com an e mail is sent to notify the administrator of the PageScope Net Care server If the administrator decides that it is necessary to download the update files the files will be downloaded from Console Tools PageScope Net Care v5 0 server Notification sent by e mail http www pagescope com Internet PageScope Net Care admin...

Страница 80: ...along the left side of the window and then select Server Setting in the list that appeared If you are using the HTML mode select Server Setting in the list and then click the Go button 2 Double click the Auto Version Check Setting icon single click in HTML mode to display the settings screen Before using the auto version check function you need to go to http www pagescope com and register as a dow...

Страница 81: ...t up Server Check Day of week This parameter is not available if Check Interval is set to Not Check Once a month or When Start up Server If Check Interval is set to Once a week select the day of the week to perform the check Check Day This parameter is not available if Check Interval is set to Not Check Once a week or When Start up Server If Check Interval is set to Once a month select the day to ...

Страница 82: ... HTTP proxy server Port Number Type in the port number of the HTTP proxy server Use HTTP Proxy Account Select this check box to use the HTTP proxy account User Name Type in the user name registered with the proxy server Password Type in the password for the account registered with the proxy server 4 Click the Apply button To cancel the operation click the Cancel button instead ...

Страница 83: ... Checking Update Files A list of update files can be checked 1 Double click the Newest Patch List icon single click in the HTML mode in the Server Setting menu tree to display the Newest Patch List screen 2 To obtain the newest information click the Check Now button ...

Страница 84: ...ed from Console Tools This section explains the procedure for using HTML version Console Tools for download Note that you can also download from the application version of Console Tools 1 On the log in screen select the Console Tools link This displays the HTML version Console Tools screen 2 Click the Download Install icon 3 Select the update files to download and then click the Install button ...

Страница 85: ...device as required Job history data e mail is sent automatically whenever a job print copy send receive is generated By viewing the job history data you can tell who performed each type of process setting Important Note that you need to configure mail settings before you can use this function See 6 12 Specifying E Mail Transmission Reception Settings p 51 for more information E mail containing job...

Страница 86: ...May 2003 the devices listed below support the sending of job history data Supporting devices appear in the device list described under 9 3 Specifying Initial Device Settings for Using Job History Data Send p 79 magicolor 7300 Only with the optional hard disk drive installed magicolor 2350 Only with the optional hard disk drive installed ...

Страница 87: ...ne along the left side of the window and then select Server Setting in the list that appeared If you are using the HTML mode select Server Setting in the list and then click the Go button 2 Double click the E mail Setting icon then the E mail Function Server icon single click in the HTML mode in the Server Setting menu tree 3 Select the check box next to the Job Log Viewer 4 Click the Apply button...

Страница 88: ...ct Job Log Viewer in the list that appeared If you are using the HTML mode select Job Log Viewer in the list and then click the Go button 2 Double click the Server Setting icon single click in the HTML mode in the Job Log Viewer menu tree 3 Specify the settings for the following parameters Enable Job Log Viewer display only This check box is selected automatically whenever the Job Viewer check box...

Страница 89: ...or 20 days The PageScope Net Care server will access the device every day at the time specified with Setting Time and update the setting As long as the setting can be updated and device setting remains at 20 the device will not stop sending e mail messages If the PageScope Net Care server is shut down the device will stop sending e mail messages after 21 days since the device setting cannot be upd...

Страница 90: ...form the following steps to specify initial device settings and allow use of job history data send 1 Double click the Device Setting icon single click in the HTML mode in the Job Log Viewer menu tree The devices compatible with this function appear in the list 2 Select a device to be managed with this function and then click the OK button ...

Страница 91: ...ype in the e mail address of the device SMTP Server Address Type in the IP address of the SMTP server that will be used when the device sends e mail messages to the PageScope Net Care server SMTP Server Port Type in the port number of the SMTP server that will be used when the device sends e mail messages to the PageScope Net Care server E mail Address Send To Type in the e mail address of the Pag...

Страница 92: ...9 Obtaining Device Job History Data by E mail and Viewing It 81 Term of validity of mail Day Shows the current Term of validity of mail Day for the device ...

Страница 93: ... whose Enable Job History check box is selected See 9 3 Specifying Initial Device Settings for Using Job History Data Send p 79 for more information 1 Double click the Job History icon single click in the HTML mode in the Job Log Viewer menu tree The devices managed with this function appear in the list 2 Click the device whose job history data you want to view If you are using the HTML mode selec...

Страница 94: ... 83 3 The Condition Setting screen appears Specify the range to be viewed and then click the OK button Job Function Select whether to display all jobs only copy jobs only print jobs only receive send jobs or only send jobs Term Specify the range to be displayed ...

Страница 95: ...9 Obtaining Device Job History Data by E mail and Viewing It 84 4 The job history for the device is displayed Note Click to output the table information as a file in the CSV format ...

Страница 96: ...nd Viewing It 85 9 5 Changing the Job History Data List View The job history items that are displayed can be changed 1 On the job history list that appears click the View Setting button 2 Select the check boxes for the items that you wish to display ...

Страница 97: ...his information and the user can easily manage the operating status at any time for any device the administrator of the device no longer needs to examine the counter information each time by using this function Important You must enable the Copy Track function of a device before it can be managed by this function Note that you need to configure mail settings before you can use this function See 6 ...

Страница 98: ... are already configured if you are using the remote diagnosis system The remote diagnosis system and the counter information function use common settings which are already configured if you are using the remote diagnosis system The Copy Track function keeps track of the number of sheets of paper used by each account number When the Copy Track function is enabled anyone wanting to use the copier mu...

Страница 99: ...counter information acquisition function A device must have the printer controller option or scanner option installed in order to use the counter information function Applicable devices appear in the device list described under 10 5 Registering Devices Using This Function With the PageScope Net Care Server This procedure is performed from the PageScope Net Care server p 94 CF3102 2002 Di470 552 Di...

Страница 100: ...For details on the setting procedure go to http www pagescope com Main parameters SMTP Server IP Address Type in the host name or IP address for the SMTP server POP3 Server IP Address Type in the IP address of the POP3 server POP3 Server Login User Name Type in the user name for logging into the POP3 server POP3 Server Login Password Type in the user password for logging into the POP3 server Devic...

Страница 101: ...py Track Function on the Device This procedure is performed from the device In order to use this function the Copy Track function must be enabled for the device The procedure for specifying the setting differs depending on the device Refer to the User Manual included with the device ...

Страница 102: ... arrow button above the pane along the left side of the window and then select Server Setting in the list that appeared If you are using the HTML mode select Server Setting in the list and then click the Go button 2 Double click the E mail Setting icon then the E mail Function Server icon single click in the HTML mode in the Server Setting menu tree 3 Select the check box next to the Counter Reade...

Страница 103: ...on above the pane along the left side of the window and then select Counter Reader in the list that appeared If you are using the HTML mode select Counter Reader in the list and then click the Go button 2 Double click the Server Setting icon single click in HTML mode 3 Specify the settings for the following parameters from the server Enable Counter Reader display only This check box is selected au...

Страница 104: ... Obtaining Counter Information by E Mail and Viewing It 93 Time of Data Acquisition Specify the time for requesting counter information Preservation Period Specify how long the counter information is kept ...

Страница 105: ...rt this function register with the PageScope Net Care server the devices to be managed 1 Double click the Device Setting icon single click in the HTML mode in the Counter Reader menu tree 2 Select the device to be registered and then click the OK button 3 Specify the settings Enable Counter Reader Select this check box to activate the counter information acquisition function E mail Address Type in...

Страница 106: ...ox is selected appear in device list See 10 5 Registering Devices Using This Function With the PageScope Net Care Server This procedure is performed from the PageScope Net Care server p 94 for more information 1 Double click the Remote Care Counter icon single click in the HTML mode in the Counter Reader menu tree The devices managed with this function appear in the list 2 Click to select the devi...

Страница 107: ...on by E Mail and Viewing It 96 3 The Condition Setting screen appears Specify the range to be viewed and then click the OK button Counter Menu Select Total Counter Size Counter or Track Counter Term Specify the range to be displayed ...

Страница 108: ...10 Obtaining Counter Information by E Mail and Viewing It 97 4 The counter information for the device is displayed Total Counters Size Counters ...

Страница 109: ...10 Obtaining Counter Information by E Mail and Viewing It 98 Track Counters Note Click to output the table information as a file in the CSV format ...

Страница 110: ...ation contained in this manual is subject to change without notice to incorporate improvements made on the product or products the manual covers KONICA MINOLTA BUSINESS TECHNOLOGIES INC Marunouchi Center Building 1 6 1 Marunouchi Chiyoda ku Tokyo 100 0005 Japan 4343 PS006 03 ...

Отзывы: