■
GB
│
IE
12
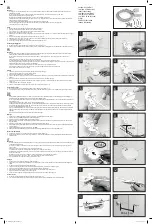
Assembly (see figs. A–C)
The appliance is suitable for doors/windows with
hinges on the right or left. Operating two magnets
5
with only one alarm device
1
is not possible. The
alarm device
1
and the magnets
5
are attached
using the self-adhesive strips on the rear side. The
surface to which the self-adhesive strips are affixed
must be clean, free of grease and dry. Remove the
protective film from the self-adhesive strips and affix
the alarm device
1
to the frame of the window or
door. Attach the magnets
5
parallel to the alarm
device
1
on the door window casement or the door
panel. The alignment mark
4
on the magnet
5
must
match up with the alignment mark
3
on the alarm
device
1
. With larger window casements or door
panels, you can compensate the height difference
between the alarm device
1
and the magnet
5
using the additional self-adhesive strips.
NOTE
►
When the door or window is closed, the distance
between the alarm device
1
and the magnet
5
must not be greater than 15 mm!
Activate/deactivate alarm function
♦
Push the On/Off switch
6
to the “ON” position.
The alarm function is now activated and the alarm
will sound if the door or window is opened.
♦
Move the On/Off switch
6
to the “OFF” position
to deactivate the alarm.
Cleaning/storage
CAUTION
►
To avoid irreparable damage, ensure that
no moisture penetrates the appliance during
cleaning.
♦
Clean the appliance with a soft, dry cloth.
♦
If you decide not to use the appliance for a long
period, remove the batteries and store it in a clean,
dry place away from direct sunlight.
IB_340492_FA110A2_LB8.indb 12
18.02.2020 14:56:14
Содержание 340492 1910
Страница 3: ...B C max 15 mm A ...
Страница 11: ... DE AT CH 8 ...
Страница 19: ... GB IE 16 ...
Страница 37: ... NL BE 34 ...
Страница 45: ... PL 42 ...
Страница 53: ... CZ 50 ...
Страница 61: ... SK 58 ...