Foreword and general information
Explanation of terms for maintenance standard
PC800, 850-8E0
Explanation of terms for maintenance standard
00-19
(Rev. 2010/03)
The maintenance standard chapter explains the criteria for replacing or reusing products and parts in the ma-
chine maintenance work. The following terms are used to explain the criteria.
1.
Standard dimension and tolerance
q
To be accurate, the finished dimension of
parts is slightly different from one to another.
q
To specify the finished dimension of a part, a
certain dimension is set for the part and an al-
lowable difference from that dimension is in-
dicated.
q
The above dimension set is called the "stan-
dard dimension" and the range of difference
from the standard dimension is called the
"tolerance".
q
The tolerance with the symbols of + or – is in-
dicated on the right side of the standard di-
mension.
a
The tolerance may be indicated in the text
and a table as [standard dimension (upper
limit of tolerance/lower limit of tolerance)].
Example) 120 (–0.022/–0.126)
q
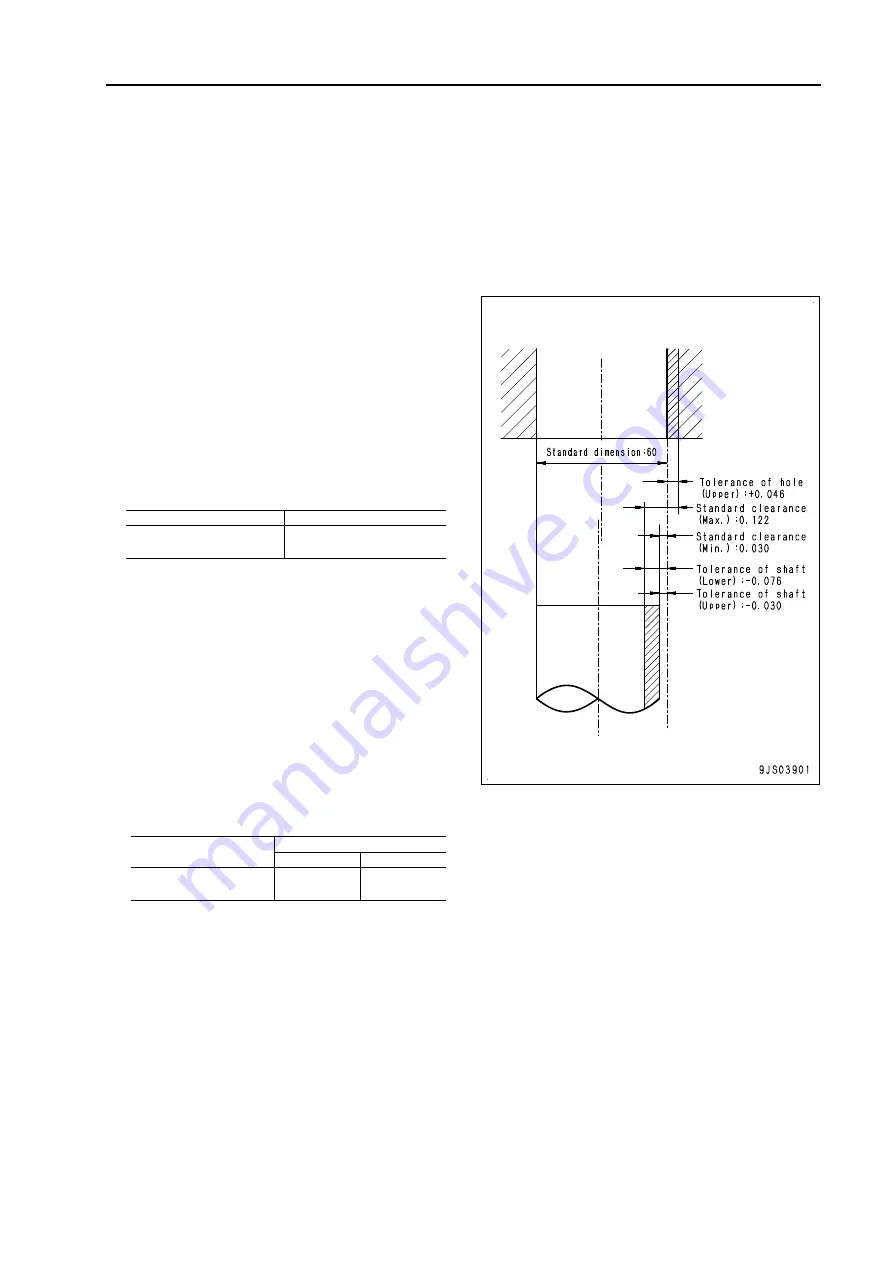
Usually, the dimension of a hole and the di-
mension of the shaft to be inserted into that
hole are indicated by the same standard di-
mension and different tolerances of the hole
and shaft. The tightness of fit is decided by
the tolerance.
q
Indication of dimension of rotating shaft and
hole and their related drawing.
2.
Standard clearance and standard value
q
The clearance made when new parts are as-
sembled is called the "standard clearance",
which is indicated by the range from the min-
imum clearance to the maximum clearance.
q
When some parts are repaired, the clearance
is generally adjusted to the standard clear-
ance.
q
The values indicating performance and func-
tion of new products or equivalent are called
the "standard value", which is indicated by a
range or a target value.
q
When some parts are repaired, the value of
performance/function is set to the standard
value.
3.
Standard interference
q
When the diameter of a hole of a part shown
in the given standard dimension and toler-
ance table is smaller than that of the shaft to
be inserted, the difference between those di-
ameters is called the "interference".
q
The range (between A and B) from the differ-
ence (A) between the minimum dimension of
the shaft and the maximum dimension of the
hole to the difference (B) between the maxi-
mum dimension of the shaft and the mini-
mum dimension of the hole is the “standard
interference”.
q
After repairing or replacing some parts, mea-
sure the dimension of their hole and shaft
and check that the interference is in the stan-
dard range.
Example:
Standard dimension
Tolerance
120
-0.022
-0.126
Example:
Standard dimension
Tolerance
Shaft
Hole
60
-0.030
-0.076
+0.046
0
00-19


