background image

PRECAUTIONS FOR MAINTENANCE

70

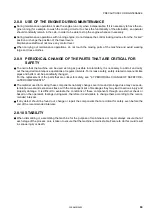
2.8.11 STOP THE ENGINE BEFORE CARRY-

ING OUT ANY MAINTENANCE OPER-
ATION OR INSPECTION 

q

Stop the machine only on firm and level ground and stop the en-
gine before carrying out any maintenance operation or inspec-
tion.

q

If  it  is  necessary  to  have  the  engine  running  during  mainte-
nance, shift the safety lever (1) to the “locked” position (L) and 
carry  out  any  maintenance  operation  with  the  help  of  another 
person; one operator must remain on board and the words to be 
used during the operation must be agreed upon in advance.

q

The person who carries out the maintenance operation must be 
very careful not to touch any moving part of the engine.

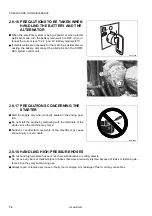
2.8.12 BATTERY MAIN SWITCH  PRECAUTIONS

q

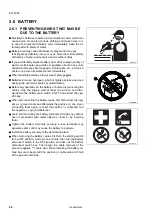
Should the electric circuits need to be checked or serviced, stop the engine, wait at least one minute, and after-
wards turn the battery main switch to OFF and extract the specific key.

q

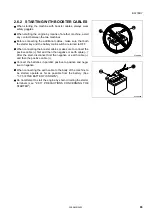
The switch must be always turned to OFF:

• When the machine is not going to be used for a long period or when the machine is prepared for prolonged 

inactivity.

• When the electric circuits need to be fixed.

• Before arc welding.

• Before removing the battery.

• Before replacing a fuse.

RYA00860

RKA22440

WEAM012405

Содержание PC16R-3

Страница 1: ...must read this manual before operating or maintaining this machine This manual should be kept inside the cab for reference and periodically reviewed by all personnel who will come into contact with th...

Страница 2: ......

Страница 3: ...report on the situation and say exactly what has been done and what has to be done after the next maintenance interval Therefore it is advisable to consult both the hour meter and the mainte nance pla...

Страница 4: ...ing words are used to express the potential level of the hazard DANGER q Indicates a situation of imminent danger that if not avoided may cause serious injury and even death The use of this term must...

Страница 5: ...fy the setting of the hydraulic system safety valves Komatsu cannot be held liable for any damage to persons property or the machine if this has been tampered with by modi fying the standard settings...

Страница 6: ...xpress a level of hazardous condition equivalent to the signal word These safety pictograms use pictures in order to let the operator or maintenance worker understand the level and type of hazardous c...

Страница 7: ...n demolition work will dis play the Komatsu demolition decal q If the machine does not display this decal and it is neces sary to carry out demolition work contact your distributor for information on...

Страница 8: ...RUNNING IN Every machine is scrupulously adjusted and tested before delivery A new machine however must be used carefully for the first 100 hours in order to ensure proper running in of the various c...

Страница 9: ...anual the terms front forward rear backward left and right refer to the travel direction as seen from the operator seat when it is facing the front and the sprocket is at the rear of the machine A For...

Страница 10: ...r when requiring assistance and ordering spare parts 1 4 1 MACHINE SERIAL NUMBER The machine serial number is stamped on the front upper part of the main frame on the left side 1 4 2 MACHINE IDENTIFIC...

Страница 11: ...1 4 2 1 MACHINE SERIAL NUMBER PLATE according directive 2006 42 EC A SERIAL NUMBER E MACHINE DESIGNATION TYPE B OPERATING MASS F YEAR OF CONSTRUCTION C PRODUCT IDENTIFICATION NUMBER G ENGINE POWER D...

Страница 12: ...on the plate positioned on the engine itself The exhaust gas emission plate is applied to the counterweight 1 4 4 TRAVEL REDUCTION GEAR SERIAL NUMBER The serial number is stamped on the plate positio...

Страница 13: ...ION GEAR SERIAL NUMBER The serial number is stamped on the plate positioned on the up per side of the swing motor 1 4 6 CAB SERIAL NUMBER The serial number is stamped on the plate positioned on the up...

Страница 14: ...serial No Product identification number PIN Manufacturers name Address Komatsu Italia Manufacturing S p A Via Atheste 4 35042 Este PD Italy Authorized representative Address Distributor name Address...

Страница 15: ...way radio communication device KOMTRAX Keep away from any explosive area If the machine must operate within 12 metres from an explosive area or from an active electric exploder the cable harness must...

Страница 16: ...ainous areas where radio waves cannot be received Even when the machine is outdoors it cannot be used in areas where radio signals are weak or areas not covered by the signal q Do not disconnect or ta...

Страница 17: ...ecember 2009 12 1 5 KOMTRAX SYSTEM 13 1 5 1 GENERAL PRECAUTIONS 13 TABLE OF CONTENTS 15 SAFETY AND ACCIDENT PREVENTION 2 1 SAFETY NOISE AND VIBRATION PLATES 24 2 1 1 POSITION OF THE SAFETY PLATES 24 2...

Страница 18: ...TARTING THE ENGINE 50 2 4 2 CHECK THE DIRECTION BEFORE STARTING THE MACHINE 50 2 4 3 HAND SIGNALS 51 2 4 4 CHECKS FOR TRAVELLING IN REVERSE 56 2 4 5 MOVING THE MACHINE 56 2 4 6 MOVING ON SLOPES 57 2 4...

Страница 19: ...CHEMICAL HAZARD 75 2 8 26 WASTE MATERIALS 75 2 8 27 COMPRESSED AIR 75 2 8 28 PRECAUTIONS TO BE TAKEN WHEN HANDLING TECHNOPOLYMERS AND ELASTOMERS 76 2 8 29 PRECAUTIONS TO BE TAKEN WHEN USING SYNTHETIC...

Страница 20: ...143 3 3 9 UNAUTHORIZED OPERATIONS 146 3 3 10 PRECAUTIONS FOR USE 148 3 3 11 PRECAUTIONS TO BE TAKEN WHEN TRAVELLING ON SLOPES 150 3 3 12 GETTING THE MACHINE OUT OF MUD 152 3 3 13 OPERATIONS THAT CAN B...

Страница 21: ...NANCE 190 4 2 MAINTENANCE NOTES 192 4 2 1 OIL FUEL AND COOLANT 192 4 2 1 1 OIL 192 4 2 1 2 FUEL 193 4 2 1 3 COOLANT 193 4 2 1 4 KOWA KOMATSU OIL WEAR ANALYSIS 194 4 2 1 5 STORING OIL AND FUEL 195 4 2...

Страница 22: ...ATION Only for machines in which synthetic biodegradable oil type HEES is used 228 4 9 6 MAINTENANCE EVERY 500 HOURS OF OPERATION 229 4 9 6 a CHANGING THE ENGINE OIL AND THE ENGINE OIL FILTER CARTRIDG...

Страница 23: ...nal controls 261 6 5 1 POSITION OF THE DEVICES 261 6 5 2 WORK EQUIPMENT CONTROL LEVERS 266 6 5 3 LIFTING CAPACITIES TABLES 267 6 5 4 HYDRAULIC CIRCUIT 269 6 5 4 1 INSTALLING AND CONNECTING THE EQUIPME...

Страница 24: ...22 THIS PAGE WAS INTENTIONALLY LEFT EMPTY WEAM012405...

Страница 25: ...SAFETY AND ACCIDENT PREVENTION 23 WEAM012405...

Страница 26: ...ade of water and detergent Do not use fuel petrol or solvents q If the plates are damaged ask for new ones to Komatsu or to your Komatsu Distributor q In case of replacement of a component provided wi...

Страница 27: ...heir respective meanings 1 DANGER IN THE WORKING AREA q Do not approach or stand within the equipment operating range when the boom and the bucket are raised 2 DO NOT OPEN THE ENGINE HOOD q Do not ope...

Страница 28: ...TY q When the gauge is fully retracted the lateral stability is reduced In jobsites where there is danger of the machine turning over extend the gauge and be extremely careful when travelling Do not r...

Страница 29: ...dio transmitter active in an explosive area q Keep the machine at a safe distance from an explosive area and from a detonator RISK OF EXPLOSION ON THE HYDRAULIC ACCU MULATOR AND GAS SPRING q Recommend...

Страница 30: ...S 28 CAUTION WHEN HANDLING BATTERIES q Never smoke or use any naked flame near the batteries no sparks q Always wear safety glasses when working with batteries q Keep children away from batteries q Ca...

Страница 31: ...opening or closing the front window or when adjusting the oper ator s seat always lower the work equipment completely to the ground set lock lever 1 securely to the LOCK position then stop the engine...

Страница 32: ...L TOPPING UP q Only for machines in which synthetic biodegradable oil type HEES is used HYDRAULIC OIL TOPPING UP ENGINE LUBRICATING OIL FILTER FUEL FILTER RKA14710 BIO OIL 22F 98 33630 RKA28970 22F 98...

Страница 33: ...tsu genuine engine coolant AF NAC to prevent radia tor damage by corrosion HYDRAULIC OIL TOPPING UP REFUELLING ENGINE OIL FILTER FUEL FILTER 09642 A0480 RKA29010 AF NAC 21D 98 11230 RKA29760 21D 98 11...

Страница 34: ...ES 32 ENGINE AIR INTAKE FILTER ENGINE COOLANT ENGINE COOLANT PRESSURE HYDRAULIC OIL LEVEL HYDRAULIC OIL FILTER 21D 98 11180 RKA30000 21L 09 R4170 RKA29680 21D 98 11150 RKA29790 21D 98 12030 RKA29800 2...

Страница 35: ...AND VIBRATION PLATES 33 POWER OUTLET ANCHORAGE POINT LIFTING POINT EMERGENCY EXIT machines with cab 21D 98 12040 RKA30060 12 V 21D 98 11860 RKA28810 RKA28830 2 2 L 0 9 R 4 1 6 0 22L 98 18270 RKA30050...

Страница 36: ...0kg 275kg 165kg 150kg 310kg 170kg 140kg 280kg 155kg 145kg 195kg 125kg A B 2m 3m MAX W 400mm kg 23 825kg 1m A B RKA23200 W W 400mm kg 23 L 2m 3m 1m 0 1m 0 L 965mm L 1215mm A B 2m 3m MAX 1m 855kg 1175kg...

Страница 37: ...e sure that such a plate is applied also to the new part EXTERNAL NOISE q Sound power level emitted by the machine measured accord ing to ISO 6395 Dynamic test method simulated working cy cle This is...

Страница 38: ...make sure that such a plate is applied also to the new part EXTERNAL NOISE q Sound power level emitted by the machine measured accord ing to ISO 6395 Dynamic test method simulated working cy cle This...

Страница 39: ...correct equipment and attachments 2 Maintain the machine according to this manual Tension of crawler for crawler machines Brake and steering systems Controls hydraulic system and linkages 3 Keep the t...

Страница 40: ...an be effective to minimize risks of low back pain Operate the machine only when you are in good health Provide breaks to reduce long periods of sitting in the same posture Do not jump down from the c...

Страница 41: ...the guards when the engine is running q Always use the proper safety devices to lock the machine when parking always fasten the seat belt q Do not remove the safety devices and always keep them in go...

Страница 42: ...damage caused by unauthorized modifications 2 2 6 LEAVING THE OPERATOR SEAT q When leaving the operator seat even if temporarily make sure that the machine is in a safe position See 2 4 14 PARKING THE...

Страница 43: ...7 EMERGENCY EXIT q In the even of an emergency where the cab door cannot be opened use the hammer provided to break the win dow and escape through the window taking care to avoid injury cause by broke...

Страница 44: ...ully q Do not hold or rest on the control levers q Both when getting on and when getting off the machine always maintain three points of contact holding or resting points in or der to avoid losing you...

Страница 45: ...DUE TO FUEL AND OIL Fuel oil and some types of antifreeze can easily ignite if they get in contact with a flame Fuel is flammable and therefore very dan gerous q Keep any naked flame away from flammab...

Страница 46: ...the lower housing panels q To prevent ignition caused by sparks released by other sources of flame remove ant inflammable material such as dry leaves detritus pieces of paper soot etc accumulating aro...

Страница 47: ...q Do not stand within or approach the operating range of the work equipment even when the operator is on board the machine and the engine is running q Do not stand or work under the arms or the articu...

Страница 48: ...in the sur rounding area They may be hit by falling objects or flying objects q When carrying out breaker operations install a front guard ma chines with canopy and use a fully transparent laminated c...

Страница 49: ...tsoever and avoid using the machine without canopy q If it is absolutely necessary to remove the ROPS canopy always contact your Komatsu distributor before carry ing out this operation 2 2 22 2 ROPS C...

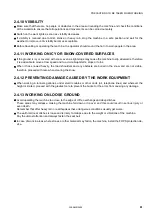
Страница 50: ...of the operations Be careful not to sever or damage any of these lines q Check the depth and flow of water before operating in water or on river banks 2 3 2 FIRE PREVENTION q Completely remove any woo...

Страница 51: ...a cab window breaks on the side facing the work equipment this may hit the operator Therefore it is advisa ble to stop the machine immediately and to replace the broken glass q Check the level of the...

Страница 52: ...while seated with fastened seat belt q Do not allow anyone to get on the machine q Make sure that the platform fastening screws 1 are well tight ened Incorrect tightening of the cab floor may lead to...

Страница 53: ...son must be entrusted with making signals q The operator must make sure that the signalman is always within his field of vision and follow all his sig nals The use of hand signals serves to direct the...

Страница 54: ...s the signalman move the hand in the di rection of the movement to be carried out 5 LIFT THE BOOM With an arm extended in horizontal position and closed fin gers point the thumb upwards 6 LOWER THE BO...

Страница 55: ...eep one hand still and open Rotate the other hand vertical ly with the thumb pointed towards the open hand 13 TRAVEL WHILE STEERING Lift the forearm corresponding to the inner steering side with clenc...

Страница 56: ...laterally indicating the distance to be covered 18 CARRY OUT THE MOVEMENTS SLOWLY One hand still in front of the hand that indicates the move ment to be carried out The figure represents the lift slo...

Страница 57: ...PRECAUTIONS TO BE TAKEN WHEN WORKING 55 21 STOP THE ENGINE Pass thumb or forefinger across the throat RKA15340 WEAM012405...

Страница 58: ...evaluate more precisely the space required for the movements and at the same time ensures the stability of the machine q Make sure that the driver seat is directed towards the blade Otherwise pay atte...

Страница 59: ...travelling downhill position the machine with the turret rotated by 180 so that the sprocket 1 and the boom are in travelling direction as shown in the figure and proceed at low speed q Do not change...

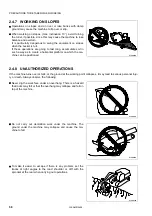
Страница 60: ...ch the ma chine can be positioned 2 4 8 UNAUTHORIZED OPERATIONS If the machine turns over or falls or the ground at the working point collapses it may lead to serious personal inju ry or death Always...

Страница 61: ...nt or rear to the side of machine while it is applied a load There is danger that the machine may turn over q When using a breaker or other heavy work equipment there is a hazard of the machine losing...

Страница 62: ...ehaviour rules to be followed in case of electrocution 5 Keep the phone number of the electricity company and of the nearest first aid station at hand q If the work equipment gets accidentally entangl...

Страница 63: ...nowed heavily the road shoulders and any obstacle are buried in the snow and are not visible therefore proceed with care when clearing the snow 2 4 12 PREVENTING DAMAGE CAUSED BY THE WORK EQUIPMENT q...

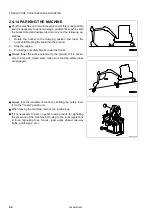
Страница 64: ...Stop the engine 3 Put wedges or safety blocks under the tracks q Always lower the work equipment to the ground if it is neces sary to park with raised arms make sure that the safety locks are engaged...

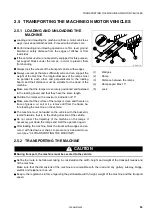
Страница 65: ...ith a maximum inclination of 15 q Make sure that the surface of the ramps is clean and there is no trace of grease oil soil or ice remove dirt from the tracks be fore loading the machine on the vehicl...

Страница 66: ...e battery or before disconnecting the cables stop the engine wait at least one minute and after wards turn the battery main switch to OFF and extract the spe cific key q When disconnecting the battery...

Страница 67: ...er cables make sure to connect the positive cable first and then the negative or earth cable After the start disconnect first the negative or earth cable and then the positive cable q Connect the batt...

Страница 68: ...q Move the machine only as far as necessary to allow the re quired repairs to be carried out q Put wooden blocks between the towing cable and the machine body in order to avoid wear or damage q Do not...

Страница 69: ...e and high quality tools suitable for the tasks to be performed q Do not use worn damaged low quality tools or tools that are not suitable for the tasks to be performed in order to avoid any personal...

Страница 70: ...tools or broken pieces are dan gerous because they may cause someone to slip or trip Al ways keep the machine and the work site clean and tidy q To clean the machine use a pressurized jet of warm wat...

Страница 71: ...maintenance operations at regular intervals To increase safety safety related components like pipes and belts must be periodically changed For the replacement of the parts that are critical for safety...

Страница 72: ...during the operation must be agreed upon in advance q The person who carries out the maintenance operation must be very careful not to touch any moving part of the engine 2 8 12 BATTERY MAIN SWITCH PR...

Страница 73: ...the fuel gun firmly and keep it constantly in contact with the filler until you have finished in order to avoid sparks due to static electricity q Do not fill the tank completely in order to leave roo...

Страница 74: ...ARTER q Start the engine only when correctly seated in the driving posi tion q Do not start the engine by tampering with the terminals of the starter since the machine may move q Sudden or accidental...

Страница 75: ...or this reason always wear goggles and thick gloves during the inspections and use a piece of cardboard or a sheet of ply wood to check for oil leakages If you are hit by a jet of high pressure oil or...

Страница 76: ...gh preload in order to absorb the im pacts of the front idler roller Do not attempt to remove the spring since this may lead to serious accidents and even death For any operation on the shock absorber...

Страница 77: ...ns should be taken If any doubt exists contact your Komatsu distributor See also disposal of 2 8 26 WASTE MATERIALS 2 8 26 WASTE MATERIALS q Do not dispose of used oil in the sewer system rivers etc q...

Страница 78: ...ater and an alkaline detergent for about 30 min utes and then contact a poisoning treatment center without delay 2 8 29 PRECAUTIONS TO BE TAKEN WHEN USING SYNTHETIC BIODE GRADABLE OIL TYPE HEES q It i...

Страница 79: ...THE MACHINE AND ITS OPERATIONS 77 WEAM012405...

Страница 80: ...1 MACHINE ILLUSTRATIONS 3 1 1 OVERALL VIEW OF THE MACHINE RKA22480 1 2 3 4 5 6 Bucket Bucket cylinder Arm Arm cylinder Boom Boom cylinder 7 8 9 10 11 12 Track Sprocket Undercarriage Idler roller Cylin...

Страница 81: ...rol lever variable width Indicators and warning lights display Accelerator lever Start up switch 16 17 18 19 20 21 22 23 24 25 26 27 28 Hour counter Translation speed increase warning light Engine wat...

Страница 82: ...re necessary for correct operation of the machine To perform the required operations correctly and safely it is important to understand the equipment operating methods and the meaning of the informati...

Страница 83: ...g stop the machine immediately and try to find the cause of the failure see 3 7 6 OTHER TROUBLES 2 Charge level warning light It comes on when the start up circuit is energised and comes off when the...

Страница 84: ...hine and provide for refuelling 2 Hour meter This instrument indicates the total number of operating hours of the engine The count is continuous and the hour number is in creased by 0 1 when the engin...

Страница 85: ...g light This warning light comes on when the travel speed selection switch is in high speed position see 3 2 2 pos 4 Travel speed selection switch When the speed selection switch in low speed position...

Страница 86: ...g light This warning light comes on when the engine coolant exceeds the maximum temperature allowed in this case reduce the engine speed until the warning light goes out If this inconvenience oc curs...

Страница 87: ...under voltage Keep the key in this position when the engine is on q Position START This is the ignition position Keep the key in this position to make the starter run As soon as the engine starts rel...

Страница 88: ...canopy 4 Travel speed selection switch WARNING q When loading or unloading the machine on from a motor vehicle always travel at low speed Never operate the trav el speed selection switch during the l...

Страница 89: ...st attention during travel q Before using the blade adjustable track gauge lever check the position of the switch This is a two position switch and allows the operator to choose between using the blad...

Страница 90: ...eep the switch pressed in spraying position for more than 10 consecutive seconds Do not press the switch to spray detergent if the reservoir is empty 8 Cab heating and ventilation switch machines with...

Страница 91: ...ays be set to ON except in the following cases q When the machine is not going to be used for a long period or when the machine is prepared for prolonged inactivity q When the electric circuits need t...

Страница 92: ...k equipment control lever Accelerator lever Blade adjustable track gauge lever if provided Travel levers 7 8 9 10 11 12 1st boom swing control pedal locking device 1st boom swing control pedal Tower r...

Страница 93: ...afety lever take care to avoid touching the equipment control levers This lever operates the safety device that locks the work equipment the swing and travel functions and the attach ments When pulled...

Страница 94: ...ety lever and stop the engine IMPORTANT q The horn push button is positioned on the right lever grip and must be used to warn all the people in the vicinity be fore starting work and in case of danger...

Страница 95: ...small spaces In any other condition always select the wide track gauge q Avoid adjusting the track gauge when the machine is work ing on a slope This may affect the lateral stability of the machine q...

Страница 96: ...ut steering manoeuvres use the pedals with the maximum care q When leaving the operator seat always rotate the pedals to the rest position in order to avoid pressing them by mis take These levers are...

Страница 97: ...dal and has two positions F free L locked 8 Boom swing control pedal This pedal controls the boom swing to the right and to the left ac cording to the movements indicated below a swing to the right b...

Страница 98: ...en if the lever is at the locking position To unlock tower rotation pull the lever fully up and turn it down wards IMPORTANT q Do not turn the upper tower when the lever is at the locking position 10...

Страница 99: ...s injury Do not tilt or close the cab floor on slopes or if there is a strong wind To tilt or close the cab floor pull the lever to the free position F After tilting or closing the cab floor release t...

Страница 100: ...SCREEN machines with cab WARNING q When the upper windscreen or the cab door is opened or closed always take the safety device lever to the locking position L If the control levers are not locked and...

Страница 101: ...t or left top of the front wind screen and push the locking levers B down to release the windscreen 5 Seize the handles C and D pull up the windscreen and push it until the lock E is tripped RKAB9680...

Страница 102: ...n stop the engine 2 Shift the safety lever to the locked position 3 Release the windscreen by means of the upper lock E le ver 4 Seize the handles C and D push the windscreen forwards and lower it slo...

Страница 103: ...the operating ef fort may change suddenly Do not open or close the door on slopes q Be careful to your hands in order to prevent them from be ing caught between the door and the front or centre pilla...

Страница 104: ...ndow release and draw the handle 1 to slide the window 3 2 4 4 EMERGENCY EXIT HAMMER machines with cab WARNING q When it is necessary to break the window with the hammer pay attention not to get injur...

Страница 105: ...ly partially into the lock it may break OPENING AND CLOSING THE COVERS WITH LOCK Opening 1 Insert the key into the lock 2 Turn the key counterclockwise and open the cover Closing 1 Close the cover and...

Страница 106: ...ake sure that it is kept open by the apposite rod q Non compliance with these rules may lead to serious accidents IMPORTANT q If it is not necessary to open the cover always keep it locked q When the...

Страница 107: ...ator cover always open it completely and make sure that it is kept open by the apposite rod OPENING THE BATTERY COVER 1 Release the radiator cover lock 1 see 3 2 5 COVERS WITH LOCK 2 Pull the radiator...

Страница 108: ...inspections and maintenance operations are required in side the battery housing remove the fixing screws 1 and com pletely remove the housing 2 After the inspections or maintenance operations reassemb...

Страница 109: ...the platform always attach the safety stop q Do not carry out any operation on the machine without having first attach the safety stop q If there is something wrong in the locking function when the ca...

Страница 110: ...ction of the ar row approximately 45 IMPORTANT q When tilting or closing the cab floor be extremely careful and keep away from the area under the cab floor NOTE q The cab floor tilts thanks to the ope...

Страница 111: ...orm 5 downwards in the direction of the arrow approximately 45 IMPORTANT q Lower the cab floor slowly and make sure that the wires and pipes located under it are neither damaged nor twist ed q When ti...

Страница 112: ...he platform always attach the safety stop q Do not carry out any operation on the machine without having first attach the safety stop q If there is something wrong in the locking function when the cab...

Страница 113: ...er 5 in the di rection indicated by the arrow and at the same time push the handle 6 upwards in the direction indicated by the arrow approx 45 IMPORTANT q If the cab floor does not tilt pull the handl...

Страница 114: ...inserted in the groove 9 of the locking plate 8 9 Insert the safety pin 10 into the hole 11 from the outside 10 Turn until the coupling at the end of the safety pin 10 is completely engaged with the...

Страница 115: ...me 2 Pull the cab floor release lever 5 in the direction shown by the arrow and at the same time pull the handle 6 down wards in the direction indicated by the arrow approximately 45 IMPORTANT q Lower...

Страница 116: ...with white powder or loose in the fuse holder change it Replace the fuse with a new one having the same capacity Fuse capacity and circuits involved F1 F5 F6 F9 F10 F11 F7 F8 F2 F3 F4 RKA16520 RKA227...

Страница 117: ...how to open and close the cover on the left side of the machine see 3 2 8 BATTERY COVER NOTE q The main fuse is the high capacity fuse installed to protect the electric components and the wiring 3 2...

Страница 118: ...ting the engine 1 Check the work equipment the cylinders the articulations and the pipes for damage wear excessive play If any anomaly is observed provide for the necessary repairs 2 Remove dirt and d...

Страница 119: ...necessary Before checking the coolant level wait for the engine to cool down and check the expansion tank q Immediately after the engine has stopped the coolant is very hot and under pressure Removin...

Страница 120: ...g the engine oil level wait approximately 15 minutes in order to allow the engine to cool down 1 Open the engine hood For details see paragraph 3 2 6 EN GINE HOOD 2 Remove the dipstick G and wipe it w...

Страница 121: ...the fuel level is low open the engine hood 3 for details see 3 2 6 EN GINE HOOD remove the cap and refuel through the filler F While refuelling check the fuel level on the sight gauge G Tank capacity...

Страница 122: ...level is included between the H and L marks on the sight gauge G IMPORTANT q Do not exceed the max level mark H This would damage the hydraulic circuit and cause the oil to overflow q If too much oil...

Страница 123: ...s CHECKING THE AIR FILTER CLOGGING INDICATOR 1 Open the engine hood For further details see paragraph 3 2 6 ENGINE HOOD 2 Check if the red piston is visible in the transparent portion of the filter cl...

Страница 124: ...AINING THE FUEL TANK CHECKING THE WIRING SYSTEM WARNING q If fuses are corroded rusted or do not hold well in place replace them with fuses featuring the same rat ing before replacing a fuse make sure...

Страница 125: ...1 Turn the ignition switch to position ON 2 Press the button positioned on the right lever and make sure that the horn functions correctly If the horn does not sound contact your Komatsu Distributor...

Страница 126: ...t deep digging opera tions make the seat slide forward to improve visibility on the low er area in front of the machine B Suspension In order to adjust the suspension turn the handwheel 2 placed on th...

Страница 127: ...ame are not loose If necessary apply a tightening torque of 24 5 4 9 Nm 2 5 0 5 kgfm If the surface of the belt is damaged or if the couplings are broken or deformed change the belt assembly Fastening...

Страница 128: ...If the safety lever is in working position F the engine does not start up 2 Check the position of each lever 3 Turn the ignition key 2 to position ON and carry out the fol lowing checks 1 Make sure th...

Страница 129: ...ns correctly If it does not function this may be due to a faulty bulb or to an interruption in the wirings therefore it is advisable to contact a Komatsu Distributor who will provide for the necessary...

Страница 130: ...the engine only while seated with fastened seat belt q Before starting the engine make sure that there is no one within the operating range of the machine and sound the horn q Exhaust gas is toxic Wh...

Страница 131: ...NE AND RELATED CONTROLS 129 3 Turn the ignition key 3 to position START to start the engine 4 As soon as the engine starts release the key 3 which will automatically return to position ON RYA17360 RYA...

Страница 132: ...ine make sure that there is no one within the operating range of the machine and sound the horn q Never use starting aid fluids as they may cause explosions q Exhaust gas is toxic When starting the en...

Страница 133: ...er approximately 10 seconds the warning light 4 goes out indicating that the preheating phase has been completed 4 When the preheating warning light 4 goes out turn the ignition key 3 directly to posi...

Страница 134: ...procedure correctly 3 3 3 1 RUNNING IN A NEW MACHINE CAUTION q Komatsu machines are adjusted and tested completely before shipment However operating the ma chine under severe conditions at the beginn...

Страница 135: ...gine idle accelerate every now and then or increase the speed up to an intermediate value After starting the engine let it warm up before starting work Carry out the operations and checks indicated be...

Страница 136: ...rning light off 5 Make sure that the colour of the exhaust gases is normal and that there are no strange noises or vibrations If any anomaly is observed contact your Komatsu Distributor 6 Shift the sa...

Страница 137: ...d not to stop the engine suddenly if it has been running for a long period and is still hot in this case let the engine run at low idling speed for about 5 minutes in order to allow it to cool down gr...

Страница 138: ...e that there are no persons other equipment or ob stacles in the way q Avoid any travel manoeuvre or change of direction with the accelerator at maximum speed since ma noeuvres carried out in these co...

Страница 139: ...over from high to low speed or vice versa takes place whenever the switch is pressed When the machine is travelling at high speed the travel speed increase warning light 5 comes on For details on the...

Страница 140: ...the rear of the machine pull the levers 3 slowly backward to start moving in reverse When the sprocket A is at the front of the machine push the levers 3 slowly forward to start moving in reverse 4 C...

Страница 141: ...travels at high speed on soft ground or up a slope and the load increases the low speed is automatically selected but the travel speed increase warning light remains on When the load is reduced the tr...

Страница 142: ...he load increases the low speed is automatically selected and the machine slows down When the load is reduced the travel system automatically changes over to high speed Use the travel levers to change...

Страница 143: ...NOTE q To steer to the right operate the right travel lever in the same way HOW TO CARRY OUT COUNTER ROTATIONS SPIN TURN To carry out a counter rotation to the left pull the left travel lever backward...

Страница 144: ...t is full pay the utmost attention and avoid abrupt movements 3 When the rotation function is not used place the tower paral lel to the lower car then take the rotation locking lever 1 to the LOCKING...

Страница 145: ...tral position and the work equipment remain in the position where they stopped The movements of the levers and the corresponding movements of the equipment are shown in the dia grams below q Arm contr...

Страница 146: ...swing the boom use the boom swing control pedal q Blade control Select the use of the blade with the blade adjustable track gauge selection switch To operate the blade shift the lever positioned to th...

Страница 147: ...ack gauge switch to the track gauge adjustment position To adjust the track gauge shift the lever positioned to the right of the operator seat forward or backward IMPORTANT q If there are obstacles th...

Страница 148: ...travel force to carry out digging operations This may damage the ma chine or the work equipment q PRECAUTIONS WHEN USING HYDRAULIC CYLINDERS AT THE END OF STROKE When the hydraulic cylinders are activ...

Страница 149: ...LOWED TO EX PLOIT THE FORCE OF GRAVITY OF THE MACHINE Do not use the force of gravity of the machine to carry out dig ging operations When working on hard rocky surfaces use some other method to break...

Страница 150: ...the left if one of the rubber tracks passes over obstacles such as big stones or logs or gets into a ditch or a hole In these cases lower the speed and take care to keep the machine balanced during tr...

Страница 151: ...will be sub merged and this may cause the cooling fan to break Be extremely careful when driving the machine out of wa ter Do not immerse the machine in water beyond the permissible depth under the ca...

Страница 152: ...he machine at about 20 30 cm from the ground Do not travel downhill in reverse q Do not change direction on slopes side movements must be carried out on level ground or with inclination not ex ceeding...

Страница 153: ...atically engage the brakes WHEN THE ENGINE STOPS ON A SLOPE If the engine stops when the machine is travelling uphill shift the travel levers to the neutral position lower the bucket to the ground sto...

Страница 154: ...angle between the boom and the arm should be included between 90 and 110 When only one side gets stuck in mud use the bucket to raise the track then lay boards or logs under the track and drive the m...

Страница 155: ...chine to a 30 angle towards the ma chine There may be some differences depending on the digging depth but it is advisable to try to keep within the above range rather than operate with the cylinders r...

Страница 156: ...e to fill excavations and level the ground surface For refilling operations widen the track gauge and the blade SIDE DITCHING WORK It is possible to use the machine for side ditching work in limited s...

Страница 157: ...described procedures are valid also for the coupling of the mechanical connections of the optional equipment 1 Position the bucket on level ground directing it so that the flat part of its back rests...

Страница 158: ...the work equipment into the ground to prevent the machine from moving q If the control levers are inadvertently touched the work equipment or the machine may move suddenly and cause serious accidents...

Страница 159: ...RELATED CONTROLS 157 3 Lower the bucket keeping it in horizontal position until its bot tom touches the ground 4 Lower the blade to the ground 5 Shift the safety lever 3 to the locked position L RYA17...

Страница 160: ...riage and make sure that there are no oil or coolant leakages If any anomaly is observed provide for the necessary repairs 2 Fill the fuel tank 3 Check the engine compartment for paper and debris Remo...

Страница 161: ...e necessary precautions for use and to avoid performing operations that are not allowed This will in crease the life of the rubber tracks and will allow their characteristics to be fully exploited Bef...

Страница 162: ...able differences in height When moving on obstacles or surfaces with considerable differences in height position the machine perpendicular to the obstacle to prevent the tracks from coming off q If th...

Страница 163: ...on a slope carry out this manoeuvre gradually 3 Do not proceed along the edges of a slope or on uneven ground keeping one track in horizontal position and the other inclined or partially raised with m...

Страница 164: ...achine travels in reverse a gap forms between the carrier roller the idler roller and the rubber track The rubber track may come off also in the following conditions q When the machine steers but the...

Страница 165: ...E AND RELATED CONTROLS 163 q If the machine travels in reverse in these conditions the rubber track will come off q If the machine steers in these conditions the rubber track will come off RYA02820 RY...

Страница 166: ...om collapsing q Before loading the machine remove any trace of mud and dirt from the tracks in such a way as to prevent the ma chine from slipping when it is on the ramps Make sure that the surface of...

Страница 167: ...dges 1 under the wheel to prevent it from moving q Place the ramps at the right and left sides 2 in such a way that they are parallel and there is the same distance from the centre 3 of the trailer Th...

Страница 168: ...e travel levers slowly When the machine is on the ramps do not operate any lever apart from the travel levers 8 Stop the machine at the specified point then swing the turret by 180 SECURING THE MACHIN...

Страница 169: ...securing the machine to prevent it from sliding laterally When securing the machine with a chain or metal cable use the hole in the rear part of the undercarriage and the hole in the blade side plate...

Страница 170: ...r ropes of adequate resistance Connect one end to the coupling holes placed on the lower frame and the other end of the trailer q X 50 100 mm NOTE q Make sure that the chains or ropes do not interfere...

Страница 171: ...are parallel and there is the same distance from the centre 3 of the trailer The installation angle 4 must be 15 max If the ramps bend excessively under the weight of the machine put blocks under the...

Страница 172: ...e work equipment make sure that the travel direction is in line with the ramps and start travelling slowly Lower the work equipment as much as possible without causing interferences When the machine i...

Страница 173: ...rohibited to lift the machine using the holes provided in the undercarriage since these must be used only for transporting the machine This would damage the under carriage IMPORTANT q For details on t...

Страница 174: ...the space around the operator seat is clear then get off the machine 7 Install shackles in the lifting holes on both ends of the blade 2 points then pass the metal cables through them NOTE q On machi...

Страница 175: ...th swing boom or re volving frame q Pay attention to the pipes and take care that they do not get caught 10 Lift the machine slowly until the ropes are stretched and make sure that the fastenings are...

Страница 176: ...n case of contact with the eyes or the skin wash with plenty of running water and consult a doctor without delay q The coolant containing antifreeze is flammable do not smoke and do not use naked flam...

Страница 177: ...battery decreases accordingly If the battery charge is low the electrolyte may freeze Keep the battery charge level as high as possible and insulate the battery against excessively low temperatures i...

Страница 178: ...the fan there is a radiator that transfers heat to the air sent into the cab it is used during the cold season and re ceives the hot water necessary for exchange heat directly from the engine cooling...

Страница 179: ...on wooden boards to prevent the tracks from freezing on the ground which would make it extremely difficult to start the machine the following morning q Open the drain valve and drain the water accumul...

Страница 180: ...piston rod with grease q After shutting off the engine wait over one minute then turn the battery disconnect switch to the OFF position and take out the battery disconnect switch key Put a cover on th...

Страница 181: ...age the tank 3 6 4 RECOMMENDATIONS FOR MACHINES EQUIPPED WITH KOMTRAX SYSTEM DURING LONG PERIODS OF INACTIVITY Even if the starter key is turned to OFF the KOMTRAX system can absorb a minimum quantity...

Страница 182: ...no load the bucket speed drops momentarily according to the more or less horizontal position of the bucket teeth q When the swing is operated or locked the brake valve emits a noise q When the machine...

Страница 183: ...which may explode Do not smoke and avoid producing sparks near the battery q The battery electrolyte is made of diluted sulphuric acid that may corrode clothes and even the skin in case of con tact wi...

Страница 184: ...de therefore for this operation it is neces sary to remove the battery from the machine position it in a well ventilated place and remove the caps before proceeding q Immediately change any damaged ca...

Страница 185: ...ect the cable as far from the battery as possible In any case avoid the attachments since they are poor conductors q When removing the booster cables take care to avoid any contact of the clamps with...

Страница 186: ...machine to be started STARTING THE ENGINE CAUTION q Make sure that the safety levers of both machines are in the locked position Also make sure that all the control levers are in NEUTRAL 1 Make sure...

Страница 187: ...lty alternator Faulty cables Change Check and repair Alternator emits abnormal noise Faulty alternator Change Starter does not turn with ignition switch in position ON Faulty cables Battery charge ins...

Страница 188: ...arning light comes on Oil level in oil pan too low air sucked in Oil filter clogged Oil leakage due to damage or incor rect tightening of oil pipes or joints Engine oil pressure sensor faulty Restore...

Страница 189: ...arance Exhaust gases white or light blue Too much oil in oil pan Unsuitable fuel Restore level See CHECKS TO BE CARRIED OUT BEFORE START ING THE ENGINE Change with fuel in compliance with standards Ex...

Страница 190: ...188 THIS PAGE WAS INTENTIONALLY LEFT EMPTY WEAM012405...

Страница 191: ...MAINTENANCE 189 WEAM012405...

Страница 192: ...rease containers clean and prevent any foreign matter from get ting into them q Keep the machine thoroughly clean this facilitates troubleshooting In particular grease nozzles breather holes and the a...

Страница 193: ...e avoid using trichloroethylene to clean it Trichloroethylene reduces the resistance and duration of the tank q Before starting work on muddy ground under rain or snow on seashores or river banks chec...

Страница 194: ...e of pollution of the oil 3 periodical change q When changing the oil change also the filters q It is advisable to have the oil periodically analysed in order to check the conditions of the machine Th...

Страница 195: ...ng to the mini mum atmospheric temperature For concentration see 4 4 1 COOLANT q The coolant containing antifreeze is flammable do not use naked flames near the coolant and do not smoke while topping...

Страница 196: ...ful and allows customers to save money and avoid many problems KOWA ANALYSIS STAGES q Analysis of metal particles In this stage a ICP Inductively Coupled Plasma analyser is used to measure the density...

Страница 197: ...are very important components for safety They prevent any impurities from getting into the oil fuel or in the air circuits thus avoiding problems to important components of the machine Periodically ch...

Страница 198: ...q The maintenance operations required for the hydraulic system are the following 1 Daily check of the oil level in the tank 2 Periodical change of the oil filter 3 Periodical change of the oil and cl...

Страница 199: ...it is advisable to indicate also the machine serial number to the Komatsu Distributor in order to receive the most updated version of the component required 4 3 1 LIST OF THE PARTS SUBJECT TO WEAR The...

Страница 200: ...OIL API CD 3 6 3 3 Travel reduction gears 0 3 0 3 Hydraulic system 23 8 15 2 e Hydraulic system with biodegrada ble oil See par 4 4 1 23 8 15 2 Fuel tank DIESEL OIL 19 Engine cooling system PERMANENT...

Страница 201: ...nge quantity quantity of oil necessary to fill the system or unit during the normal inspection and mainte nance operations ASTM American Society of Testing and Materials SAE Society of Automotive Engi...

Страница 202: ...trans missions the braking system etc q Before introducing biodegradable oil in the hydraulic system drain the system completely disconnect ing the cylinders and all the parts that may contain tradit...

Страница 203: ...tightening torque table is not valid for screws or nuts that must fasten parts made of nylon or simi lar materials onto washers or components made of nylon or nonferrous metals or requiring specific...

Страница 204: ...ays use Komatsu original spare parts having the same size of the part to be replaced a Nm Newton metre 1 Nm 0 102 kgm RKA12600 a Thread diameter a Wrench size mm TIGHTENING TORQUE kgm Nm 9 16 18 11 16...

Страница 205: ...icated in the lubricant table see 4 4 FUEL COOLANT AND LUBRI CANTS BALL BEARING RING GREASING POINT RKA16640 Z Z Z Z Y Y Y Y PC14R 3 PC14R 3 PC16R 3 PC16R 3 22L 09 R3N80 2000h 1000h 500h 100h 10h RKA3...

Страница 206: ...terval prescribed for their change has not elapsed yet If the pipe clamps show signs of deterioration like deformations or cracks provide for changing them together with the pipes In addition to the p...

Страница 207: ...1 5 Fuel pipe fuel filter fuel tank 1 6 Fuel return pipe fuel filter injection pump 1 7 Fuel return pipe between the nozzles 2 8 Fuel return pipe nozzles injection pump 1 9 Fuel return cap 1 10 Hydrau...

Страница 208: ...for ma chines in which synthetic biodegradable oil type HEES is used a CHANGING THE HYDRAULIC OIL FILTER 234 MAINTENANCE EVERY 100 HOURS OF OPERATION a LUBRICATION 226 MAINTENANCE AFTER THE FIRST 500...

Страница 209: ...NCE PLAN 207 MAINTENANCE EVERY 2000 HOURS OF OPERATION a CHANGING THE OIL IN THE HYDRAULIC TANK AND CLEANING THE FILTER 237 b CHANGING THE COOLANT 239 c CHECKING THE ALTERNATOR AND THE STARTER 240 WEA...

Страница 210: ...e contains synthetic biodegradable oil type HEES the filter must be changed after the first 50 hours of operation A Hydraulic fluid filter replacement interval X Hydraulic breaker use percentage Y Cha...

Страница 211: ...ara graph 3 2 6 ENGINE HOOD 2 If the red piston of the filter clogging indicator 1 is visible clean the air filter cartridge IMPORTANT q Do not clean the cartridge if the red piston of the filter clog...

Страница 212: ...amaged change it 7 Remove the cloth or adhesive tape used to cover the air connector inside the filter body 8 Install the cleaned cartridge 4 or a new cartridge 9 Position the cap 3 with the drain val...

Страница 213: ...ry housing see 3 2 8 BATTERY COVER A visual indicator 2 signals with different colours the battery charge level according to the table next to the indicator Green optimal charge Gray the battery needs...

Страница 214: ...metal ring 2 7 Turn the valve 1 of the water separator to the open position B and bleed the air by proceeding as indicated below IMPORTANT q When removing the water separator take care not to lose the...

Страница 215: ...d before refuelling q Never use trichloroethylene to wash the inside of the tank Use exclusively diesel oil 4 9 1 e CHECKING AND ADJUSTING THE STEEL TRACK TENSION The pins and bushings of the undercar...

Страница 216: ...Distributor WARNING q If the resistance met when injecting the grease is excessive move the machine forward and backward covering a short distance To increase the track tension proceed as follows 1 Ca...

Страница 217: ...gree of wear of pins and bushings varies depending on the work conditions and on the characteristics of the ground It is therefore necessary to check the track tension fre quently in order to ensure t...

Страница 218: ...TENSION IMPORTANT q If the track tension is such that the track may come off its seat the track may be lengthened and the track tensioner cylinder damaged 6 If the broken area between the rubber trac...

Страница 219: ...forward of a distance corresponding to the length of the track on the ground then lower the equipment to the ground and stop the engine 2 Choose a perfectly flat rod 3 long enough to cover the distanc...

Страница 220: ...contact your Komatsu Distributor who will provide for the necessary repairs 1 Gradually loosen the grease valve 1 to let the grease out do not give the valve more than one turn 2 If the grease does no...

Страница 221: ...the idler roller This operation can be performed only by specialized personnel at any Komatsu Distributor REMOVING THE RUBBER TRACK DANGER q The grease contained in the hydraulic cylinder is pressur...

Страница 222: ...loosen the grease valve 1 to let the grease out do not give the valve more than one turn 3 If the grease does not come out smoothly move the machine slowly forward and backward covering a short dista...

Страница 223: ...n the sprocket 1 as if in reverse then push the track to wards the turret 4 Using a steel tube 2 position the track and turn the sprock et again 5 Make sure that the track is correctly installed on th...

Страница 224: ...ANT q To fill the reservoir use only non flammable detergent an ethyl alcohol based of the type used for cars q Do not use methyl alcohol based detergents may irritate the eyes q Do not use the antifr...

Страница 225: ...ventilation of the cab is protected by a filter positioned on the right side of the cab This filter blocks all the impurities contained in the air and must be cleaned whenever a decrease in air circu...

Страница 226: ...often if you work in fairly critical environmental conditions It is also advis able to clean the windscreen regularly to remove any dirt grease or residue of any kind since they can hamper the wiper r...

Страница 227: ...coolant level and top up q Check the oil level in the oil pan and top up q Check the fuel level and top up q Check the oil level in the hydraulic tank and top up q Check the air filter clogging indic...

Страница 228: ...ENTS OF THE SWING SYSTEM NOTE q When injecting grease to lubricate the swing pinion and the ball bearing ring swing the turret slowly and grease every 90 1 Carefully clean the grease nipples 1 and 2 a...

Страница 229: ...end 1 point 5 Link connection pin 1 point 6 Boom swing bracket pin 1 point 7 Boom base pin 1 point 8 Boom cylinder base pin 1 point 9 Boom cylinder rod end 1 point 10 Boom cylinder base pin 1 point 11...

Страница 230: ...iodegradable oil type HEES is used The following maintenance operation must be carried out after the first 500 hours of operation together with the maintenance operations to be carried out EVERY 500 H...

Страница 231: ...ng the used oil that flows out of it into a container with suitable capacity While the oil flows out remove the filler cap F so that the oil can flow out freely 3 Screw the plug P onto the engine oil...

Страница 232: ...e the metal ring a further 2 3 turn IMPORTANT If the casing is tightened excessively the seal may be dam aged and cause fuel leakages Fuel leakages may also be due to insufficient tightening Therefore...

Страница 233: ...6 d CHECKING AND CLEANING THE FINS OF THE RADIATOR AND OF THE EXCHANGER WARNING q If compressed air steam or water hit someone they may cause serious injury Always wear a visor and safety shoes 1 Ope...

Страница 234: ...mb on the intermediate point between the drive shaft pulley and the fan pulley with a force equal to 98 Nm 10 kg the resulting deflection must be approximately 9 13 mm 2 If the deflection exceeds this...

Страница 235: ...and dis posed of according to the regulations in force 1 Turn the turret so that the lower part of the hydraulic oil tank is not covered by the tracks 2 Retract the arm and bucket cylinders completel...

Страница 236: ...of according to the regulations in force CAUTION q On machines containing synthetic biodegradable oil type HEES this must be changed for the first time after the first 50 hours of operation and succes...

Страница 237: ...uipped with breaker hydraulic oil deterio rates more rapidly than in machines used for simple dig ging operations On new machines change the filter after the first 100 150 hours of operation and for t...

Страница 238: ...on of any suspended solid particles 1 Move the machine until the drain plug P is in low position and perpendicular to the ground 2 Remove the drain plug P and let the used oil flow out com pletely gat...

Страница 239: ...is very hot and may cause burns let it cool down to 40 45 C before carrying out this maintenance operation q Immediately clean any area dirty with oil q Oils filters the coolant and the battery are co...

Страница 240: ...ge 6 with the filter 7 checking the soundness of the gasket and the suction pipe 4 with the clamps 3 12 Fill with prescribed oil until reaching the level G Use only oil of the prescribed type see 4 4...

Страница 241: ...ressure and it may cause serious burns let the engine cool down until it reaches approximately 40 45 C before changing the coolant q Slowly loosen the radiator cap in order to release any residual pre...

Страница 242: ...new fluid see 4 4 FUEL COOLANT AND LUBRICANTS 6 Start the engine and let it run at high idling speed for a few minutes check the level again and top up before putting back the upper cap 2 7 Fill the...

Страница 243: ...END OF SERVICE LIFE 241 4 10 END OF SERVICE LIFE For safe dismantling of the machine at end of service life please contact your local Komatsu Distributor WEAM012405...

Страница 244: ...242 THIS PAGE WAS INTENTIONALLY LEFT EMPTY WEAM012405...

Страница 245: ...TECHNICAL SPECIFICATIONS 243 WEAM012405...

Страница 246: ...tsu 3D67E 2A diesel engine Engine power ISO 14396 2002 KW HP rpm 11 8 16 0 2600 A Total length mm 3500 B Total height mm 2320 C Total width mm 1000 D Track width mm 230 E Swing radius mm 825 F Total l...

Страница 247: ...depth mm 2160 C Max digging height mm 3615 D Max vertical wall digging depth mm 1785 E Max dumping height mm 2610 F Work equipment min swing radius mm 1470 Work equipment min swing radius with boom sw...

Страница 248: ...of the tipping limit Load limited by the hydraulic lifting capacity and not by the tipping limit ROPS CANOPY STANDARD ARM STANDARD COUNTERWEIGHT LOWERED BLADE Unit kg 1 m 1 5 m 2 m 2 5 m 3 m 3 5 m Ma...

Страница 249: ...28 409 242 300 194 1 0 m 1175 958 690 502 480 332 331 246 298 233 1 5 m 422 422 266 266 265 265 ROPS CANOPY STANDARD ARM ADDITIONAL COUNTERWEIGHT RAISED BLADE Unit kg 1 m 1 5 m 2 m 2 5 m 3 m 3 5 m Max...

Страница 250: ...2 0 m 229 229 235 200 242 175 1 5 m 296 296 268 264 249 198 244 158 1 0 m 417 354 324 255 276 193 247 149 0 5 m 527 336 378 246 302 188 253 148 253 148 0 m 957 484 584 325 412 239 317 184 259 152 0 5...

Страница 251: ...88 277 205 218 156 1 0 m 1175 868 597 436 385 302 281 207 261 190 1 5 m 422 422 266 266 265 265 ROPS CAB STANDARD ARM ADDITIONAL COUNTERWEIGHT LOWERED BLADE Unit kg 1 m 1 5 m 2 m 2 5 m 3 m 3 5 m Max 3...

Страница 252: ...1 184 142 1 0 m 1204 784 582 401 375 280 272 202 213 165 1 5 m 1045 786 594 405 382 290 257 218 ROPS CAB LONG ARM ADDITIONAL COUNTERWEIGHT LOWERED BLADE Unit kg 1 m 1 5 m 2 m 2 5 m 3 m 3 5 m Max 3 0 m...

Страница 253: ...AUTHORISED OPTIONAL EQUIPMENT 251 WEAM012405...

Страница 254: ...y read and understand the in struction manuals for the machine and the attachment or option q If you lose the instruction manual or it is damaged always obtain an new copy from the attachment manufact...

Страница 255: ...calculated so allow extra space to the swing position when swinging Q The hydraulic drift of the work equipment the amount of the work equipment moves down under its own weight when it is stopped in a...

Страница 256: ...ce valve working pressure 1st attachment 20 6 MPa 206 bar q Optional Safety service valve working pressure 1st attachment MPa bar q Standard Service valve safety pressure 1st attachment MPa bar 6 2 1...

Страница 257: ...ith safety but may also have an adverse effect on the operation of the machine and the life of the equipment q Any injuries accidents or damage resulting from the use of unauthorized attachments or op...

Страница 258: ...th Working pressure Working flow Main dimension ISO capacity Lift capacity Height Width kg Mpa l min mm mm m3 kg 1 Core machine PC16R 3 1450 PC16R 3 HS 1610 2 Work Equipment Boom 1760 mm Equipment 81...

Страница 259: ...NTS 257 6 4 MACHINE CONFIGURATION FOR THE INSTALLATION OF ATTACHMENTS 6 4 1 POSITION OF THE DEVICES RKA23120 1 2 Quick couplers Selection valve 3 4 Optional equipment control pedal Pedal locking devic...

Страница 260: ...iring the use of the hydraulic breaker Spool A completely rotated clockwise Use a 10 mm hexagonal wrench 3 Optional equipment control pedal The pedal 3 controls oil delivery to and return from the opt...

Страница 261: ...e engine and move the hydraulic controls in all direc tions in order to release the residual pressures present in the circuits of the machine 2 Press the optional equipment control pedal to release th...

Страница 262: ...ng the air sucked in by the cylinders may damage the piston gaskets 3 Slowly make all cylinders reach the end of stroke for 3 4 times 4 Press the optional equipment control pedal a dozen times to blee...

Страница 263: ...THE DEVICES 1 Quick coupler 1st attachment 2 Equipment 2nd attachment 3 Selection valve 4 Attachment proportional roller 1st line breaker activation 5 Attachment proportional roller 2nd 3rd line 6 Hor...

Страница 264: ...ents used for attachment 2nd line are NOTE When the attachments are removed fit the cap on the hose q When the attachments are fitted remove the cap and clean the hose carefully before connecting the...

Страница 265: ...side of the roller for general attachment the oil flows towards the piping of 1st line on the right side of the arm hydraulic tank side q Activation of the left side of the roller for general attachme...

Страница 266: ...vation of the 2nd line is marked by a light a positioned on the left armrest When the left switch is pressed the 3rd line is activated Press the switch again the 3rd line is turned off The activation...

Страница 267: ...d q Pos B LED off disables the quick coupler activation switch For more details see 6 6 HYDRAULIC QUICK COUPLER SIN GLE EFFECT 11 3rd line The 3rd line uses for its operation the same control hydrauli...

Страница 268: ...lt q Before leaving the driver seat lower the equipment to the ground lock the controls with the safety lever and stop the engine IMPORTANT q The horn push button is positioned on the right lever grip...

Страница 269: ...e equipment q Carry out lifting operations only with the machine positioned on firm and flat ground NOTE q The load does not exceed 87 of the hydraulic lifting capacity or 75 of the tipping limit Load...

Страница 270: ...30 150 215 125 0 m 350 200 240 140 210 130 1 0 m VARIABLE GAUGE EXTENDED LOWERED BLADEUnit of measurement 2 m 3 m Max 3 0 m 2 0 m 190 190 200 195 200 200 1 0 m 380 370 235 230 225 210 0 m 400 350 280...

Страница 271: ...the bucket as described in 3 3 14 CHANGING THE BUCKET and carry out the hydraulic connections using the pipes arranged After connecting the mechanical retainers carry out the hydraulic connections by...

Страница 272: ...ing the maintenance operations required for the equipment see the specific operation manuals 6 5 4 4 BLEEDING 1 After connecting the pipes start the engine and let it idle for approximately 10 minutes...

Страница 273: ...ivation of the proportional equipment switch or the breaker switch can cause serious incidents The equipment works as described below 6 5 5 1 WHEN USING HAMMER 1st attachment line Precautions for use...

Страница 274: ...onsult the user manual supplied by the hammer manufac turer 6 5 6 LONG PERIODS OF INACTIVITY If the machine is going to remain unused for a long period proceed as indicated below q Put the plug on the...

Страница 275: ...s three times for 2 seconds 7 Move the roller all the way to the left and press the button 2 for 5 seconds The green led does not blink and the red led blinks rapidly 8 Press the button 2 for 2 second...

Страница 276: ...oupling user manual and follow the recommendations In case of doubts about the installation or operation consult the Komatsu distributor 4 The pressure adjustment valve 3 allows to limit the quick cou...

Страница 277: ...GLE EFFECT 275 6 6 1 POSITION OF THE DEVICES 1 Hydraulic quick coupler switch 2 Quick coupler operation switch 3 Pressure adjustment valve 4 Hydraulic quick coupler connection DIN CONICO M12x1 5 unloc...

Страница 278: ...ables the quick coupler activation switch 4 With switch 1 in position A press and hold the switch 2 of the right lever to activate the quick coupler WARNING q European safety standards require that is...

Страница 279: ...fety mechanism which prevents accidental activation Slide the stop near itself and then press the switch The light of the switch switches on and the horn sounds 3 With the switch 1 in B position press...

Страница 280: ...eaker make sure that the spool of the selection valve 1 is completely rotated clockwise and resting against its retainer position b q When using the breaker shift the accelerator almost to max idling...

Страница 281: ...the selection valve 1 is completely rotated counterclockwise and resting against its retainer position a q For further details and other precautions to be taken when han dling the equipment carefully...

Страница 282: ...led q Use only optional or special equipment recommended and approved by Komatsu and in compliance with the requirements indicated see 6 3 2 ATTACHMENT CONFIGURATION 6 8 1 HYDRAULIC BREAKER MAIN APPLI...

Страница 283: ...if the chisel does not penetrate or break the surface within 1 min ute change the point of impact and carry out breaking opera tions closer to the edge q The direction of penetration of the chisel and...

Страница 284: ...ll cylinders to the end of their strokes Always leave approximately 5 cm to spare q Using the mount to gather in pieces of rock q Operations using the swing force q Moving the tool while it is hitting...

Страница 285: ...se the breaker holding it in the right posture IMPORTANT q If grease is injected with the breaker in the wrong position the breaker circuit will receive more grease than necessary Consequently soil an...

Страница 286: ...284 WEAM012405...

Страница 287: ......

Страница 288: ...2017 KOMATSU ITALIA MANUFACTURING S p A All Rights Reserved Printed in Europe 02 2017...

Отзывы: