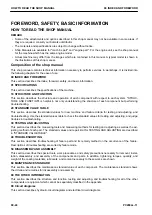
background image

• Be sure to assemble all parts again in their original places. Replace any damaged parts and parts which

must not be reused with new parts. When installing hoses and wiring harnesses, be sure that they will not

be damaged by contact with other parts when the machine is operated.

• When installing high pressure hoses and tubes, make sure that they are not twisted. Damaged hoses and

tubes are dangerous, so be extremely careful when installing hoses and tubes for high pressure circuits. In

addition, check that high pressure hoses and tubes are correctly installed.

• When assembling or installing parts, always tighten them to the specified torques. When installing protec-

tive parts such as guards, or parts which vibrate violently or rotate at high speed, check again that they are

installed correctly.

• Never insert your fingers or hand when aligning 2 holes. Be careful not to get your fingers caught in a hole.
• Check that the measuring tools are correctly installed when measuring hydraulic pressure.
• Take care when removing or installing the tracks of track-type machines. Since the track shoe may sepa-

rate suddenly when you remove it, never let anyone stand at either end of the track shoe.

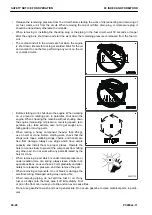
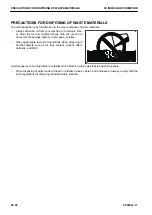
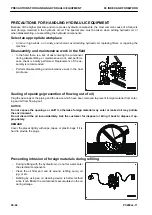
• If the engine is operated for a long time in a closed place

with  poor  ventilation,  it  may  cause  gas  poisoning.  Open

the windows and doors to ventilate the place well.

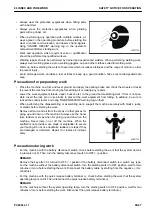
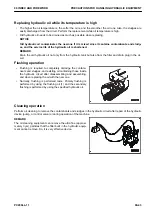
Precautions for slinging work and making signals

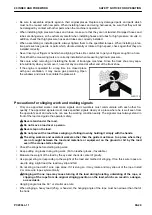
• Only  one  appointed  worker  must  make  signals  and  co-workers  must  communicate  with  each  other  fre-

quently. The appointed signaler must make specified signals clearly at a place where he is well seen from

the operator's seat and where he can see the working condition easily. The signaler must always stand in

front of the load and guide the operator safely.

k

Never stand under the load.

k

Do not move a load over a person.

k

Never step on the load.

k

Do not prevent the load from swinging or falling down by holding it simply with the hands.

k

The sling workers and assistant workers other than the guide must move to a place where they
are  not  caught  between  the  load  and  materials  or  equipment  on  the  ground  or  hit  by  the  load
even if the crane starts abruptly.

• Check the slings before starting sling work.
• Keep putting on gloves during sling work. (Put on leather gloves, if available.)
• Measure the weight of the load by the eye and check its center of gravity.
• Use proper sling corresponding to the weight of the load and method of slinging. If too thick wire ropes are

used to sling a light load, the load may slip and fall.

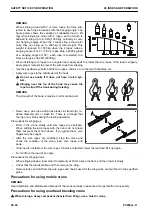
• Do not sling a load with 1 wire rope alone. If it is slung so, it may rotate and may slip out of the rope. Install

2 or more wire ropes symmetrically.

k

 Slinging with one rope may cause turning of the load during hoisting, untwisting of the rope, or

slipping of the rope from its original slinging position on the load, which can result in a danger-
ous accident.

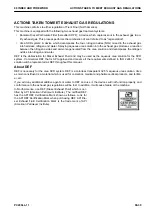
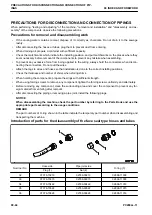
• Hanging angle must be 60 ° or smaller as a rule.
• When slinging a heavy load (25 kg or heavier), the hanging angle of the rope must be narrower than that of

the hook.

,&

00 INDEX AND FOREWORD

SAFETY NOTICE FOR OPERATION

PC290LL-11

00-29

Содержание A29501

Страница 1: ...olicy to improve our products whenever it is possible and practical to do so We reserve the right to make changes or improvements at any time without incurring any obligation to install such changes o...

Страница 2: ...Find manuals at https best manuals com...

Страница 3: ...00 INDEX AND FOREWORD PC290LL 11 00 1 Find manuals at https best manuals com...

Страница 4: ...NECTING AND CONNECTING CONNECTOR WITH LOCK TO PULL 00 66 METHOD FOR DISCONNECTING AND CONNECTING CONNECTOR WITH LOCK TO PUSH 00 67 METHOD FOR DISCONNECTING AND CONNECTING CONNECTOR WITH HOUSING TO ROT...

Страница 5: ...WORK EQUIPMENT SYSTEM 10 251 SWING SYSTEM 10 267 LAYOUT DRAWING OF SWING SYSTEM 10 267 SWING CONTROL SYSTEM DIAGRAM 10 271 COMPONENT PARTS OF SWING SYSTEM 10 277 TRAVEL SYSTEM 10 291 LAYOUT DRAWING OF...

Страница 6: ...6 TEST SWING CIRCLE BEARING CLEARANCE 30 86 UNDERCARRIAGE AND FRAME 30 88 TEST AND ADJUST TRACK TENSION 30 88 HYDRAULIC SYSTEM 30 90 RELEASE REMAINING PRESSURE FROM HYDRAULIC SYSTEM 30 90 TEST AND ADJ...

Страница 7: ...FAILURE CODE 879EMC Ventilation Damper Malfunction 40 179 FAILURE CODE 879FMC Air Mix Damper Malfunction 40 180 FAILURE CODE 879GKX Refrigerant Pressure Input Signal Out of Range 40 181 FAILURE CODE 9...

Страница 8: ...ne Controller Internal Failure 40 268 FAILURE CODE CA351 Injectors Drive Circuit Error 40 269 FAILURE CODE CA352 Sensor 1 Supply Voltage Low Error 40 270 FAILURE CODE CA356 MAF Sensor High Error 40 27...

Страница 9: ...gh Error 2 40 377 FAILURE CODE CA1942 Crankcase Pressure Sensor In Range Error 40 382 FAILURE CODE CA1993 KDPF Differential Pressure Low Error 40 383 FAILURE CODE CA2185 Throttle Sensor Supply Voltage...

Страница 10: ...emperature Sensor Low Error 40 508 FAILURE CODE CA3322 KDPF Outlet Temperature Sensor In Range Error 40 510 FAILURE CODE CA3419 MAF Sensor Supply Voltage High Error 40 512 FAILURE CODE CA3421 MAF Sens...

Страница 11: ...4166 SCR Temperature Sensor ECU High Temperature Error 40 649 FAILURE CODE CA4168 DEF Pump Heater ON Stuck Error 40 651 FAILURE CODE CA4169 DEF Pump Heater OFF Stuck Error 40 654 FAILURE CODE CA4171 D...

Страница 12: ...ensor Frozen 40 776 FAILURE CODE DHPAMA Front Pump Pressure Sensor Defective Function 40 778 FAILURE CODE DHPBMA Rear Pump Pressure Sensor Defective Function 40 781 FAILURE CODE DHS3MA RB Arm IN LL Ar...

Страница 13: ...olenoid Short Circuit 40 903 FAILURE CODE DXE6KA Merge divider LS Solenoid Open Circuit 40 905 FAILURE CODE DXE6KB Merge divider LS Solenoid Short Circuit 40 907 FAILURE CODE DXE7KA Attachment Flow Re...

Страница 14: ...DOES NOT MOVE FROM MINIMUM OR MAXIMUM 40 987 E 22 DISPLAY OF HYDRAULIC OIL TEMPERATURE GAUGE DIFFERS FROM ACTUAL OIL TEM PERATURE 40 989 E 23 SOME AREAS OF MACHINE MONITOR SCREEN ARE NOT DISPLAYED 40...

Страница 15: ...N MENTIONED IN TROUBLESHOOTING TABLE H MODE 40 1041 SYSTEM CHART OF HYDRAULIC AND MECHANICAL SYSTEMS 40 1042 FAILURE MODE AND CAUSE TABLE 40 1044 H 1 ANY OF WORK EQUIPMENT SWING AND TRAVEL DOES NOT WO...

Страница 16: ...ARTABILITY IS POOR 40 1110 S 5 ENGINE DOES NOT PICK UP SMOOTHLY 40 1112 S 6 ENGINE STOPS DURING OPERATION 40 1114 S 7 ENGINE RUNS ROUGH OR IS UNSTABLE 40 1116 S 8 ENGINE LACKS POWER 40 1117 S 9 KDPF G...

Страница 17: ...NSTALL AIR CLEANER ASSEMBLY 50 272 REMOVE AND INSTALL AIR CONDITIONER COMPRESSOR ASSEMBLY 50 275 REMOVE AND INSTALL AIR CONDITIONER CONDENSER ASSEMBLY 50 280 POWER TRAIN 50 282 REMOVE AND INSTALL TRAV...

Страница 18: ...T 60 8 MAINTENANCE STANDARD OF COOLING SYSTEM 60 9 POWER TRAIN 60 10 MAINTENANCE STANDARD OF SWING CIRCLE 60 10 MAINTENANCE STANDARD OF SWING MACHINERY 60 11 MAINTENANCE STANDARD OF FINAL DRIVE 60 13...

Страница 19: ...ECIRC AIR CHANGEOVER 80 47 TEST SUNLIGHT SENSOR 80 48 TEST DUAL PRESSURE SWITCH FOR REFRIGERANT 80 49 TEST RELAYS 80 50 AIR CONDITIONER TROUBLESHOOTING CHART 1 80 51 AIR CONDITIONER TROUBLESHOOTING CH...

Страница 20: ...CIRCUIT DIAGRAM 1 3 90 8 HYDRAULIC CIRCUIT DIAGRAM 2 3 90 10 HYDRAULIC CIRCUIT DIAGRAM 3 3 90 12 ELECTRICAL CIRCUIT DIAGRAM 90 13 SYMBOLS IN ELECTRICAL CIRCUIT DIAGRAMS 90 13 ELECTRICAL CIRCUIT DIAGR...

Страница 21: ...n auto matically applies the retarder with a constant braking force HD HM ARSC Automatic Retarder Speed Control Travel and brake When the accelerator pedal is released while the machine is traveling d...

Страница 22: ...raulic system This mechanism allows actuators to be operated in proportion to the current supplied FOPS Falling Object Protective Structure Cab and canopy This structure protects the operator s head f...

Страница 23: ...the opti mum force and at the same time activates the in ter axle differential lock when the wheels idle while the machine travels on the soft ground road HM KVGT Komatsu Variable Ge ometry Turbochar...

Страница 24: ...essure PPM Piston Pump and Motor Hydraulic system Piston type hydraulic pump and motor D PC etc PTO Power Take Off Power train system Power take off mechanism PTP Power Tilt and power Pitch dozer Work...

Страница 25: ...Auxiliary BR Battery Relay CW Clockwise CCW Counter Clockwise ECU Electronic Control Unit ECM Electronic Control Module ENG Engine EXGND External Ground F G Frame Ground GND Ground IMA Inlet Metering...

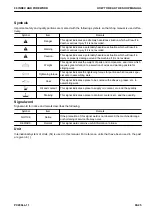
Страница 26: ...adjusting and troubleshooting Use the standard values table to check the standard values for testing and adjusting and judge troubles in troubleshooting 30 TESTING AND ADJUSTING This section describe...

Страница 27: ...ing posture for slinging work Tightening torque This signal indicates the tightening torque for portions which requires spe cial care in assembling work Coat This signal indicates a place to be coated...

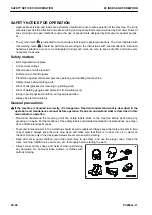
Страница 28: ...in good physical condition and good preparation Always be alert and careful General precautions k If the machine is handled incorrectly it is dangerous Read and understand what is described in the ope...

Страница 29: ...levers and hang UNDER REPAIR warning tag on them When performing the disassembling or assembling work support the machine securely with blocks jacks or stands before starting the work Remove all mud...

Страница 30: ...caught in ro tating parts or moving parts When raising a heavy component heavier than 25 kg use a hoist or crane Before starting work check that the slings wire ropes webbing slings chains and hooks a...

Страница 31: ...workers must communicate with each other fre quently The appointed signaler must make specified signals clearly at a place where he is well seen from the operator s seat and where he can see the worki...

Страница 32: ...ok is maximum at its central part Never use a wire rope which has breaks in strands A re duced diameter B or kinks C There is a danger that the rope may break during the towing operation Precautions f...

Страница 33: ...o work and passage After operating the hoist do not swing the control switch Remember the position of the main switch so that you can turn off the power immediately in an emer gency If the hoist stops...

Страница 34: ...to use 2 wrenches use one wrench to fix and use the other one to loosen the nut Precautions for air conditioner piping When installing the air conditioner piping be careful so that dirt dusts and wate...

Страница 35: ...An O ring is fitted to every joint of the air conditioner piping For tightening torques see PRECAUTIONS FOR DISCON NECTING AND CONNECTING HOSES AND TUBES IN AIR CONDITIONER PIPINGS 80 85 00 INDEX AND...

Страница 36: ...umulated or attached to or around the engine exhaust manifold muffler or battery or on the undercovers To prevent fires from being caught remove any flammable materials such as dry leaves chips pieces...

Страница 37: ...ee the Operation and Maintenance Manual for the setting procedure Explosion caused by lighting equipment When checking fuel oil battery electrolyte or coolant always use lighting equipment with anti e...

Страница 38: ...hen they are inhaled Do not breathe the fumes After a fire there may be harmful compounds left If they touch your skin they may have a bad influence on your body Be sure to wear rubber gloves when han...

Страница 39: ...he cab and riser assembly when the machine is on a slope Do not tilt the cab and riser assembly in windy conditions When the tilt operation is being performed ensure that the work equipment is in an e...

Страница 40: ...or lakes Obey appropriate laws and regulations when disposing of harmful objects such as oil fuel coolant solvent filters batteries and DEF Avoid exposure to burning rubber or plastics which produce a...

Страница 41: ...R system Commercial DEF that is API approved and meets all the requirements defined in ISO 22241 1 This solution will be represented as DEF throughout this manual About DEF DEF is necessary for the ur...

Страница 42: ...l up its con tainer for storage When opening the container perform it where there is good ventilation For storage see STORE DEF 00 41 Store DEF avoiding direct sunlight Always use the original contain...

Страница 43: ...rage area Storage period Max 10 C Up to 36 months Max 25 C Up to 18 months Max 30 C Up to 12 months Max 35 C Up to 6 months Do not store DEF in the temperature of 35 C or above Handling DEF in cold we...

Страница 44: ...aling of openings prevention of flowing out of oil Plug the openings of the piping and the device which have been removed to prevent foreign material from enter ing and oil from flowing out NOTICE Do...

Страница 45: ...required to completely dislodge the contami nants and sludges and existing oil containing those inside the hydraulic circuit after disassembling and assembling and when replacing the oil with the new...

Страница 46: ...ckness and number of shims when storing shims When hoisting the components prepare the slings with sufficient strength When using forcing screws to remove any component tighten the forcing screws unif...

Страница 47: ...n of the split flange type hoses and tubes Nomi nal No Bolt pitch mm Hose side Tube side O ring 4 Bolt 5 Washer 6 a b Flange 1 Split flange 2 Sleeve head 3 04 38 1 17 5 07379 00400 07371 30400 07378 1...

Страница 48: ...1643 51232 30 106 4 62 07379 03010 07371 13010 07378 13000 07000 12085 07372 51650 01643 51645 34 120 6 69 8 07379 03411 07371 13411 07378 13400 07000 12100 07372 51650 01643 51645 40 130 2 77 8 07379...

Страница 49: ...ps of adhesive to the threaded portion When applying liquid gasket clean and degrease the surface and apply it uniformly after making sure that the surface is free from dust or damage Clean all of the...

Страница 50: ...t of grease to the work equipment parts When the coolant is drained be sure that the drain valve is securely tightened then refill the coolant reser voir with the coolant Komatsu recommends to the spe...

Страница 51: ...lation portion If there is any damage replace the part Check that there is no looseness on the exhaust equipment and mounting bolts nuts and clamps on the instal lation portion If there is any loosene...

Страница 52: ...it is necessary to be extremely careful when handling and maintenance of the wiring harnesses If DEF is spilled over wiring harness and connectors it may cause corrosion and defective contact Be caref...

Страница 53: ...icity Entry of water dirt or dust when disconnecting a con nector If any water mud or dust is stuck to the outside surface of a connector it can enter inside the connector when the connector is discon...

Страница 54: ...y pollute the environ ment Do not discard the oil inconsiderately Ask the customer for disposal or bring it back to dispose it appropriately How to clean parts when dirt is stuck If any dirt or dust s...

Страница 55: ...l when servicing the intake system Select an appropriate workplace Avoid the work of adding hydraulic oil replacing filters or repairing the machine in rainy or windy weather or in dusty environment S...

Страница 56: ...undness of machine in addition to KOMTRAX function described above These data can be used on per sonal computer screens How to make a full use of KOMTRAX Making use of KOMTRAX enables the following ac...

Страница 57: ...connection 1 Hold adapter 1 and push hose joint 2 into mating adapter 3 REMARK Push it in approximately 3 5 mm Do not hold rubber cap portion 4 2 While having adapter 3 inserted into hose side joint 2...

Страница 58: ...isconnection 1 Hold the tightening adapter part and push body 2 straight until sliding prevention ring 1 contacts contact surface a of the hexagonal part at the male end 2 While keeping the condition...

Страница 59: ...traight until sliding prevention ring 1 contacts contact surface a of the hexagonal part at the male end 2 While keeping the condition of step 1 push cover 3 straight until it contacts contact surface...

Страница 60: ...ning adapter part and push body 2 straight un til sliding prevention ring 1 contacts contact surface a of the hexagonal part at the male end DISCONNECT AND CONNECT PUSH PULL TYPE COUPLER 00 INDEX AND...

Страница 61: ...This as a preview PDF file from best manuals com Download full PDF manual at best manuals com...

Отзывы: