background image

LFO 

AND

 E

NVELOPE

 G

ENERATOR

LFO

The LFO provided on the RH301 is the perfect companion for the clock syncing functions described earlier.

If you have your gear running in sync it gives you an extra CV source that can automatically be synced to
the master clock or a division/multiple of it. The output of the LFO as well as the inverted LFO is 0V – 7.6V.

The LFO has four easy to understand controls:

With the RATE knob you adjust the frequency of the LFO. If it's running in sync mode with the master clock
you can choose between the various divisions and multiples of the master tempo. If the LFO is running in

free mode you can change the frequency continuously from 0.25Hz to 260Hz. The LFO is not intended to
be used as a proper voltage controlled oscillator; it does not respond with 1 octave per volt and in the

higher frequencies the stability is less than 100%.
While the LFO is in sync mode, it will always need one bar in order to adjust to the newly set division after

you haven chosen a new division.

The SHAPE dial lets you choose between the  five different waveforms of the LFO: sine, triangle, square,
sample and hold (S&H), and a special waveform which is composed of a sine wave and digital noise.

With the SYMMETRY knob you can bend the waveform. The wave shaping is wavetable based so it will not

be linear for the sine wave and the triangle. For the square wave the SYMMETRY acts like a pulse width
modulation; it ranges from 10% duty cycle to 90% duty cycle. For the S&H output the symmetry adds noise

to the LFO signal. For the “noisine” waveform the symmetry knob changes the noise level.

The SYMMETRY knob has a dent at the 50% setting, so it is easy to find the original, non-shaped waveforms.
Take your time and try the waveforms separately and change the symmetry to get an idea of what you're

changing.

LFO RANGE and SYMMETRY can be modulated by external CVs as well (see Control Voltage Theory
section for more information on that). Please keep in mind that the incoming CV signal (LFO SPEED input)

acts as if you would turn the potentiometer from fully counter-clockwise (CCW) to fully clockwise (CW),
so a rising CV signal from 0V – 5V gets you through the divisions from fast to slow in sync mode but gets

you from a low frequency to the fastest one in Hz mode.

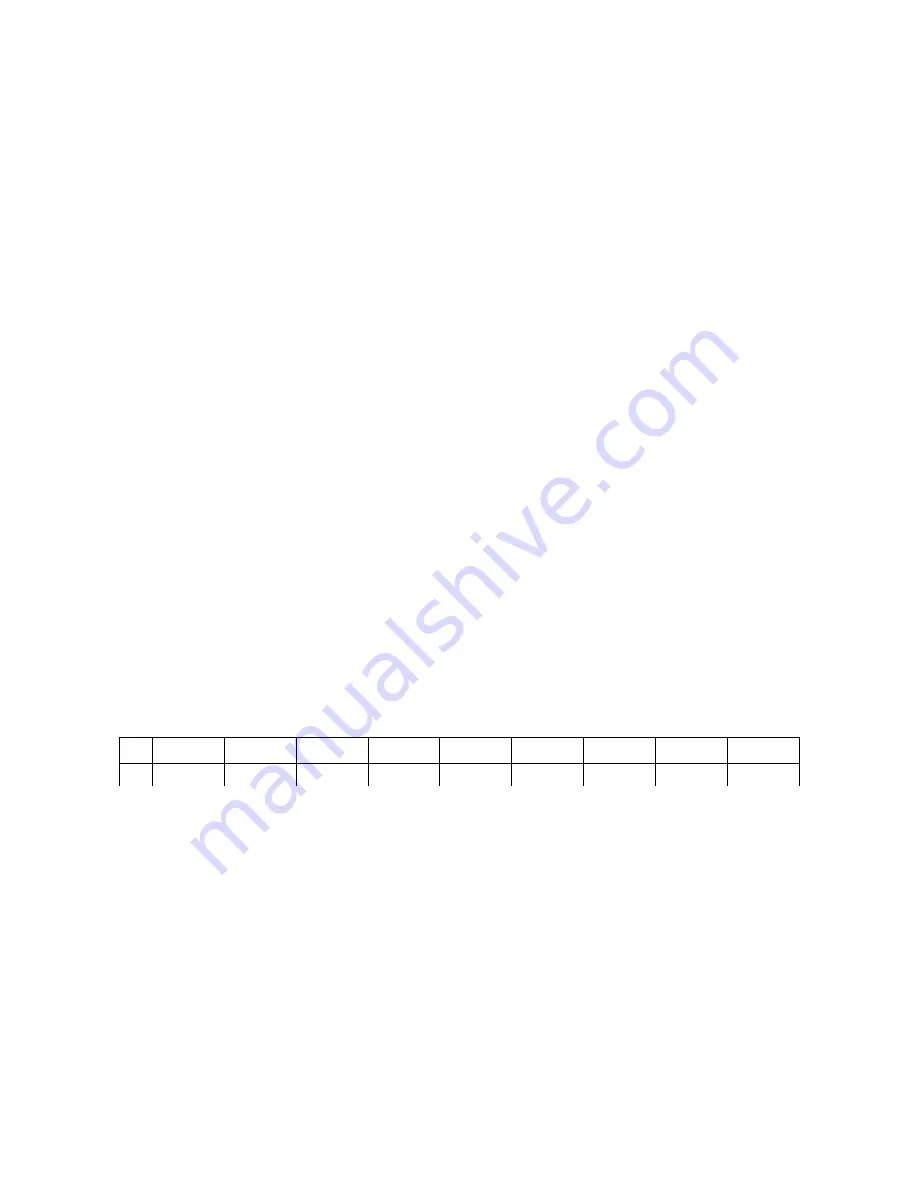
Here is a table for the CV if you want to change your LFO division precisely:

:16

:8

:4

:3

:2

x1

x2

x3

x4

CV

0V– 0.55V

0.56V-1.1V

1.11V-1.65V 1.66V-2.2V

2.21V-2.75V 2.76V-3.3V

3.31V-3.85V 3.86V-4.4V

4.41V-5.0V

Envelope Generator

The RH301 also comes  with an envelope generator onboard. For the most part it is a classic  ADSR

envelope generator with the addition of the RANGE knob. The RANGE knob is used to scale the time
ranges   of   the  ATTACK,  DECAY   and   RELEASE   stages.  Simultaneously   the   behavior   of  the   envelope   is

changed from linear to logarithmic. The output of the envelope ranges from 0V – 7.6V.

SUSTAIN is not affected by the RANGE knob as its time is solely affected by the envelope gate. If the
envelope generator is synced to the master clock or the division, the gate is high for exactly 50% of the

corresponding beat.

The RANGE knob scales the time ranges of the attack, decay and release stages from 3ms – 400ms to 40ms
– 4s. At the same time the response curve of the envelope changes gradually from linear to logarithmic, so

you have a snappy linear envelope in the shorter times and a more organic feeling envelope with longer
times.

You can trigger the envelope externally through the ENV GATE input, either with a trigger or a gate signal.

KOMA Elektronik RH301 – Rhythm  Workstation / Utility Tool

Page 8

Содержание RH301

Страница 1: ...KOMA Elektronik RH301 Rhythm Workstation Utility Tool USER MANUAL version 2 1 2014 KOMA Elektronik All rights reserved KOMA Elektronik RH301 Rhythm Workstation Utility Tool Page 1...

Страница 2: ...Envelope Generator 8 Control Voltage Theory 10 Patch Bay and Rear Connections 11 Updating Firmware 12 Examples 13 Troubleshooting 15 Some Nice Tricks 16 Technical Specifications 17 Warranty 19 Imprint...

Страница 3: ...hru and MIDI Out sockets And that s not all besides having a master clock section the RH301 is also fitted with a LFO which can be synced to the master clock a division of the master clock or run free...

Страница 4: ...freely set the main tempo of the pedal with the TEMPO button The EXT position serves as your choice i e if you want the pedal to sync to either MIDI or DIN Sync input LFO The LFO low frequency oscill...

Страница 5: ...start stop signals over MIDI and DIN Sync Sensor One of the features on your RH301 that you won t find in any other pedal is the possibility to control the features of the pedals with the on board mot...

Страница 6: ...atible with Fig 2The difference between MIDI DIN Sync and Analog Clock Signals MIDI is a digital communication standard from the 80s coming in the flavor of a serial protocol With MIDI clock the clock...

Страница 7: ...to having your pedal synced to a MIDI signal An incoming start stop gate is translated into a corresponding start stop byte on the MIDI OUT connection If no start stop gate is being received by the pe...

Страница 8: ...haped waveforms Take your time and try the waveforms separately and change the symmetry to get an idea of what you re changing LFO RANGE and SYMMETRY can be modulated by external CVs as well see Contr...

Страница 9: ...and will then proceed to the release stage If you trigger the envelope with an external trigger the SUSTAIN knob simply determines the level that the envelope falls to between the decay and release s...

Страница 10: ...e word CV until you hear your desired result By turning it counter clockwise you attenuate the incoming CV signal Fully counter clockwise means that the incoming CV signal is completely gone whereas f...

Страница 11: ...put This CV input accepts rising edge driven analog clock signals Every time a signal rises from 0V 3V the pedal counts one beat LFO SPEED CV input The LFO SPEED CV input controls the speed of the LFO...

Страница 12: ...r gate arrives at this input the RH301 will react as if the pushbutton on the pedal would have been pressed You can use this input to externally start stop the RH301 when in FREE mode re sync it when...

Страница 13: ...a computer running DAW software is the provider of the master clock signal In the example above a drum computer with DIN Sync Out is providing the master clock signal KOMA Elektronik RH301 Rhythm Wor...

Страница 14: ...KOMA Elektronik RH301 Rhythm Workstation Utility Tool Page 14...

Страница 15: ...sound cards hardware MIDI controllers etc Try to prevent ground loops and check your MIDI connections did we already mention that a lot of problems come from cheap or broken MIDI cables When I connec...

Страница 16: ...dard 1 4 patch cable and connect it from the envelope output to the LFO speed input Set both LFO and envelope generator to sync and create a slowly changing envelope The envelope will change the LFO d...

Страница 17: ...rol to set the attack time of the envelope DECAY Rotary control to set the decay time of the envelope SUSTAIN Rotary control to set the level of the envelope while the gate is high RELEASE Rotary cont...

Страница 18: ...output 0 8V of the onboard motion sensor for usage with CV inputs on the pedal other KOMA Elektronik pedals or other voltage controlled devices All patch bay inputs and outputs are mono inch phone ja...

Страница 19: ...ENR CKSENDUNG and carefully pack your product ship the product to KOMA Elektronik with transportation and insurance charges paid and include your return shipping address What will we do Once received...

Отзывы:

Похожие инструкции для RH301