background image

QUICK-MOUNT WINCH KIT

Assembly / Owner’s Manual

APPLICATION: Kawasaki MULE

Pro-FX / FXT / FXR /

DX / DXT

Verify accessory fitment at Kolpin.com

Instr 26-2000

Rev 01 2020-09

Page 1 of 12

P/N 26-2000

KAWASAKI MULE

QUICK-MOUNT 4500

LB WINCH KIT

Содержание KAWASAKI MULE QUICK-MOUNT 4500

Страница 1: ...CH KIT Assembly Owner s Manual APPLICATION Kawasaki MULE Pro FX FXT FXR DX DXT Verify accessory fitment at Kolpin com Instr 26 2000 Rev 01 2020 09 Page 1 of 12 P N 26 2000 KAWASAKI MULE QUICK MOUNT 45...

Страница 2: ...nsure a satisfactory installation follow all steps correctly and in the sequence described Keep these instructions for future reference or for informational requests To facilitate installation make su...

Страница 3: ...1 1 Winch Assembly 4500 lb n a 2 1 3 Wire Splitter n a 3 1 Winch Switch 25 0700 4 1 UTV Dash Switch Harness n a 5 1 Remote Switch n a 6 2 Screw Torx Pan Head HI LO 10 x 3 4 7512026 7 2 Washer Flat M5...

Страница 4: ...50R 1 6 1 Cable Winch Blue 6 GA 241 mm n a 1 7 1 Cable Winch Yellow 6 GA 241 mm n a 1 8 1 Cable Power Red 6 GA 2184 mm n a 1 9 1 Cable Power Black 6 GA 2197 mm n a 1 10 1 Contactor 85068 1 11 2 Screw...

Страница 5: ...bolt and nut 5 Remove and keep three bottom bumper bolts Remove and set aside bumper 6 Remove and set aside seat 7 Disconnect battery as shown in Owner s Manual ACCESSORY INSTALLATION WINCH INSTALLAT...

Страница 6: ...ification TORQUE Winch Bracket Nuts a 34 ft lbs 46 N m 6 Attach winch power cables to parking brake cable transmission shifting cable bundle with two cable ties i 7 Put bundle of cables through hook o...

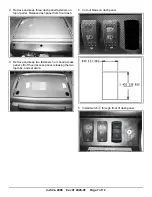
Страница 7: ...h panel fasteners on top of panel Release dash panel from front dash 3 Remove and keep two fasteners from hood access panel Lift off hood access panel releasing the two top tabs and set aside 4 Cut ou...

Страница 8: ...led hole and mark screw holes on dash panel Remove remote port 9 Drill two holes 5 32 in 4 mm in dash panel 10 Install two screws y and two washers u to attach remote to dashboard Tighten until fully...

Страница 9: ...onnect AND tighten red positive battery cable FIRST Failure to comply will result in a high current electrical arc that may result in battery explosion if tool touches grounded frame Death or serious...

Страница 10: ...sembly Defective motor Check for voltage at armature port with switch pressed If voltage is present replace winch assembly Nested and bounded cable within winch assembly Move free spool knob to the fr...

Страница 11: ...ates in one direction only Defective or stuck contactor Tap contactor to loosen contacts Repair or replace contactor Defective switch assembly Replace switch assembly Defective brake assembly Replace...

Страница 12: ...please call 1 877 956 5746 for a Return Merchandise Authorization RMA number and shipping instructions This warranty does not apply to parts that have been damaged by accident alteration abuse imprope...

Отзывы: