background image

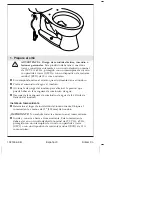
5. Connect the Water Supply

CAUTION: Risk of property damage.

Do not push or pull

on the water connection between the seat and the water
supply stop. This will prevent water leakage.

NOTICE:

Use care to avoid cross threading or overtightening the

connections. Use an adjustable wrench to tighten one-quarter turn
past hand tight.

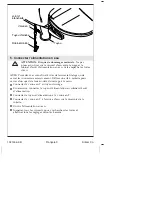
Connect the T-valve to the seat hose.

If needed, connect the supply hose to the supply stop.

Connect the supply hose to the T-valve.

Connect the T-valve to the water inlet on the toilet tank.

Turn on the water supply.

Check all connections for leaks and make any adjustments as
needed.

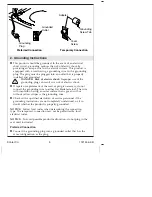
Hose

Gasket

T-Valve

Supply Stop

Supply Hose

1321456-2-B

10

Kohler Co.

Содержание Novita K-BN330-N0

Страница 1: ...Installation Guide Cleansing Seat Français page Français 1 Español pagina Español 1 1321456 2 B ...

Страница 2: ...e Do not supply electrical power to the unit until the plumbing installation work has been completed as it may cause the product to malfunction Observe all local plumbing electrical and building codes Only connect the seat to a drinking quality cold water supply with a pressure of 20 139 kPa 80 psi 551 kPa CAUTION Risk of property damage Damaged water connections may leak Do not push or pull on th...

Страница 3: ...Tools and Materials PLUS Plastic wrap Kohler Co 3 1321456 2 B ...

Страница 4: ... the toilet to relieve any pressure from the water supply hose Disconnect the water supply hose from the toilet fill valve Install an Electrical Outlet Determine the electrical outlet location Locate the electrical outlet within 12 305 mm of the toilet IMPORTANT Do not plug the seat into the electrical outlet at this time Install and ground the electrical outlet This electrical outlet must be a de...

Страница 5: ...blade terminal The wire with insulation having an outer surface that is green with or without yellow stripes is the grounding wire Check with a qualified electrician or service personnel if the grounding instructions are not completely understood or if in doubt whether the product is properly grounded NOTICE Follow local codes when determining the connection type The temporary connection may not b...

Страница 6: ...adapter grounding screw tab to the cover screw will NOT ground the unit If there is any doubt whether the cover screw is grounded have it checked by a qualified electrician or service professional A temporary connection with a two prong adapter may be used where local codes permit provided the adapter is grounded 1321456 2 B 6 Kohler Co ...

Страница 7: ...ded mounting holes Insert the bolts through the washers and thread into the mounting holes Do not fully tighten at this time For all other installations Insert the bolts through the washers and into the mounting holes Thread a nut gasket and flat washer onto each bolt Do not fully tighten at this time Mounting Plate Bolt Washer Flat Washer Nut Gasket Kohler Co 7 1321456 2 B ...

Страница 8: ...engage the washers from the mounting plate Reposition the mounting plate as needed Reinstall the washers and tighten the bolts to secure Install the Seat Securely tighten the mounting plate bolts and nuts Slide the seat onto the mounting plate until you feel it snap into place Install the Hose IMPORTANT Risk of product damage Do not cross thread the hose to seat connection Connect the seat supply ...

Страница 9: ...Install the Seat and Hose cont Use the supplied clips to attach the power cord and seat supply hose together Kohler Co 9 1321456 2 B ...

Страница 10: ...ng the connections Use an adjustable wrench to tighten one quarter turn past hand tight Connect the T valve to the seat hose If needed connect the supply hose to the supply stop Connect the supply hose to the T valve Connect the T valve to the water inlet on the toilet tank Turn on the water supply Check all connections for leaks and make any adjustments as needed Hose Gasket T Valve Supply Stop S...

Страница 11: ...he wand with your hand NOTE When testing the features activate the sensor with your hand by pressing on the seat next to the side control or by sitting on the cleansing seat Plug the power cord into the electrical outlet The seat will go through a power up sequence Refer to the Homeowners Guide to test the various seat features Kohler Co 11 1321456 2 B ...

Страница 12: ...ent du produit Ne pas fournir d alimentation électrique au dispositif avant d avoir effectué le travail d installation de la plomberie étant donné que cela pourrait créer des problèmes de fonctionnement Respecter tous les codes électriques de plomberie et de bâtiment locaux Connecter seulement le siège à une alimentation en eau froide fournissant de l eau d une qualité potable à une pression de 20...

Страница 13: ...Avant de commencer cont AVIS Ne pas utiliser de cordon de rallonge avec ce produit Outils et matériel PLUS Film plastique étirable Kohler Co Français 2 1321456 2 B ...

Страница 14: ...elâcher toute pression du tuyau d alimentation en eau Déconnecter le tuyau d alimentation en eau de la vanne de remplissage de la toilette Installer une prise de courant Déterminer l emplacement de la prise électrique Positionner la prise électrique dans un rayon de 12 305 mm de la toilette IMPORTANT Ne pas brancher le siège dans la prise électrique à ce point Installer la prise électrique et la m...

Страница 15: ...e câble de mise à la terre à l une des bornes à lame plate Le câble avec isolation dont l extérieur est vert avec ou sans rayures jaunes est le câble de mise à la terre Vérifier auprès d un électricien qualifié ou d un dépanneur si les instructions de mise à la terre ne sont pas bien comprises ou en cas de doute sur la mise à la terre adéquate du produit AVIS Suivre les codes locaux lors de la dét...

Страница 16: ...a fixation de la languette de la vis de mise à la terre de l adaptateur à la vis du couvercle ne met PAS le dispositif à la terre En cas de doute quelconque quant à la mise à la terre de la vis du couvercle demander à un électricien qualifié ou à un technicien professionnel de vérifier Une connexion temporaire avec un adaptateur à deux broches peut être utilisée là où les codes locaux le permetten...

Страница 17: ...ation filetés Insérer les boulons dans les rondelles et les enfiler dans les trous de fixation Ne pas serrer entièrement à ce point Pour toutes les autres installations Insérer les boulons dans les rondelles et dans les trous de fixation Enfiler un écrou un joint d étanchéité et une rondelle plate sur chaque boulon Ne pas serrer entièrement à ce point Plaque de fixation Boulon Rondelle Rondelle pl...

Страница 18: ...ns et désengager les rondelles de la plaque de fixation Repositionner la plaque de fixation selon les besoins Réinstaller les rondelles et serrer les boulons pour les fixer en place Installer le siège Bien serrer les boulons et les écrous de la plaque de fixation Faire glisser le siège sur la plaque de fixation jusqu à ce qu un enclenchement soit ressenti Installer le tuyau IMPORTANT Risque d endo...

Страница 19: ...cont Connecter le tuyau d alimentation du siège au siège nettoyant Ne pas trop serrer Utiliser les agrafes fournies pour attacher le cordon d alimentation et le tuyau d alimentation du siège ensemble Kohler Co Français 8 1321456 2 B ...

Страница 20: ...ur serrer d un quart de tour au delà du serrage à la main Connecter la vanne en T au tuyau du siège Si nécessaire connecter le tuyau d alimentation au robinet d arrêt d alimentation Connecter le tuyau d alimentation à la vanne en T Connecter la vanne en T à l arrivée d eau sur le réservoir de la toilette Ouvrir l alimentation en eau Inspecter tous les raccords pour y rechercher des fuites et effec...

Страница 21: ... baguette avec la main REMARQUE Lors de la vérification des fonctions activer le capteur avec la main en appuyant sur le siège à côté de la commande latérale ou en s asseyant sur le siège nettoyant Brancher le cordon d alimentation dans la prise électrique Le siège passera par une séquence de mise sous tension Consulter le guide du propriétaire pour tester les diverses fonctionnalités du siège Koh...

Страница 22: ...Riesgo de daños al producto No suministre corriente eléctrica a la unidad mientras no se haya completado la instalación de la plomería ya que esto podría causar que el producto no funcionara bien Cumpla todos los códigos locales eléctricos de plomería y de construcción Conecte el asiento solamente a un suministro de agua fría potable a una presión entre 20 psi 139 kPa y 80 psi 551 kPa PRECAUCIÓN R...

Страница 23: ...Herramientas y materiales MÁS Envoltura de plástico Kohler Co Español 2 1321456 2 B ...

Страница 24: ...carga del inodoro para eliminar la presión que pueda haber en la manguera de suministro de agua Desconecte la manguera de suministro de agua de la válvula de llenado del inodoro Instale un tomacorriente Determine el lugar de instalación del tomacorriente Ubique el tomacorriente a menos de 12 305 mm del inodoro IMPORTANTE No enchufe todavía el asiento en el tomacorriente Instale y conecte a tierra ...

Страница 25: ...e conexión a tierra a ninguno de los terminales de hoja plana El alambre con aislamiento con superficie exterior verde con o sin rayas amarillas es el alambre de conexión a tierra Si tiene alguna duda de si el producto está bien conectado a tierra o si las instrucciones de conexión a tierra no están completamente claras solicite la verificación de un electricista calificado o de personal de servic...

Страница 26: ...avés del cableado de la casa fijar la lengüeta del tornillo de conexión a tierra del adaptador al tornillo de la tapa NO conecta la unidad a tierra Si tiene alguna duda de que el tornillo de la tapa esté conectado a tierra solicite la verificación de un electricista calificado o profesional de servicio Donde los códigos locales lo permitan es posible hacer una conexión provisional con un adaptador...

Страница 27: ...uzca los pernos a través de las arandelas y enrósquelos en los orificios de montaje No apriete por completo en este momento En el resto de las instalaciones Introduzca los pernos a través de las arandelas y en los orificios de montaje Meta una tuerca un empaque y una arandela plana en cada perno No apriete por completo en este momento Placa de montaje Perno Arandela Arandela plana Tuerca Empaque K...

Страница 28: ...te las arandelas de la placa de montaje Cambie la posición de la placa de montaje lo que sea necesario Vuelva a instalar las arandelas y apriete los pernos hasta que queden fijos Instale el asiento Apriete con firmeza los pernos y las tuercas en la placa de montaje Deslice el asiento hacia dentro de la placa de montaje hasta que sienta que encaja en su lugar Instale la manguera IMPORTANTE Riesgo d...

Страница 29: ...guera cont Conecte la manguera de suministro al asiento de limpieza No apriete demasiado Una el cable de suministro eléctrico y la manguera de suministro al asiento mediante los clips que incluimos Kohler Co Español 8 1321456 2 B ...

Страница 30: ...to de vuelta adicional después de apretar a mano Conecte la válvula en T a la manguera del asiento De ser necesario conecte la manguera de suministro a la llave de paso de suministro Conecte la manguera de suministro a la válvula en T Conecte la válvula en T a la entrada de agua en el tanque del inodoro Abra el suministro de agua Revise todas las conexiones para asegurarse de que no haya fugas y h...

Страница 31: ...briendo la varilla con la mano NOTA Al probar las funciones active el sensor con la mano oprimiendo el asiento junto al control lateral o sentándose en el asiento de limpieza Enchufe el cable eléctrico al tomacorriente El asiento pasa por una secuencia de encendido Consulte la Guía del propietario para probar las distintas funciones del asiento Kohler Co Español 10 1321456 2 B ...

Страница 32: ...USA Canada 1 800 4KOHLER México 001 800 456 4537 kohler com 2017 Kohler Co 1321456 2 B ...

Отзывы: