background image

8

1393517-W2-D

Warning! This product does not allow for reversed inlets and will deliver 

unstable temperatures if fitted incorrectly.

Installation

General

1.

   Installation of the product must be carried out in accordance with these 

instructions by qualified, competent personnel.

2.

   The plumbing installation must comply with all national or local water regulations 

and all relevant building regulations, or any particular regulation or practice 

specified by the local water supply company.

3.

   Make sure all pressures and temperatures comply with the requirements of the 

shower. See 

‘Specifications’

. For Type 2 Valves, refer to supply conditions 

given in the 

TMV2  Requirements  Manual  (this  is  available  to  view  or 

download from our website www.mirashowers.com)

.

4.

   Full bore/non restrictive servicing valves must be fitted in a readily accessible 

position adjacent to the shower to facilitate maintenance of the shower.


Note:

 These should still be fitted even for products with integrated isolators.


DO NOT

 use integral isolating elbows for flow regulation. The product should 

be installed with nominally equal inlet supply pressures.


DO NOT

 use a valve with a loose washer plate (jumper) as this can lead to a 

build up of static pressure.

5.


 DO  NOT

 apply excessive force to plumbing connections; always provide 

mechanical support when making plumbing connections. Any soldered joints 

should be made before connecting the shower.

6.

  Pipework dead-legs should be kept to a minimum.

7.


DO NOT 

install the shower unit in a position where access for maintenance is 

restricted.

8.

   The shower must be fitted to a waterproof, flat and even wall surface. The 

two screws and wall plugs supplied are suitable for most solid wall installations. 

Alternative fixing screws for panel structures are not supplied. Use both fixing 

points to secure the shower, be sure to use fixings appropriate for the chosen 

wall structure.

9.

  When pipework enters the product from the rear through a hole in the wall, 

provision must be made to prevent water ingress back into the wall structure.

Suitable Plumbing Installations

The Thermostatic Mixer can be installed with all systems with balanced pressures. 

Mixed gravity and mains supplies are not recommended.

Содержание Mira Assist 1.1900.017

Страница 1: ...tion and User Guide For SPARES ADVICE or REPAIRS please call us free on 0800 001 4040 UK only These instructions must be left with the user Affix Sticker Here Model Name Product Code Date of Manufacture Please keep these details safe as you will need them when registering your product guarantee ...

Страница 2: ...ded that they are installed used and maintained in good working order in accordance with our instructions and recommendations Follow all warnings cautions and instructions contained in this guide and on or inside the shower This guide is also available in digital format from our website or by contacting customer services Introduction Guarantee Type 2 Valves This product has been certified as a Typ...

Страница 3: ...tes 2 x Compression Nuts 2 x Olives 2 x Wall Plugs 2 x Fixing Screws 1 x Component Pack Containing Documentation 1 x Installation and User Guide Guarantee Card Back pages of Installation and User Guide Wall Mount Product Only 1 x Pair of Handles 1 x Pair of Handles OR OR 1 x Pair of Handles 1 x 6 l min Flow Regulator Assist and React Only 2 x Sealing Washers 2 x Elbow Fittings 1 x Component Pack C...

Страница 4: ...ntation 1 x Installation and User Guide Guarantee Card Back pages of Installation and User Guide 1 x Pair of Handles 1 x Pair of Handles OR OR 2 x Elbow Fittings 1 x Component Pack Containing 2 x Isolating Elbow Fittings 1 x Component Pack Containing 2 x Sealing Washers ...

Страница 5: ...ement parts 4 If the product is dismantled during installation or servicing then upon completion an inspection must be made to ensure all connections are tight and that there are no leaks Safety Information WARNING This shower can deliver scalding temperatures For continued safe operation follow all instructions warnings and cautions contained in this guide and on or inside the shower Periodic mai...

Страница 6: ...r anyone inexperienced in the correct operation of the controls 9 DO NOT allow children to clean or perform any user maintenance to the product unit without supervision 10 Always check the water temperature is safe before entering the shower 11 DO NOT adjust the temperature control rapidly while using the product 12 Use caution when altering the water temperature while in use always check the temp...

Страница 7: ...ons it is recommended that the maximum hot water temperature is limited to 65 C Minimum Recommended Differential between Hot Supply and Outlet Temperature 12 C at desired flow rates Cold Water Range 1 25 C Specifications Pressures Maximum Static Pressure 1000 kPa 10 bar Maximum Maintained Pressure 500 kPa 5 bar Minimum Maintained Pressure Gas Water Heater 100 kPa 1 bar for optimum performance supp...

Страница 8: ...egral isolating elbows for flow regulation The product should be installed with nominally equal inlet supply pressures DO NOT use a valve with a loose washer plate jumper as this can lead to a build up of static pressure 5 DO NOT apply excessive force to plumbing connections always provide mechanical support when making plumbing connections Any soldered joints should be made before connecting the ...

Страница 9: ...pill over level of any bath shower tray or basin There must be a minimum distance of 30 mm between the showerhead and the spill over lever of any toilet bidet or other appliance with a Fluid Category 5 backflow risk Zone of Backflow Risk 30 mm Minimum Toilet or Bidet FC5 Hand Basin FC3 Bath or Shower Tray FC3 Shower Unit 25 mm Minimum 25 mm Minimum Note Therewillbeoccasionswhenthehoseretainingring...

Страница 10: ...HOT COLD 150 mm Fit the plastic pipe guide over the inlet pipes Level the pipe guide and secure to the wall to hold in position Leave the guide in place and finish the wall Installation of Wall Mounted Bath Shower Mixer Ø6 mm Note Connections are Hot Left Cold Right ...

Страница 11: ...turn Turn on the water supply and flush the pipework Attach the BSM to the wall fixings Install the diverter flow handle Note Fit the handles See Instructions on the box in which the handles are packed Install the temperature handle Note Make sure that the sealing washer filter is installed in each inlet ...

Страница 12: ...nstalltheelbowstothebath donotfully tighten as elbows need to be aligned to fit the BSM Connect the water supply pipe work and flush the pipes Installation of Deck Mounted Bath Shower Mixer Bath Filler Install the shower fittings refer to the Installation Guide packed with the product On some models Assist and React a 6 l min flow regulator can be fitted into the outlet Shower Hose Valve Body Note...

Страница 13: ...rated isolators in the elbows ensure these are fully open before commissioning the product On some models Assist and React a 6 l min flow regulator can be fitted into the outlet Shower Hose Valve Body Install the shower fittings refer to the Installation Guide packed with the product Note Orientate flow regulator as shown above Install the temperature handle ...

Страница 14: ...nough 2 If not depress the override button and carefully rotate the handle further If the water temperature is still not hot enough complete the following procedure 3 Rotate the temperature selector handle back to the override position 4 Remove temperature handle by pressing the override button and pulling the handle Note Make sure that the hot water temperature is at least 55 C and that there is ...

Страница 15: ...Many household and commercial cleaners including hand and surface cleaning wipes contain abrasives and chemical substances that can damage plastics plating and printing and should not be used These finishes should be cleaned with a mild washing up detergent or soap solution and then wiped dry using a soft cloth Important The showerhead must be de scaled regularly keeping the showerhead clean and f...

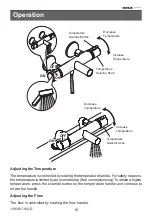
Страница 16: ...e Temperature Operation Adjusting the Temperature The temperature is controlled by rotating the temperature handle For safety reasons the temperature is limited by an override stop See commissioning To obtain a higher temperature press the override button on the temperature handle and continue to rotate the handle Adjusting the Flow The flow is controlled by rotating the flow handle ...

Страница 17: ...r maintenance and TMV testing only When the valve is in normal operation the isolators should be left in the fully open position Isolator shown in OPEN position Isolator shown in CLOSED position 3 0 mm Note Isolator on off control can be rotated in either direction ...

Страница 18: ...pressures are nominally balanced and sufficient Refer to Specifications Air lock or partial blockage in the pipework Ensure isolators are fully open only applicable to products with integral isolation in elbows Water leaking from the shower handset overhead Normal for a short period after shut off Check that the pressures are not in excess of the specifications for this product There may be occasi...

Страница 19: ... the requirements of applicable data protection law Marketing We along with other members of our Group and Kohler Mira Limited may use your information to tell you about any offers products or services which may be of interest to you We may contact you by post telephone email and or other electronic messaging services To change your marketing preference let us know by emailing marketingpreferences...

Страница 20: ...ltenham Gloucestershire GL52 5EP 14648 Guarantee Your product has the benefit of our manufacturer s guarantee which starts from the date of purchase This guarantee only applies in the United Kingdom and Republic of Ireland Activating Your Guarantee Registering your guarantee is quick and simple To ensure your product is covered please register online Scan the QR code to activate your guarantee now...

Отзывы: