1213402-2A-E
2
1213402-2A-E
3
INSTALLATION CHECKOUT
CLEANING INSTRUCTIONS
All Finishes: Clean the finish with mild soap and warm water. Wipe entire surface completely dry with clean soft
cloth. Many cleaners may contain chemicals, such as ammonia, chlorine, toilet cleaner etc, which could adversely
affect the finish and are not recommended for cleaning.
Do not use abrasive cleaners or solvents on Kohler faucets and fittings.
INSTALLATION
How to Install the Faucet
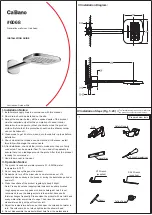
To perform installation, installer must provide G1/2˝ female supply fittings,
spaced 150mm apart and horizontally. The supply fittings should be
vertical and not beyond the finished wall. Hot supply pipe must be located
on the left.
Install the two offset connectors(1) into the hot and cold supply fittings.
Use appropriate thread sealants or thread tape onto the threads.
Adjust the center-to-center distance between the connectors to 150mm
and horizontally. They should extend 44 to 50mm beyond the finished
wall. Apply a ring of plumbers putty around the back edge of the
escutcheon(2). Thread the escutcheons onto the connectors until they
are against the finished wall. Remove any excess putty.
Put the washers(4) into the nuts(3) and tighten the nuts with strap
wrench.
Install the regulator(9) of handspray(5) as needed(shown in regulator
installation instruction). Washers(6) provided with hose(7) must be
installed in each end. Connect the faucet outlet(8) and handspray with
hose.
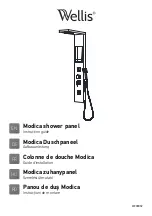
How to Install the Bracket
Determine a suitable location on the finished wall to install the bracket.
Mark bracket support(11) mounting hole locations on the wall according
to the dimension. Drill two holes on the finished wall, the holes should
match the anchors(10). Install the anchors. Tighten screws(12) to secure
bracket support. Apply a ring of plumbers putty or sealant around the
back surface of the bracket(13). Keep the mounting hole facing
downwards, install the bracket onto the bracket support. Secure the
bracket by tightening the screw(14) with hex wrench(15). Remove any
excess puttty or sealant.
Ensure that all connections are tight. Ensure that the handles are in the
off position.
Turn on the drain and main water supply, and check for leaks. Repair as
needed.
Bath & Shower Faucet:
Remove the handspray(5) and aerator (17) by the key(16). Run hot and
cold water through the faucet for about one minute to remove any debris.
Check for leaks. Remove any debris from the aerator. Shut off the faucet.
Reinstall the aerator and handspray.
Shower Faucet:
Remove the handspray
(5)
. Run hot and cold water through the faucet for
about one minute to remove any debris. Check for leaks. Shut off the
faucet. Reinstall the handspray.
1
2
5
7
4
8
6-1
9
6-2
3
150mm
44~50mm
Hot
Hot
Cold
Cold
10
40.6
11
12
14
15
13
▲
▲
5
17
16
5