background image

Kohler Co. 

13 

1204153-X2-A

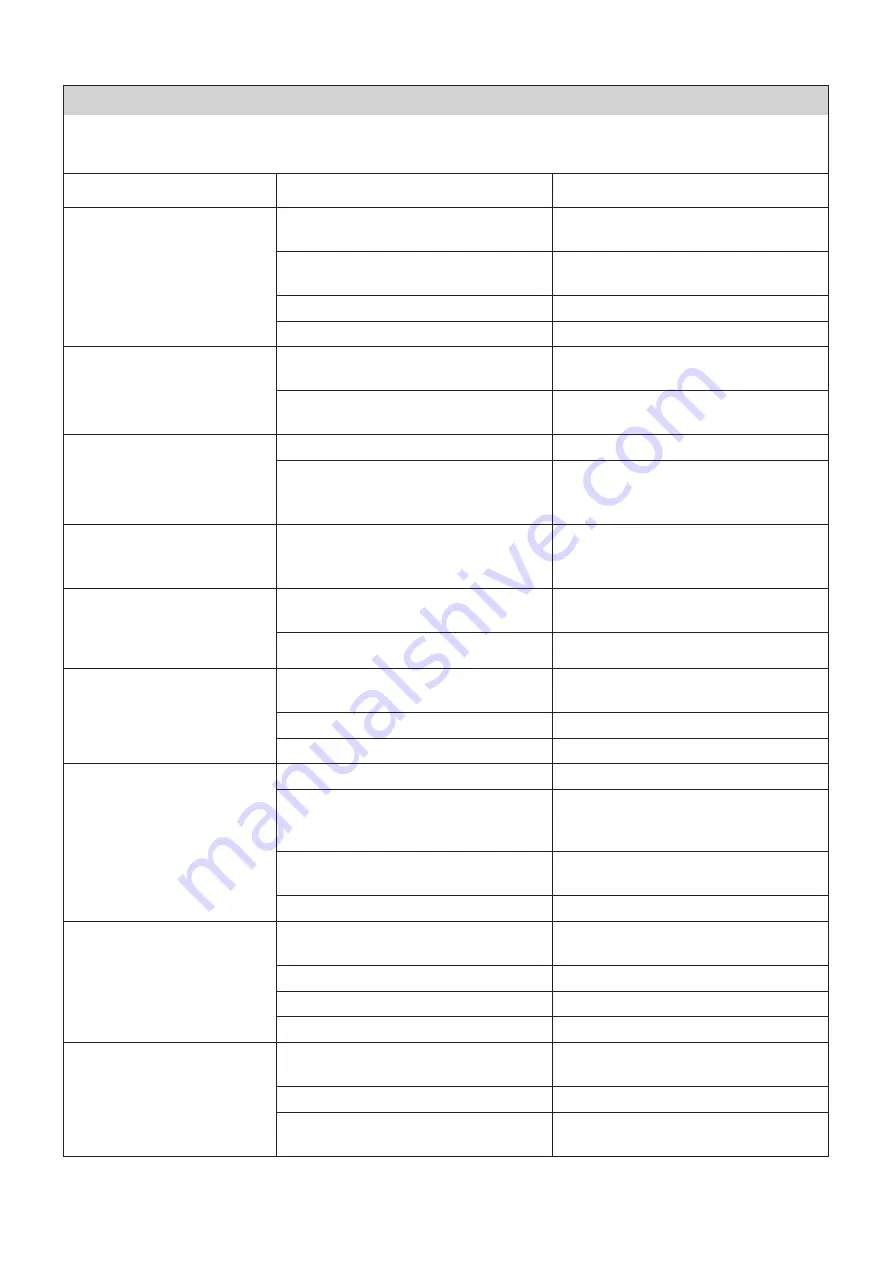
Symptoms

Probable Causes

Recorrection Action

1.  Bath with airjets does not 

start.

A.  Controller is not power on.

A.  Set/reset GFCI or ELCB breaker; 


check wiring.

B.  User keypad cable loose or 


damaged.

B.  Check wire connections.  

If necessary, replace user keypad.

C.  User keypad does not work.

C.  Replace user keypad.

D.  Blower motor does not work.

D.  Replace blower motor.

2.  Blower motor starts,  

but there are few or 


no bubbles.

A.  Pipeline leaking.

A.  Apply silicone sealant to the 


leakage.

B.  Pump inlet is blocked.

B.  Clean the area around the blower-

motor. Ensure adequate ventilation.

3.  Blower motor stops  

automatically within  

20 minutes.

A.  GFCI or ELCB trips.

A.  Correct GFCI or ELCB trips.

B.  Motor overheated and protection 

device activated.

B.  Check for blockage at motor vents. 

Remove blockage and allow motor 

to cool.

4.  Blower motor does not 

stop automatically after 

20 minutes.

A.  Controller trips.

A.  Replace controller.

5.  Blower motor does not 

stop when pump on/off 

button on user keypad is 

touched.

A.  User keypad cable loose or 


damaged.

A.  Check wire connections. 


If necessary, replace user keypad.

B.  User keypad does not work.

B.  Replace user keypad.

6.  Blower motor operates 

but speed timing does not 

work.

A.  User keypad cable loose or 


damaged.

A.  Check wire connections. 


If necessary, replace user keypad.

B.  User keypad does not work.

B.  Replace user keypad.

C.  Controller dose not work.

C.  Replace the controller.

7.  Automatic purge does not 

occur.

A.  Blower motor does not work.

A.  Replace blower motor.

B.  Water level sensor trips or circuitry 

plough.

B.  Check wire connections.  

If necessary, replace water level 

sensor.

C.  Over-height of the water level.

C.  Operation after water level is below 

the airjets.

D.  Controller dose not work.

D.  Replace the controller.

8.  Manual purge cycle does 

not work.

A.  User keypad cable loose or 


damaged.

A.  Check wire connections. 


If necessary, replace user keypad.

B.  User keypad does not work.

B.  Replace user keypad.

C.  Blower motor does not work.

C.  Replace blower motor.

D.  Controller dose not work.

D.  Replace the controller.

9.  Cannot operate or stop 

electronic drain.

A.  User keypad trips.

A.  Check wire connections. 


If necessary, replace user keypad.

B.  Controller trips.

B.  Replace controller.

C.  Electronic drain mechanism 


does not work.

C.  Replace electronic drain 

mechanism.

This  troubleshooting  guide  is  for  general  aid  only. A  Kohler Authorized  Service  Representative  or  qualified 


eletrician should correct all electrical problems. For warranty service, contact your dealer or call center.

Troubleshooting

Содержание K-98155X

Страница 1: ...Installation and Care Guide Freestanding BubbleMassage Bath คู มือแนะนำ การติดตั งและการดูแลรักษา อ างอาบน ำ บับเบิ ลมาสซาจ แบบตั งลอย 1204153 X2 A 2013 Kohler Co K 98155X ...

Страница 2: ...tect the finish Be careful not to scratch the surface of the bath Thank you for choosing Kohler Kohler craftsmanship offers you a rare combination of proven performance and graceful sophistication that will satisfy you for years to come The dependability and beauty of your Kohler product will surpass your highest expectations We re very proud of our products here at Kohler and we know you will be ...

Страница 3: ...ture in the bath WARNING Keep the area around the blower motor clean and free of debris Ensure that the area around the blower motor is free of sawdust insulation dirt or other small loose debris Such material could clog the blower motor air ducts and reduce the air flow through the blower WARNING Risk of damp Silicone sealant shall be applied to connections of the bath drain pipe and the drainage...

Страница 4: ...or use the air channels or blower motor for structural support of the bath CAUTION Risk of product damage Do not support the bath by the rim Your new bubble has been manufactured to the highest possible standards it has been factory tested and approved When removing bath from protective carton DO NOT LIFT BATH BY PIPE WORK Inspect for any possible damage that may have occurred in transit Position ...

Страница 5: ... damage Ensure a watertight seal on the bath drain Installation Cont Up stand bathtub slide feet to the bath fixed position check all clips in the same direction locate center lines as drawing according to the line on the ground line on the bathtub rim by square Ensure the adequate space for the bath sliding from the feet Check and insure the clip direction to making the bath slide in and out in t...

Страница 6: ...et button and adjust the pillow to a proper angle recommend for three adjust angles In case the bracket button is loose please tighten it Uplift the bath and the apron and then connect the drain pipe Incorporate the lines on the bath and the floor slide the bathtub to the feet clip if the bath loosely connected to the clip remove the bath and adjust the nut to fasten the bath to the clip Installat...

Страница 7: ...rupters GFCI s Do not remove the plug grounding pins Do not use grounding adapters NOTE Electronic parameter label located on the controller This label also identifies the electrical rating Your Kohler bath with airjets is equipped with a cord and plug The blower motor has been wired at the factory A licensed electrician must install a dedicated GFCI protected 220 V 10 A grounded outlet Plug the c...

Страница 8: ... can be restored by polishing with an abrasive cleaner Deep scratches can be removed by rubbing with 600 grade wet dry sandpaper then polishing J Clean Up After Installation Clean the area around the blower motor of all dust and debris Use warm water and a liquid detergent to clean the surface of the bath with airjets Do not use abrasive cleansers as they may scratch and dull the surface Do not us...

Страница 9: ...Touch again to stop it blue light half flashes Touch the button The blower motor will automatically stop after running for about 20 minutes Bubble Adjustment Slide the sliding slip to unlock the panel When the blower motor is running slide in direction to increase the air flow and the light gradually flashes from white to blue as the finger moves along direction Slide in direction to decrease the ...

Страница 10: ...r Off No Display 2 Power On 4 Blower Open 3 Light Change to Stand by Situation Blue Orange Red Orange Green Blue White Blue 50 Blue White Pink Water Temperature Light depend on water temperature Water Temperature Blue Orange Red Drain Close Pink BBM Open Blue Adjust the Strength of BBM White Blue ...

Страница 11: ...Kohler Co 11 1204153 X2 A Bath Operation Cont 38 c o 38 c o 38 c o 5 Drain Open 7 System Clean 6 Overflow Alarm Green 50 Blue White 50 Blue 50 Blue White White Orange Green Flash ...

Страница 12: ...Off Compelling Drain Protect Function Slide the sliding slip to unlock the panel Touch electronic drain on off the electronic drain stops Unplug the connector plugs of the controller Observe that the electronic drain starts automatically Plug again the electronic drain restores its former status NOTE Please do not use the bath in case of outage In this case the electronic drain automatically opens...

Страница 13: ... 6 Blower motor operates but speed timing does not work A User keypad cable loose or damaged A Check wire connections If necessary replace user keypad B User keypad does not work B Replace user keypad C Controller dose not work C Replace the controller 7 Automatic purge does not occur A Blower motor does not work A Replace blower motor B Water level sensor trips or circuitry plough B Check wire co...

Страница 14: ...d because of excessive moisture Cleaning Surfaces Do not use abrasive cleansers on any surfaces as they will scratch and dull the surface Wipe out the bath after each use to prevent a build up of soap and scum If the surface becomes dull an automotive type rubbing compound may be used on the unit followed by an application of paste wax We recommend Rubbing compound mequiars mirror glaze 28 metal p...

Страница 15: ...ควรอ านวิธีการทั งหมดรวมถึงข อสำ คัญด านความปลอดภัย คู มือนี ประกอบด วยขั นตอนการติดตั ง การดูแลรักษาและการทำ ความสะอาดสุขภัณฑ โปรดเก บคู มือนี เพื อเป นเอกสารอ างอิง ในอนาคต หมายเหตุ รูปผลิตภัณฑ ที แสดงอยู ในขั นตอนการติดตั งอาจจะแตกต างจากรุ นผลิตภัณฑ ที ท านกำ ลังติดตั ง ข อสำ คัญถึงผู ติดตั ง คู มือนี มีข อมูลสำ คัญ โปรดมอบเอกสารให กับเจ าของสุขภัณฑ นอกจากนี ขั นตอนการติดตั ง คู มือนี ยังมีข อ...

Страница 16: ...อน การแก ไขหรือดัดแปลงอาจเป นสาเหตุให เกิดการใช งานที ไม ปลอดภัยหรือมีผลต อประสิทธิภาพการทำ งาน ของแอร เจ ท ห ามเคลื อนย ายมอเตอร หรือทำ การแก ไขอื นๆภายในระบบ ซึ งอาจมีผลต อประสิทธิภาพการทำ งานและความ ปลอดภัยจากการใช งานอ างอาบนํ าที มีแอร เจ ทบริษัทฯจะไม รับผิดชอบหรือรับประกันความเสียหายต อทรัพย สินรวมทั งบุคคล ที ได รับบาดเจ บที เกิดจากการแก ไขหรือดัดแปลงโดยไม ได รับอนุญาตใดๆ คำ เตือน ดูแลรักษา...

Страница 17: ...บการรับรองจากทางบริษัทฯ เมื อยกอ างอาบนํ าออกมาจากกล องบรรจุภัณฑ ห ามยกอ างอาบนํ าจากท อที อยู รอบอ างอาบนํ า โปรดตรวจสอบความเสียหาย ที อาจเกิดขึ นจากการขนส งสินค า หาผ านุ มวางใต อ างอาบนํ าเพื อป องกันรอยขีดข วนบนพื นผิวสำ เร จและพื นผิวผลิตภัณฑ ข อสำ คัญ อ างอาบนํ าจะต องถูกวัดระดับนํ าบนขอบอ างอาบนํ าเท านั น ข อควรระวัง ความเสี ยงซึ งอาจทำ ให ผลิตภัณฑ ชำ รุด ห ามยกอ างอาบนํ าจากท อลมหรือมอเตอ...

Страница 18: ... ขา ให มีระดับตํ ากว าแผงครอบอ าง 48 มม ทั งนี ขาตั งทั งหมดจะต องปรับระดับให อยู ในระดับ เสมอกัน ยกอ างอาบนํ าตั งขึ น จากนั นเลื อนขาอ างอาบนํ าให ตรงตำ แหน ง ตรวจสอบตัวล อคขาตั งทั งหมดให วางไปในทิศทางเดียวกัน กำ หนดจุดกึ งกลางขาตั ง จากนั นจึงลากเส นกึ งกลาง ลากเส นบนพื นโดยลากเส นให ออกมาจากขอบอ างอาบนํ าเป นเส นตั งฉาก ตรวจสอบบริเวณที ติดตั งว ามีพื นที เพียงพอสำ หรับการเลื อนขาตั งอ างอาบนํ...

Страница 19: ...ากอ างอาบนํ าประกอบเข ากับตัวล อคขาตั ง ไม แน น ให นำ อ างอาบนํ าออกจากตำ แหน งเพื อปรับนอตให แน นขึ นตามความเหมาะสม ปุ มกด หมอนรองศีรษะ ที หมอนรอง ง ติดตั งหมอนรองศีรษะ ทำ ความสะอาดที รองหมอนและหมอนรองศีรษะให แห ง จากนั นติดหมอนรองศีรษะบนที รองหมอน ให ระยะหมอนรองศีรษะเกิน ที รองหมอนทุกด าน ด านละ 2 มม กดปุ มกดและปรับระดับองศาของหมอนรองตามความเหมาะสม ซึ งแบ งเป น 3 ระดับ หากปุ มกดหลวม กรุณาขันให แ...

Страница 20: ...บสายดินออก ช การต อสายไฟ ข อสังเกต ฉลากที ติดอยู บนกล องควบคุมได ระบุค าไฟฟ าที สำ คัญ อ างอาบนํ าบับเบิ ลมาสซาสของท านได ติดตั งสายไฟและปลั กไฟไว เรียบร อยจากโรงงานผู ผลิต ช างไฟฟ าต องเป นผู ติดตั งอุปกรณ ตัดกระแสไฟฟ าอัตโนมัติแบบ GFCI หรือเบรกเกอร ELCB 220 โวลต 10 แอมป ที มีสายดิน เสียบปลั กกล องควบคุมเข ากับอุปกรณ ตัดกระแสไฟฟ าอัตโนมัติ ทำ ความสะอาดเศษผงและฝุ นละอองในบริเวณนี ซ ทดสอบการทำ งานข...

Страница 21: ...างอาบนํ าเกิดความเสียหาย กรุณาอ านคำ แนะนำ การทำ ความสะอาดในคู มือการดูแล รักษาและการทำ ความสะอาด ข อควรระวัง ความเสี ยงซึ งอาจทำ ให ผลิตภัณฑ ชำ รุดตรวจสอบให แน ใจว าบริเวณรอบๆมอเตอร ปราศจากขี เลื อย ฉนวน สิ งสกปรก หรือเศษชิ นส วนเล กๆ วัสดุดังกล าวอาจทำ ให เกิดการอุดตันที ท อมอเตอร เป าลมและลดการระบายลม ก เปิดนํ าลงอ างอาบนํ า หมายเหตุ โปรดอ านขั นตอนให เข าใจก อนท านใช งานอ างอาบนํ าบับเบิ ลมาสซ...

Страница 22: ...ใช งาน ระบบจะทำ งานเป นเวลา 20 นาที จากนั นระบบจะปิดการ ทำ งานเองอัตโนมัติ การปรับระดับบับเบิ ลมาสซาส ขณะที ระบบทำ งานให เลื อนแถบบนแผงควบคุมหน าจอสัมผัสเพื อปลดล อค หากต องการเพิ มฟองอากาศบับเบิ ลมาสซาส ให เลื อน แถบปรับระดับบับเบิ ลมาสซาจ ไปตามทิศทางที เพิ มขึ น ซึ งแสงไฟจะค อยๆไล จากแสงสีขาวเป นแสงสีฟ าไปตามนิ วมือที เลื อนไปตามสัญลักษณ หากต องการลดฟองอากาศบับเบิ ลมาจซาส ให เลื อนแถบปรับระดับบั...

Страница 23: ...ถานะป ดเครื อง ไม มีการแสดง 2 สถานะเป ดเครื อง 4 สถานะเครื องเป ด 3 แสงไฟแสดงตามสถานะ สีฟ า สีส ม สีแดง สีส ม สีเขียว สีขาว สีฟ า สีฟ า 50 สีฟ า สีชมพู สีขาว อุณหภูมินํ า แสดงแสงไฟตามอุณหภูมินํ า อุณหภูมินํ า สีฟ า สีส ม สีแดง สะดืออ างป ด สีชมพู ระบบบับเบิ ลมาสซาสเป ด สีฟ า แถบปรับระดับบับเบิ ลมาสซาจ สีขาว สีฟ า ...

Страница 24: ...X2 A 24 Kohler Co การใช งานอ างอาบนํ า ต อ 38 c o 38 c o 38 c o 5 สถานะสะดืออ างเป ด 7 สถานะระบบกำลังทำความสะอาด 6 สถานะท อนํ าล นเตือน สีเขียว สีขาว 50 สีฟ า 50 สีฟ า 50 สีฟ า สีขาว สีขาว สีส ม สีเขียว กะพริบ ...

Страница 25: ...ผงควบคุมหน าจอสัมผัสเพื อปลดล อค แตะปุ มคำ สั งเปิด ปิดสะดืออ าง และรอให นํ าระบายออก ให สังเกตว า ระบบการระบายนํ าในช องอัดอากาศจะเปิดและปิดการทำ งานโดยอัตโนมัติภายใน 2 นาที ฉ การป องกันปัญหาระบบสะดืออ างอิเล กทรอนิกส ขัดข อง เลื อนแถบบนแผงควบคุมหน าจอสัมผัสเพื อปลดล อค แตะปุ มคำ สั งเปิด ปิดสะดืออ าง เพื อปิดการระบายนํ า ถอดปลั กไฟออก สังเกตว า สะดืออ างระบบอิเล กทรอนิกส จะเริ มทำ งานโดยอัตโนมัต...

Страница 26: ...ลี ยนกล องควบคุมระบบใหม 5 มอเตอร ควบคุมไม หยุดทำ งาน เมื อเลื อนสัมผัสปุ มเปิด ปิด บนแผงควบคุมหน าจอสัมผัส ก สายเชื อมต อแผงควบคุมหน าจอสัมผัสหลุด หรือชำ รุด ก ตรวจสอบสายเชื อมต อแผงควบคุมหน าจอ สัมผัส ให เปลี ยนแผงควบคุมหน าจอสัมผัส ใหม หากจำ เป น ข แผงควบคุมหน าจอสัมผัสไม ทำ งาน ข ตรวจสอบสายไฟ ให เปลี ยนแผงควบคุม หน าจอสัมผัสใหม หากจำ เป น 6 มอเตอร ควบคุมทำ งาน แต ระยะเวลาการทำ งาน ไม สัมพันธ กั...

Страница 27: ...าบนํ า ข เซ นเซอร วัดระดับนํ าทำ งานหลังจาก เกินระดับนํ าล น ข ลดตำ แหน งเซ นเซอร วัดระดับนํ าภายใน อ างอาบนํ า ค ระดับนํ าล นอยู ผิดตำ แหน ง ค ติดต อลูกค าสัมพันธ ของบริษัทฯ 12 แผงวัดอุณหภูมินํ าไม แสดงค า ก สายเชื อมต อแผงควบคุมหน าจอสัมผัส ผิดปกติ ก ตรวจสอบสายเชื อมต อแผงควบคุมหน าจอ สัมผัส ให เปลี ยนแผงควบคุมหน าจอสัมผัส ใหม หากจำ เป น ข แผงควบคุมหน าจอสัมผัสผิดปกติ ข เปลี ยนแผงควบคุมหน าจอสัม...

Страница 28: ... ามากกว า 60 องศาเซลเซียส หรือสารละลายกรดโซดา Soda Acid อาจทำ ให พื นผิวหมอนรองศีรษะเกิดความเสียหาย โปรดทำ ความสะอาดพื นผิวหมอนรองศีรษะและราวจับเป นครั งคราวด วยนํ าสบู ทำ ความสะอาดพื นผิวด วยฟองนํ านุ มหรือผ านุ มซับนํ า ห ามใช วัสดุหยาบทำ ความสะอาด เช น แปรงและสก อตไบร ท บริษัทโคห เลอร ประเทศไทย จำ กัด มหาชน ชั น16 อาคารจัสมิน ซิตี 2 ซอยสุขุมวิท 23 ถนนสุขุมวิท แขวงคลองเตยเหนือ เขตวัฒนา กรุงเทพฯ ...

Отзывы: