background image

Thank You For Choosing Kohler Company

We appreciate your commitment to Kohler quality. Please take a few
minutes to review this manual before you start installation. If you
encounter any installation or performance problems, please don’t
hesitate to contact us. Our phone numbers and website are listed on
the back cover. Thanks again for choosing Kohler Company.
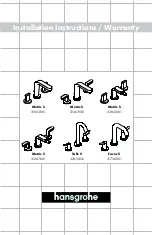
Tools and Materials

Before You Begin

Observe all local plumbing and building codes.

Inspect the drain and supply tubing. Replace if necessary.

Prior to installation, unpack the new sink and inspect for damage.
To prevent damage, return the sink to its original packaging until
installation.

These installation instructions assume a wood or laminate
countertop. If you have a stone countertop, specialized tools will
be required to cut the opening.

Because of the varying thickness of different countertop materials,
fasteners are not included with this sink. Determine the length of
the fastener by measuring the thickness of the countertop and
adding 3/4

(2 cm) to the measurement. Then purchase four

#10-32 x (determined length) fasteners for this installation.

This sink is not intended for undercounter installation.

Before proceeding, determine how far the sink will extend
beyond the front of the cabinet. It should extend a minimum of
1/2

(1.3 cm) and a maximum of 2-3/4

(7 cm).

Pencil

Drill

Scissors

Sealant

Tape 
Measure

Template 
(supplied)

Plus:

 1/2" or larger drill bit
 Jigsaw

 Gloves

 #10-32 x (determined 

length) fastener

Safety 
Glasses

1036543-2-B

2

Kohler Co.

Содержание K-3084

Страница 1: ...Stainless Steel Kitchen Sink M product numbers are for Mexico i e K 12345M Los n meros de productos seguidos de M corresponden a M xico Ej K 12345M Fran ais page Fran ais 1 Espa ol p gina Espa ol 1 K...

Страница 2: ...installation instructions assume a wood or laminate countertop If you have a stone countertop specialized tools will be required to cut the opening Because of the varying thickness of different count...

Страница 3: ...mble the faucet and drain to the sink before installing the sink All information in these instructions is based on the latest product information available at the time of publication Kohler Co reserve...

Страница 4: ...Roughing in Art Countertop Sink Cut out 31 78 7 cm 19 48 3 cm 20 50 8 cm Drop In Installation 33 83 8 cm 1036543 2 B 4 Kohler Co...

Страница 5: ...r countertop Install the water supplies and drain piping according to the roughing in information Cut along the dotted line on the template taking care to cut accurately This is the outside profile of...

Страница 6: ...ng clips to the right side of the sink Evenly tighten the mounting clip screws using a Phillips screwdriver Wipe away any excess sealant from the countertop with a dry cloth Verify that there are no g...

Страница 7: ...en the trap to the drain and complete the water supply connections to the faucet according to the instructions packed with the faucet Run water into the sink and check for leaks Clean up with a non ab...

Страница 8: ...s de plomberie et de b timent locaux V rifiez l tat des tubes des vacuations et des alimentations Remplacez les si besoin Avant son installation d ballez le nouveau vier et examinez le pour en d celer...

Страница 9: ...it pour une installation sous comptoir Avant de continuer d terminez combien doit l vier d passer l avant du meuble Il doit d passer un minimum de 1 2 1 3 cm et un maximum de 2 3 4 7 cm Coupez les arr...

Страница 10: ...Plan de Raccordement Comptoir vier Ouverture 31 78 7 cm 19 48 3 cm 20 50 8 cm Installation Encastr e 33 83 8 cm 1036543 2 B Fran ais 3 Kohler Co...

Страница 11: ...omptoir Installez les tuyaux des arriv es d eau et de l vacuation selon l information du plan de raccordement Coupez le long de la ligne pointill e sur le plan avec pr cision Ceci est le contour ext r...

Страница 12: ...t droit de l vier Serrez r guli rement les vis clips de fixation en utilisant un tournis cruciforme Essuyez tout exc dent d tanch it du comptoir l aide d un linge sec V rifiez qu il n y a pas de d esp...

Страница 13: ...on au drain et terminez les arriv es d eau au robinet tout en suivant les instructions emball es avec le robinet Laissez couler l eau dans l vier et v rifiez s il y a des fuites Nettoyez avec des nett...

Страница 14: ...odos los c digos locales de plomer a y de construcci n Examine las tuber as de suministro y de desag e Reempl celas de ser necesario Antes de la instalaci n desembale el fregadero nuevo y verifique qu...

Страница 15: ...e ado para las instalaciones bajo el mostrador Antes de continuar determine cuanto sobresaldr el fregadero de la parte frontal del gabinete Debe sobresalir 1 2 1 3 cm como m nimo y 2 3 4 7 cm como m x...

Страница 16: ...Diagrama de instalaci n Mostrador Fregadero Abertura 31 78 7 cm 19 48 3 cm 20 50 8 cm Instalaci n empotrada 33 83 8 cm 1036543 2 B Espa ol 3 Kohler Co...

Страница 17: ...le las tuber as de suministro de agua y desag e conforme al diagrama de instalaci n Recorte a lo largo de la l nea de puntos en la plantilla tratando de cortar con precisi n Este es el contorno exteri...

Страница 18: ...o para colocarlo en su lugar Monte las grapas de fijaci n en el lado derecho del fregadero Apriete los tornillos de fijaci n de manera uniforme con un destornillador de punta de cruz o Phillips Limpie...

Страница 19: ...ecte y fije el sif n en el desag e y termine las conexiones del suministro de agua a la grifer a conforme a las instrucciones incluidas con la grifer a Haga que el agua circule por el fregadero y veri...

Страница 20: ...USA 1 800 4 KOHLER Canada 1 800 964 5590 M xico 001 877 680 1310 kohler com 2004 Kohler Co 1036543 2 B...

Отзывы: