


2
1018323-2-
A
Kohler Co.
INSTALLATION
INSTALL THE BATH/WHIRLPOOL
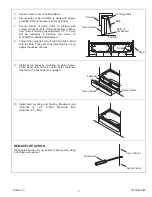
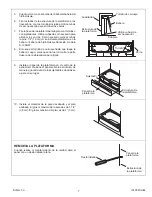
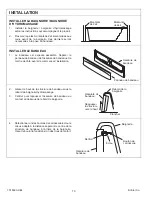
1.
Install bath/whirlpool according to the instructions
included with the product.
2.
Make sure 2x4 studs are located at front corners of
bath. These will be required when installing the
apron.
2x4 Stud
2x4 Stud
INSTALL THE APRON
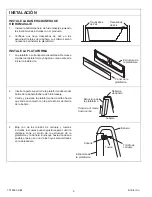
1.
The apron ships assembled. Remove the apron
panel from the apron frame and set the panel aside
before beginning the installation.
Apron Frame
Apron Panel
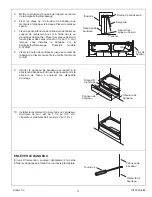
2.
Insert top of apron frame under rim of bath/whirlpool.
3.
Center and push apron frame up until it contacts
underside of bath rim.
Apron Frame
Bath Rim
Subfloor
Push
frame
up
4.
Select one of the threaded carriage bolts and nut
provided which can be best adjusted to span the
distance from the center of the apron frame to the
backside of the bath. Thread bolt into one of the
holes provided in the brace as far as it can go.
Apron Frame
Bath
Nut
Brace
Carriage
Bolt


