III. OPERATION
1. BATTERY INSTALLATION
Note:
Install the batteries in the main unit, then please install batteries in the remote sensor. The remote sensor will take approximately a minute to search for a
signal. If there is no display of outdoor temperature and humidity, please place the main unit and the remote sensor together before reinstalling the batteries.
A. The main unit
- Remove the battery cover
- Install 3 x AA batteries
- Replace the battery cover
B. The remote sensor
- Remove the battery cover,
- Install 2 x AA batteries after selecting the channel (If there is more than one channel, please set the remote sensor to different channels)
- Replace the battery cover
Note:
- The main unit can collect data from up to three sensors and detect the temperature & humidity of the remote sensor. Additional sensors are sold separately. If
you are using more than one sensor, please select a different channel for each sensor.
- The main unit will search signal within one minute after battery installation. Please ensure the remote sensor has batteries installed within one minute.
- This item can’t be used with chargeable batteries. Alkaline batteries are the best choice for lengthening the item's lifespan. When the LCD display looks faint or
LED back light is dark/dim/misty, please replace the batteries.
2. FUNCTIONS
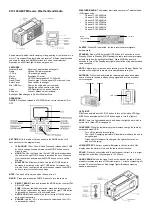
A. Buttons
MODE button
:
Press this button to shift between the unit's time mode, calendar mode, air pressure mode and relative altitude measuring. Press and hold the MODE button for
more than 3 seconds to enter Radio-controlled clock signal searching.
SET/HIST button
:
With this button, you can view barometric pressure records and take advantage of relative altitude measuring. Press and hold it for more than 3 seconds to
enter the setup screen.
MAX/MIN/UP button
:
With this button, you can view the maximum and minimum temperature and humidity. Press and hold the button for more than 3 seconds to reset. Within setup
mode, the button can be used to adjust/increase values..
SNOOZE/DOMN button
:
This button represents the ON/OFF switch when alarm clock is ringing. Within the setup screen, the button can be used to adjust/decrease values. You can
also press and hold the button for 3 seconds to view the reception of the remote sensor signal.
- 3 -
Содержание KAWTHSTATXA
Страница 1: ......


