background image

7


3.  

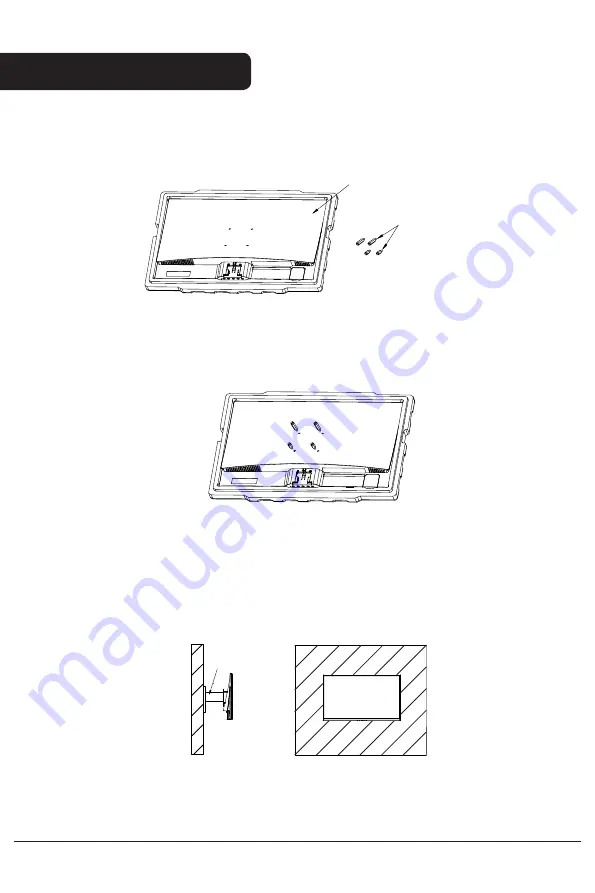
Your monitor is now ready to be attached to a wall-mounting bracket. To avoid 
damage, please do not pinch the screen during bracket installation.

Lock the two 26mm VESA connectors in the upper two holes on the rear of the 
monitor, and the two 10mm connectors in the lower two holes.

2. 

Mont

(

Not

included

)

VESA Connector 

Monitor 

1. 

Take out 4 pieces VESA connector from accessory bag.

Wall Mounting

Содержание KAMN24F75LB

Страница 1: ...User Guide KAMN24F75LB 24 Full HD IPS 75Hz Frameless Monitor 1920 x 1080 ...

Страница 2: ...liquids or other harsh cleaners 4 This monitor is designed with ventilation holes on the back of the casing Do not cover or block them 5 Avoid placing the monitor near heaters stoves fireplaces or other sources of heat as well as in rooms lacking in adequate ventilation 6 Do not insert any objects or spray any liquids into the vents 7 Do not position the monitor in unsafe locations If the monitor ...

Страница 3: ... QUICK START GUIDE KAMN24F75LB 12mm Components A B C A Monitor F 10mm VESA connectors x 2 B Stand Stem G Power Adapter C Stand Base H HDMI Cable D PM4 12mm Screws x 2 I User Guide E 26mm VESA connectors x 2 D H G E I 3 26mm 10mm F ...

Страница 4: ...nd connect the other end to the monitor s HDMI port 2 3 4 5 6 1 1 M Menu Button Press to display the OSD menu or enter sub menus 2 Down Button Press to move down in the menus 3 Up Button Press to move up in the menus 4 E Exit Button Press to exit 5 Power Button Press to turn the monitor on off 6 LED Indicator Changes colors to indicate status Monitor Ports 7 8 9 10 Audio Output Insert one end of th...

Страница 5: ...kwise to clamp the bracket into the base to complete the installation of the base 3 Align the stand with the slot at the rear of the monitor and insert the stand into the monitor To prevent damage during assembly ensure the monitor is still in the original foam 2 1 Align stand with the base slot 2 2 Keep the bracket and the base close rotate the bracket clockwise 2 3 Make the bracket click into th...

Страница 6: ...lete overall assembly Note 1 To prevent pinching please do not place your hand within the gap between the stand and the monitor Note 2 To prevent falling please avoid holding monitor by the base or inverting the monitor Note Do not invert the machine to prevent falling 6 ...

Страница 7: ...do not pinch the screen during bracket installation Lock the two 26mm VESA connectors in the upper two holes on the rear of the monitor and the two 10mm connectors in the lower two holes 2 Mont Not included VESA Connector Monitor 1 Take out 4 pieces VESA connector from accessory bag Wall Mounting ...

Страница 8: ...ve audio signals from your monitor If your earphones are connected to the monitor and audio devices are connected to your computer at the same time the audio devices will not produce sound Earphones and other audio devices not included Earphones Not included 8 Power Cable Connect the included power cable to the power connector and then plug the other end into an wall outlet Power Cable Connectivit...

Страница 9: ...HDMI In order for the monitor to receive HDMI signals from the computer use the HDMI cable the monitor to the computer to connect HDMI OUTPUT PC HDMI Cable Included 9 ...

Страница 10: ... you use a surge protector with adequate voltage if a wall outlet cannot be reached directly 3 Locate the power button on the monitor and press it to turn the monitor on Solid blue light indicates power is on and the monitor is operating normally Flashing blue light indicates no video source has been detected Red light indicates that no horizontal or vertical signal has been detected or voltage is...

Страница 11: ...on and parts etc 1 Press any one of the buttons M E to activate the navigation window eco 2 Press M to enter the OSD menu BRIGHTNESS BRIGHTNESS CONTRAST ECO DCR STANDARD OFF 3 Press or to browse functions Highlight the desired function then pressM to enter the sub menu Press or to browse sub menus then press M to highlight the desired function Press or to highlight an option then pressM to confirm ...

Страница 12: ...ents Green 0 100 Blue 0 100 OSD SETTING Language English Español Русский Français 한국 Português Deutsch Türkçe 简体中 本語 Polski Italiano Nederlands Set OSD language OSD H POS 0 100 Adjust the OSD horizontal position OSD V POS 0 100 Adjust the OSD vertical position OSD Timer 0 60 Set how long the OSD remains open a er non use Transparency 0 100 Set the OSD overall transparency RESET Reset N A Reset mon...

Страница 13: ...me icon These game icons are primarily designed to optimize your aim during shooting games though they can be used for other scenarios 3 Press to switch ECO modes These modes include Standard Text Movie Game FPS and RTS modes and can be used to optimize settings according to your activity Standard mode is suitable for most activities ECO Modes and Gameplus Switching 13 ...

Страница 14: ...t Gross Weight HDMI Cable 75x75 16 7M YES YES NO YES YES YES YES H V Model Screen Size Aspect Ratio Backlight Brightness Panel Resolution Refresh Rate Response Time Viewing Angle Contrast Ratio VESA Mounting Signal Inpt Power AMD FreeSync Colours Audio Speakers Audio Out Accessories Additional Functions Flicker Free Dimensions w Stand Dimensions w o Stand Physical Dimensions Low Blue Light ...

Страница 15: ...Notes 15 ...

Страница 16: ...Need more information For full product support and troubleshooting help head online to help kogan com ...

Страница 17: ...108 007 09302 24D2F KAMN24F75LA 2021 01 20 feihong 80G双胶纸 单色印 骑马钉 140 210mm V02 备注 如不够页数 可以在封面封底的内面插入空白页 KOGAN ...

Отзывы: