background image

13

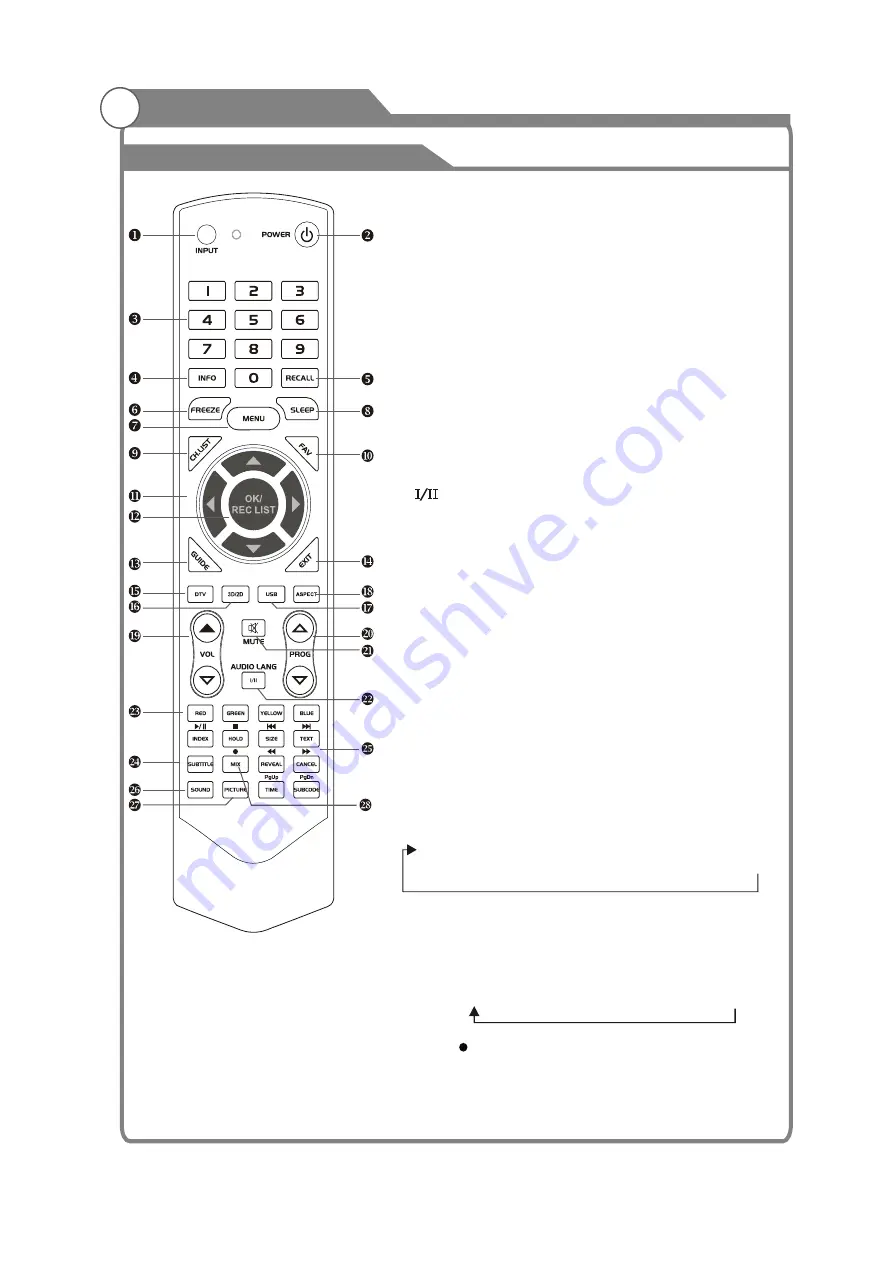
Overview of Remote Control

General Description

17. 

USB

: Switch to USB mode directly or call the 

      control menu in USB mode. Please see the 
      details in “Digital Media Player” on 

Press this button to switch the screen 

      mode.
19. 

22.        

Button/Audio Lang:


source

source

Digital media player control button:


      play/pause, stop, previous file, next file, page up, 
      page down, back, forward, is used to control in 
      USB mode. 


Please refer to 

 instructions in the section 

      of multimedia player.
26. 

SOUND:

 This button is used to select the sound 

      mode.

27. 

PICTURE:

 This button is used to adjust user 

      picture mode, press this button repeatedly and 
      select one of four settings.

28. 

MIX (      ): 

Teletext buttons for mix function, please 

      refer to page 15. It is also used for recording function 
      when TV is on DTV mode, please refer to page 39.

Page 40

      -Page49.
  18. 

ASPECT

VOL

 and VOL

Press these buttons to 

      adjust TV volume.
20. 

PROG

and PROG

Press these buttons to 

      change channel upward or downward.
      In the teletext, these buttons are used to 
      display the next page and previous page.
21. 

MUTE:

 Press this button to shut off sound of the 

      TV, press again to restore TV sound.

In ATV 

, the button 

      is used to set NICAM sound system. 
      In DTV 

, the button is used to set the audio

      language.
23. 

Red/Green/Yellow/Blue Command: 

These four 

      buttons are used to request linked buttons with the 
      current menu/page.
24. 

Teletext buttons: 

Detail operation please refer to 

      "Teletext “ in the next page.
25. 

Including

relevant


User 

"

Standard 

"

News

"

Movie

"

Sports

"

Dance

"

 Classic

"

Pop

"

Rock 

"

Jazz

"

Soft

Standard

"

Mild

"

Bright

"

User 

"

 Sports


All manuals and user guides at all-guides.com

Содержание KALED503DSA

Страница 1: ...KALED503DSA USER MANUAL All manuals and user guides at all guides com a l l g u i d e s c o m ...

Страница 2: ...h as vases shall be placed on the apparatus 1 If the following problems occur Turn off the TV set and unplug the AC power cord immediately if any of the following problems occur Ask your dealer or service centre to have it checked by qualified service personnel When AC power cord is damaged Poor fitting of AC power outlet TV set is damaged by being dropped hit or having something thrown at it Any ...

Страница 3: ...elevision is not overhanging the edge of the supporting furniture Installation The ventilation should not be impeded by covering the ventilation opening with items such as newspapers tablecloths curtains etc At least 10 cm space should be left around the apparatus for sufficient ventilation The product should be situated away from heat sources such as radiators heat registers stoves or other produ...

Страница 4: ...LED panel cracks do not touch it until you have unplugged the AC power cord Otherwise electric shock may result Do not throw anything at the TV set The LED panel may break from the impact and cause serious injury Precautions When Displaying a Still Image A still image may cause permanent damage to the TV screen Do not display still images and partially still images on the LED panel for more than 2...

Страница 5: ...t Top Box via DVI 20 Connecting DVD Player Set Top Box via HDMI 21 Connecting Digital Audio System 22 Connecting PC 23 Supporting signals 23 Basic operation 24 Turning the TV on and off 24 Menu operation 25 Menu system instruction 27 Picture 27 Sound 29 Channel 31 Time 33 Option 34 Function 35 PVR 37 Digital Media Player 40 40 41 41 43 44 47 My Disk 48 Troubleshooting 50 Picture defects and the re...

Страница 6: ...5 Remote Control Batteryx2 CAUTION Do not dispose of batteries in a fire Do not short circuit disassemble or overheat the batteries Danger of explosion if battery is incorrectly replaced please observe polarity Replace only with the same or equivalent type All manuals and user guides at all guides com a l l g u i d e s c o m ...

Страница 7: ...ut l TV adopts 50 TFT display screen l Zero X radiation complies to green environment protection requirement l Connect to computer directly to use as a TV monitor combo l 16 9 wide screen l Auto tuning and fine tuning l HDMI input l Component Compatible 480i 480P 576i 576P 720P 1080i 1080P l PC VGA l Programmable sleep timer l Wide range voltage input l No signal automatic power off LED 6 All manu...

Страница 8: ...upply TV receive system Frequency range Video in Antenna Input Speaker output power Power consumption Standby consumption Work Temperature Model Controller power Analog Antenna 46 25MHz 855 25MHz Digital 5 12 21 69 PAL NTSC SECAM 5 X2 W 145W o o 0 C 40 C 1W 110 240V 50 60Hz 75 ohms unbalanced 50 Diagonal max DC 3V Two AAA size batteries 1920X1080 1138X60X678mm 22 5Kg 1138X275X735mm 19Kg KALED503DS...

Страница 9: ...crews Figure 1 To disconnect the stand from the TV perform the above steps in reverse order Securing the TV Stand Caution Pulling pushing or climbing on the TV may cause the TV to fall In particular ensure your children do not hang over or destabilize the TV doing so may cause the TV to tip over causing serious injuries or death Follow all safety precautions If you need to remove or assemble the s...

Страница 10: ...cal hardware store into the 4 screw holes on the rear cover see the figure below 2 Fasten wall mounting bracket Not supplied with LED TV please contact your local hardware store with screws on the wall 3 Carefully check for the strength before releasing the LED TV NOTE For more detailed instructions please refer to your after market wall mounting instruction book Thread hole size M6 x 10 depth TV ...

Страница 11: ...camera to enjoy a high quality picture USB2 USB1 Camcorder DVD player PC HDMI output Blu ray disc player Audio system DVD player VCR DVD player with component output PC Home theatre system with digital input PC HDMI output PC Video game equipment CVBS SPDIF All manuals and user guides at all guides com a l l g u i d e s c o m ...

Страница 12: ...itter 3D sync signal for shutter glasses POWER INDICATOR Green In power on mode Red In standby mode INPUT Toggles between all the available input sources MENU Press to display an on screen menu of your TV s features PROGr s Press to change programs In the on screen menu use the PROGr sbuttons as up down arrow buttons VOLr s Press to increase or decrease the volume In the on screen menu use the VOL...

Страница 13: ...80 240 min Press MENU button to exit when you have set the sleep timer After you have set sleep timer press SLEEP button again you will see the Remaining time Notes The sleep timer you have set will be Cancelled when the TV turns off or if a power failure occurs 9 CH LIST Press it to show channel list on screen 10 FAV Press it to display favorite list 11 12 GUIDE In DTV source this button is used ...

Страница 14: ...fer to page 15 It is also used for recording function when TV is on DTV mode please refer to page 39 Page 40 Page49 18 ASPECT VOL and VOL Press these buttons to adjust TV volume 20 PROG and PROG Press these buttons to change channel upward or downward In the teletext these buttons are used to display the next page and previous page 21 MUTE Press this button to shut off sound of the TV press again ...

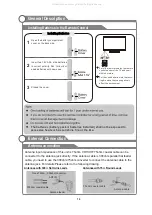
Страница 15: ...mple Press the REVEAL button again to return to normal screen 13 14 Teletext General Description Teletext is an information system broadcast by certain channels which be consulted like a newspaper It also offers to subtitles for viewers with hearing problems or who are not familiar with the transmission language You can press these buttons to operate the teletext Text Press TEXT button to enter or...

Страница 16: ...ress PROG PROG buttons to change the subcode pages Time This button is used to show the time of the Teletext Digital buttons 0 9 You can press them to enter the number of the Page required PROG PROG You can press them to change page upward or downward Mix Press MIX button the teletext page changes transparency TV content and teletext page content will display at the same time Press MIX button agai...

Страница 17: ...ial cable Antenna cable Antennas with 300 W flat twins Leads Antennas with 75 W Round Leads External Connection Installing Batteries Installing Batteries Point the remote towards the remote control sensor of the TV and use it within 8 meters Put the used batteries into the recyc ling bin since they can negatively affect the environment The batteries battery pack or batteries installed shall not be...

Страница 18: ...ack of the VCR 3 Connect an RF Cable between the ANT OUT terminal on the VCR and the ANT IN terminal on the TV 4 jack on the TV 5 Connect Audio Cables between the AUDIO OUT jacks on the VCR and the AUDIO L and AUDIO R jacks on the TV Note 1 Whenever you connect an external device to your TV make sure that power on the unit is turned off 2 When connecting an external device match the color of the c...

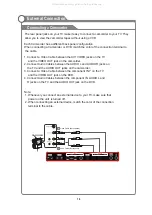
Страница 19: ...bles between the AUDIO L and AUDIO R jacks on the TV and the AUDIO OUT jacks on the camcorder 3 Connect a Video Cable between the component IN Y on the TV and the VIDEO OUT jack on the DVD 4 Connect Audio Cables between the component IN AUDIO L and R jacks on the TV and the AUDIO OUT jack on the DVD Note 1 Whenever you connect an external device to your TV make sure that power on the unit is turne...

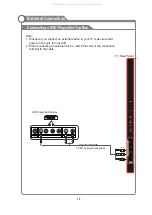
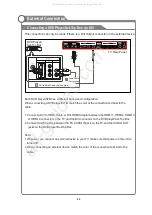
Страница 20: ...r TV make sure that power on the unit is turned off 2 When connecting an external device match the color of the connection terminal to the cable White Red VIDEO OUT DVD Player Set Top Box Red White YPbPr cable not supplied Audio Cable Not supplied Yellow TV Rear Panel All manuals and user guides at all guides com ...

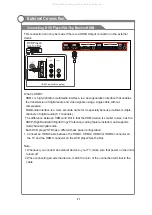
Страница 21: ...MI 3 or HDMI 4 connector on the TV and the DVI connector on the DVD player Set Top Box 2 Connect Audio Cables between the PC AUDIO IN jack on the TV and the AUDIO OUT jacks on the DVD player Set Top Box Note 1 Whenever you connect an external device to your TV make sure that power on the unit is turned off 2 When connecting an external device match the color of the connection terminal to the cable...

Страница 22: ...fference between HDMI and DVI is that the HDMI device is smaller in size has the HDCP High Bandwidth Digital Copy Protection coding feature installed and supports multi channel digital audio Each DVD player STB has a different back panel configuration 1 Connect an HDMI Cable between the HDMI1 HDMI2 HDMI3 or HDMI4 connector on the TV and the HDMI connector on the DVD player Set Top Box Note 1 Whene...

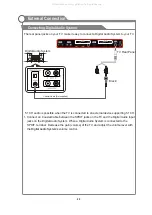
Страница 23: ... 5 1 CH 1 Connect an Coaxial Cable between the SPDIF jacks on the TV and the Digital Audio Input jacks on the Digital Audio System When a Digital Audio System is connected to the SPDIF terminal Decrease the gain volume of the TV and adjust the volume level with the volume control Digital Audio System s TV Rear Panel Coaxial Cable Not supplied Digital Audio System Black CVBS SPDIF All manuals and u...

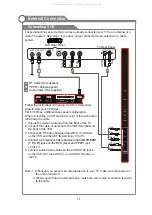
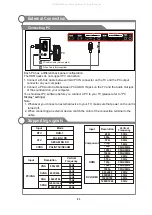
Страница 24: ...50Hz Each PC has a different back panel configuration The HDMI jacks do not support PC connection 1 Connect a D Sub Cable between VGA PC IN connector on the TV and the PC output connector on your computer 2 Connect a PC Audio Cable between PC AUDIO IN jack on the TV and the Audio Out jack of the soundcard on your computer You should set PC software before you connect a PC to your TV please refer t...

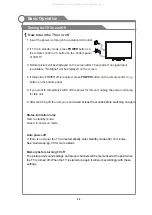
Страница 25: ... off the power for this unit unplug the power cord plug for this unit 6 After switching off the unit you should Status indication lamp Red In standby mode Green In power on mode Auto power off If there is no signal the TV will 10 minutes Memory before turning TV off wait at least 5 seconds before switching on again automatically enter standby mode after See Auto sleep pg 36 for more details The pi...

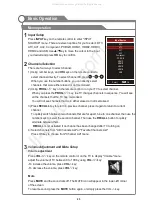
Страница 26: ... channel press it again to return to current channel To quickly switch between two channels that are far apart tune to one channel then use the number keys to select the second channel Then use the RECALL button to quickly alternate between them RECALL is not activated if no channel has been changed after TV turning on 4 Select channels from All Channels List or Favorite Channels List Press OK key...

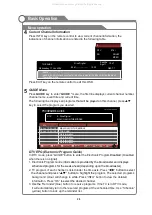
Страница 27: ...3 Reminder blue button to reserve programs If the TV is in DTV mode it will automatically turn to the reserved program at the scheduled time Use Schedule yellow button to look up the reminder list that will be played on Disabled information is provided by the broadcaster and displays scheduled programs for the week ahead depending upon the broadcaster t u button to select the channel and press p q...

Страница 28: ...show the RECORDER page INFO you can press the INFO key on the remote controller to show information in regards to the program you have chosen OK you can press the OK key on the remote controller to Exit Previous select the channel you want to view once you have selected a channel using the OK key press the Exit key to view that particular channel Picture 1 Press MENU key to display the main menu o...

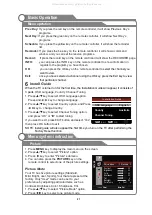
Страница 29: ...and the background Brightness Adjusts the brightness of the picture Color Adjusts the colors making them lighter or darker Sharpness Adjusts the outline of objects to either sharpen them or make them more dull Tint Adjusts the color of objects making them more red or green for a more natural look NOTE Tint can only be adjusted when signal is NTSC Adjusting the Backlight You can the brightness of t...

Страница 30: ...ass over other sounds l l l l l l l User Selects your custom sound settings See User settings for Sound Balance If the volumes of the left speaker and the right speaker are not the same you can adjust the Balance to suit your personal preference 1 Press p q key to select Balance option 2 Press t u key to decrease or increase the value of the item settings News Provides clear and live sound for new...

Страница 31: ...ulation signal is low 1 Press p q key to select Auto Volume option 2 Press t u key to select On or Off SPDIF Mode This is used to select SPDIF Mode This option is only used in HDMI DTV mode 1 Press p q key to select SPDIF Mode option 2 Press t u key to select RAW or PCM 30 User settings for SOUND Equalizer 1 Press key to select an equalizer item 2 Press OK or u key to enter the equalizer The sound...

Страница 32: ...em PAL Auto Search DTV Manual Search ATV Manual Search Programme Edit Signal Information Please select country first Then select Start to update info Cancel Start Country selection Australia Tune Type DTV ATV è è Color System è Sound System Sound ound I DK è è è è Current CH You can see the current channel number and you can press button to choose the channel you want to modify Select the Color Sy...

Страница 33: ... choose your favorite programs as soon as possible button to select the program that need to be renamed then press green button into rename state Press button to select the letter that need to be edited then press button to select a new letter repeat to rename the program Move You can press You can press Rename some program from program list in ATV mode you want to Rename Press 32 Select Menu Retu...

Страница 34: ...n to enter the submenu set the day time to turn off the TV set In On Time item press button or OK button to enter the submenu set the time to turn on the TV set when the TV set is in the standby mode You can also choose which day to control your TV set in a week Notes When the time is less than 60 seconds remind information will be displayed on the screen Press any key button to cancel timer funct...

Страница 35: ...also press key on the remote control to select one of the scale modes Each source has different scale modes 16 9 4 3 Panorama Movie Subtitle Full view Auto RESET u 1 Press MENU key to display the main menu on the screen 2 Press p q key 3 Press OK or u key to enter submenu Enter Password menu will appear enter your 4 digit password to enter submenu 1 Press p q key to select option 2 Press requireme...

Страница 36: ...A AV R Software Update USB 1 Press p q key to select Software Update USB option 2 u key to software update process Note In the software update process do not turn off the power PVR File System 1 Press MENU key to display the main menu on the screen 2 Press p q key to select PVR File System option 3 Press OK or u key to enter PVR File System submenu operation refer to PVR File System in page 37 Opt...

Страница 37: ...anguage option 2 Press key to set Secondary Subtitle Language position position t u t u t u t u t u FUNCTION Select Auto Adjust Menu Return H Position V Position Clock Phase 50 50 50 25 Window Adjust NoAct PowerOff Off Window Adjust RGB Range Change the brightness and saturation for a better picture 1 Pressp qkey to select RGB Range option 2 Press key to select 16 235 or 0 255 Note only available ...

Страница 38: ... suitable for Indicates PASS or FAIL for the status of your USB Disk formatted Do not disconnect disk or turn power off during formatting When formatting your disk a progress bar will appear on the display NOTE The larger your device the longer it will take to format The device may take many minutes to format this is not a malfunction please wait for the formatting to finish Menu Return OK EXIT OK...

Страница 39: ...stem Select Disk C Record Max Time 4Hr Check PVR File System Start USB Disk Format Time Shift Size Speed Disk Remaining Space MB OK Exit Time Shift Size Time Shift Disk Size 512MB SD 14 Mins HD 4 Miins Menu Return OK EXIT OK Exit PVR File System Select Disk C Record Max Time 4Hr Check PVR File System Start USB Disk Format nat Time Shift Size Speed Disk Remaining Space MB OK Exit File System Size S...

Страница 40: ...ndby mode This unit is able to do recording while in standby mode 1 Start a recording then press the power button A message will be displayed prompting you to continue or cancel selected t u Recording will proceed when the TV is in either active or standby modes When recording initialises in standby mode the front panel indicators will flash momentarily and there will be no picture output You can ...

Страница 41: ...uring the data transfer It may cause problems for the system Data Picture Music Video Text Format JPG JPE PNG BMP MP3 WMA AAC TXT Description of Playback Buttons Digital Media Player 40 OK PgUp PgDn Pause Play Stop Previous file Next file Page up Zoom in Page down Zoom out Backward Forward Display the short cut key Buttons Function SUBTITLE Subtitile switch video Language Soundtrack Switch video R...

Страница 42: ...in the entry photo option on the left the switch to the image preview area was selected in the image preview area in the right section then play image files Exit Key Selected in the entry in the right image preview area select the entries to switch back to the left side of photo options the selected option in the entry on the left picture the switch back to the USB interface initialization Photo P...

Страница 43: ...peat the current picture Music Shown as Figure 9 When opened will start playing the most recently played songs If this option is opened when a song has not played recently the default behaviour is to play all the music Stop Exit Slideshow When the picture have been magnified over the role of screen size Press OK to display the arrow guide OSD Figure 5 Play Prev Next Rotate Proportion Music Stop Pl...

Страница 44: ...the left side of music options selected entries in the music option on the left the switch back to the USB interface initialization Play Music Music player interface Shown as Figure 14 Action Left Right rewind fast forward Upper and lower key on a the next one OK button Play Pause music Exit exit the music player interface return to music browsing interface Menu key enter the playback control menu...

Страница 45: ...g Content Displays the playback video files under the specified path Shown in Figure 19 2 Single Repeat single track Figure 18 Figure 19 Bonnie Winds mp3 00 00 03 00 04 07 Figure 16 ByOrder Single PlayLoop Play FB FF Next PlayMode Prev Playlist Stop Bonnie Winds mp3 00 00 03 00 04 07 Figure 17 Play FB FF Next PlayMode Prev Playlist Stop 1 1 Burning mp3 Jesus To A Child Mp3 Bonnie Windsl mp3 music_...

Страница 46: ...ause Play pause the video FB Fast back playing 2x 4x 8x 16x FF Fast forward playing 2x 4x 8x 16x Prev Play previous video Next play next video Figure 20 Figure 21 Figure 22 Ad mpeg 00 00 03 00 04 07 FB FF Next PlayMode Prev Proportion Switch Play Figure 23 0 0 0 0 0 0 Input search time Enter Video view Content The specified path to all the video files displayed as thumbnails Key operation Arrow ke...

Страница 47: ... 2X 4X 8X 16X Figure 25 Ad mpeg 00 00 03 00 04 07 FB FF Next PlayMode Prev Proportion Switch Play ByOrder Single PlayLoop Ad mpeg 00 00 03 00 04 07 Slow Stepping Set A Stop Playlist Info Figure 26 Ad mpeg 00 00 03 00 04 07 Slow Stepping Set B Stop Playlist Info Figure 27 Ad mpeg 00 00 03 00 04 07 Slow Stepping None Stop Playlist Info Figure 28 3D 3D 3D Ad mpeg 00 00 03 00 04 07 FB FF Next PlayMode...

Страница 48: ... with your work but i also know there s no simple formula to achieve career success and satisfaction the workplace is chaotic if you re like most people you probably feel that you re living a career nightmare working harder to make a living with fewer available resources more demands on your time and lots of disincentives to achievement perhaps you fantasize about chucking the whole scene right ab...

Страница 49: ...All manuals and user guides at all guides com ...

Страница 50: ...when the focus is on the right side file display area if the focus on the folder then into the folder If movies music pictures text and then play the file Exit If the focus is on the left then switch back to the USB initialization interface if the focus is on the right side of the menu and when in the root directory then switch to the left region if the focus is on the right side when the non root...

Страница 51: ...nnected Batteries of remote control may have exhausted if necessary please change the batteries Clean the remote control lens The distance between LED TV and remote control should be within 8m within recommended operating angle and path is free of obstructions V HEIGHT value may be set too big restart computer and enter safe mode then set monitor parameters to correct value according to adjustment...

Страница 52: ...pixelization etc Black bars on each side will be shown on HD channels when displaying SD 4 3 contents Black bars on Top Bottom will be shown on movies that have aspect ratios different from your TV Adjust picture size option on your external device or TV to full screen Noise from speaker Check cable connections make sure a video cable is not connected to an audio input Low signal level may cause s...

Страница 53: ...roubleshooting 52 Picture defects and the reason Ghosting may also occur when still pictures are displayed continuously It may disappear after a few moments All manuals and user guides at all guides com ...

Страница 54: ...3904 All manuals and user guides at all guides com ...

Отзывы: