background image

KGC-222 

Chapter 1 Installation


0093822202-01


1-1


Chapter 1  Installation 

1.1


Items of Caution on Installation 

In order to obtain the maximum performance of the GPS compass, this compass should be 

installed by a qualified technician. Installation procedures include the following: 
(1)  Unpacking the components 
(2)  Inspection of configuration unit, spare parts, accessories and installation materials 
(3)  Checking of supply voltage and current capacity 
(4)  Selection of installation location 
(5)  Installation of Display unit and Antenna 
(6) Attachment of accessories 
(7)  Planing and implementation of cable layout and connection   
(8)  Coordinataion after installation 


Unpacking the components 

Unpack components and check that all of the items correspond with the contents discription of 

the packing list. When a discrepancy or damage has been found, contact the dealer you 

purchased this product.   


Appearance varification of each unit and accessories 

Inspect the appearance of each components and accessories and check that no dents or 

damage exist. 
If any dents or damages exist and they are believed to be caused by accident during 

transportation, contact the transportation and insurance company and consult our sales 

company or our dealer nearest to you. 


Selection of location for installation 

In order to obtain the maximum performance of the unit, it is necessary to install following 

below recommendations. 
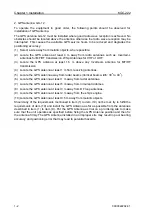
1. Display unit of KGC-222 
(1)  Install the display in the bridge where it will be easy to see and read.   
(2)  Choose the best location from humidity, spray, rain and direct sunlight. 
(3)  Keep safety distance from magnetic objects such as magnetic compasses. 


(4)  Keep sufficient maintenance space around the equipment, pay attention to the back of 

the display where cables are connected. 

(5)  Keep the equipment as far away from wireless transmitter/receivers as possible. 


Содержание KGC-222

Страница 1: ......

Страница 2: ...on number The document No is indicated at the lower right side on the cover and at the left or right side of the footer region of each page 2014 Koden Electronics Co Ltd All rights reserved No part of...

Страница 3: ...nd some parts may be omitted Koden is not liable for damages and troubles arisen from misunderstanding of the contents in this manual Koden is not liable for any damages caused by earthquake lightning...

Страница 4: ...en after the power is switched off To prevent contact with the high voltage circuits accidentally a protective cover or the label with this mark is provided on the high voltage circuit When the inside...

Страница 5: ...shock In case of failure please contact Koden s dealers or Koden In case of smoking or firing switch off the power in the boat and of this equipment It may lead to firing electric shock or damages Be...

Страница 6: ...and accessories 1 1 Selection of location for installation 1 1 Laying and Connection of Cable 1 3 Confirmation after Installation 1 4 1 2 Installation of Display unit 1 5 Table mounting 1 5 Flush moun...

Страница 7: ...ail of the serial output data 3 1 3 1 Output data format 3 1 3 2 Details of the output data format 3 1 3 3 Output data specification 3 1 3 4 Details of output sentences 3 1 Chapter 4 Technical referen...

Страница 8: ...has processor receiver and LCD display built in KGC 222 has internal electronic compass as backup sensor This enables the backup sensor to output heading even if the GPS signals are interrupted in suc...

Страница 9: ...Chart Plotter Echo sounder DATA 3 Connector CW 373 5M CW 376 5M Marine radar Chart Plotter Echo sounder Auto pilot DATA 2 Connector CW 373 5M CW 376 5M Marine radar Chart Plotter Echo sounder Auto pi...

Страница 10: ...W 376 5M DATA 4 Connector DATA 1 Connector CW 392 15M CW 392 15M CW 266 1 8M Owner supply Option Standard configuration Legend DATA 3 Connector DATA 5 Connector Junction Box JB 35 Marine radar Chart P...

Страница 11: ...een Caution The maximum current capacity is 300 mA in total then it should not exceed Take care that the grand total of each connector does not exceed 300 mA Caution KGC 222 Compass has 12V power on P...

Страница 12: ...e following color chart CW 376 5M To DATA1 of Display unit SLAVE1 SLAVE3 MASTER SLAVE2 Green Black Orange Red White Blue Shield 12V TX TX RX RX GND Green Black Orange Red White Blue Shield NC TX TX RX...

Страница 13: ...DC power cable CW 266 1 8M With a 3 pin connector and one end plain 1 8m 1 3 GPS antenna GA 12 With bird protector 1 4 Antenna cable CW 392 15M 3D 2V With BNC connectors on the both sides 15m 2 5 Inst...

Страница 14: ...wer cable VV 2D8 3M Without connectors on the both sides cable for PS 010 3m 6 Flush mount kit FMK 1 Flush mount frame with bolts washers and screws 7 Antenna cable extension kit CW 393 30M 5D FB cabl...

Страница 15: ...External view and dimensions KGC 222 xiv 0093822202 01 External view and dimensions Display unit KGC 222 MU Front view Side view Rear view Weight 0 89kg With mounting bracket Unit mm inch...

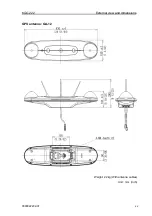
Страница 16: ...KGC 222 External view and dimensions 0093822202 01 xv GPS antenna GA 12 Weight 2 2kg With antenna cables Unit mm inch...

Страница 17: ...tioning accuracy Position Velocity GPS 10m 2 drms SA OFF PDOP 3 or less DGPS 3m 2 drms SA OFF PDOP 3 or less 1 m sec rms SA OFF PDOP 3 or less Datum 88 WGS 84 Tokyo etc Output data port 3 standard 5 w...

Страница 18: ...n found contact the dealer you purchased this product Appearance varification of each unit and accessories Inspect the appearance of each components and accessories and check that no dents or damage e...

Страница 19: ...S antenna at least 1 m from receiving antennas 5 Locate the GPS antenna away from radar beams Vertical beam width 30o to 40o 6 Locate the GPS antenna at least 1 m away from radar antennas 7 Locate the...

Страница 20: ...interference from other electronic equipment is expected to be less See Fig 1 1 Fig 1 1 Connection of Power Line Good example Bad example Display unit Display unit Battery Battery Noise Noise KGC 222...

Страница 21: ...The confirmation is mandatory to operate the equipment normally 1 Is the power voltage in the boat within the appropriate voltage range Is the current capacity enough Voltage Range 10 8 to 31 2 VDC wh...

Страница 22: ...data is used with other equipment such as echo sounder the display needs to be installed in head up orientation if display is installed at an angle with the bow line then it needs to be compensated i...

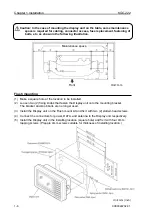
Страница 23: ...2 Loosen two 2 fixing knobs that fasten the Display unit onto the mounting bracket The bracket and knob bolts are no longer used 3 Install the Display unit on the Flush mount kit and fix it with two 2...

Страница 24: ...d be where possible installed on the midship to minimize bearing deviation between the ship s bearing and course Antenna cable layout method Two ways to run antenna cable from the antenna 1 Antenna ca...

Страница 25: ...e cradle fix the bracket When the thickness of the bracket is 4 to 5mm supplied bolts may be used M8 x 25 When the bracket is more than 6 mm thick the bolts should be choosen from the below table Plat...

Страница 26: ...nit 1 Pay attention to the BOW antenna cable marked with tape 2 Wind the self bonding tape around the joint section after connecting Pull the end of the tape and stretch it to twice its length Wrap it...

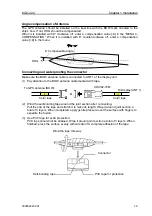
Страница 27: ...and Display unit via the cable kit as shown in the following figure 1 Connection at GPS Antenna side 2 Connecting the Display unit To GPS antenna Conversion connector NP BNCP To Display unit Waterpro...

Страница 28: ...cause of poor reception of the GPS signal when perched on top of the GPS antenna unit The use of bird protector is recommended to avoid this problem To fit this device use the following procedure Caut...

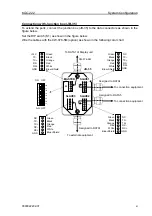
Страница 29: ...s on the Display unit DATA 3 is for navigational data Be sure to connect the Plotter or the KBG 3 to DATA 3 Chart Plotter Echo sounder Marine radar Chart Plotter Echo sounder Auto pilot Marine radar C...

Страница 30: ...ter Echo sounder Marine radar Chart Plotter Echo sounder Auto pilot Marine radar Chart Plotter Echo sounder Auto pilot POWER DATA1 DATA2 DATA3 GND ANT1 ANT2 Junction Box JB 35 Marine radar Chart Plott...

Страница 31: ...housing do not use a solvent such as thinner or alcohol Painting on the surface and characters at the operating portion may melt After wiping with soft and clean cloth dipped with diluted neutral dete...

Страница 32: ...talled in conformity to the ship s bow Compensate of HDG Refer to MENU 3 Compensation 1 HDG The heaving data is not compensated The rolling pitching data is abnormal Compensated value of Display unit...

Страница 33: ...ort circuits of the antenna cable Check the insulation of antenna cables RAM1 Error Backup DATA failure Press to initialize If the situation does not change even if the unit has been initialized repla...

Страница 34: ...t returns all the settings in the menu to the factory settings Before initializing please note all system parameters and reset them after initialize Initialization 1 Press to power on 2 Press to move...

Страница 35: ...max DTM GGA GLL GSA GSV MSS RMC VTG ZDA PKODA PKODG 1 PKODG 7 PKODQ 1sec ATT HDM HDT HVE ROT PKODG 21 20ms 40ms 50ms 100ms 200ms 1sec 3 4 Details of output sentences Sentenc e name Data name and cont...

Страница 36: ...ksum Neg Angular speed deg min Status A Valid V Void Time of measurement Hour Min Sec Latitude Longitude N North latitude S South latitude E East longitude W West longitude Status of GPS fix measureme...

Страница 37: ...ksum First satellite Available number of satellites Satellite No Elevation angle Azimuth angle S N Signal to Noise ratio 2nd sv 3rd sv Date D M Y Time H M S Day Checksum Month Year This field is not u...

Страница 38: ...et min E W Checksum Reference datum WGS84 W84 WGS84 W72 WGS72 999 user IHO datum code Satellite No in use 1 4 channel S N ratio of the satellite in use 1 4 channel Ground speed Antenna height P PDOP H...

Страница 39: ...type 16 provided from a Japanese beacon station ATT Ship s heading Pitch and Roll information FURUNO proprietary sentence PEFC GPatt xxx x 00 0 00 0 hh CR LF HVE Heaving information FURUNO proprietar...

Страница 40: ...w of Display Unit D86BG13021 No Parts Code Name Description Q ty Remarks 15 0060772012 PCB assembly D86 700 1 Main processor 6 0060390060 PCB assembly D35 900 1 Operation panel 12 0059543080 LCD modul...

Страница 41: ...Chapter 4 Technical references KGC 222 4 2 0093822202 01 4 2 Exploded view drawing...

Страница 42: ...KGC 222 Chapter 4 Technical references 0093822202 01 4 3 4 3 Block diagram...

Страница 43: ......

Отзывы: