Kodak XLS 8400 PS Скачать руководство пользователя страница 26

Getting Started

1–12

Part No. 4B1709

March 1995

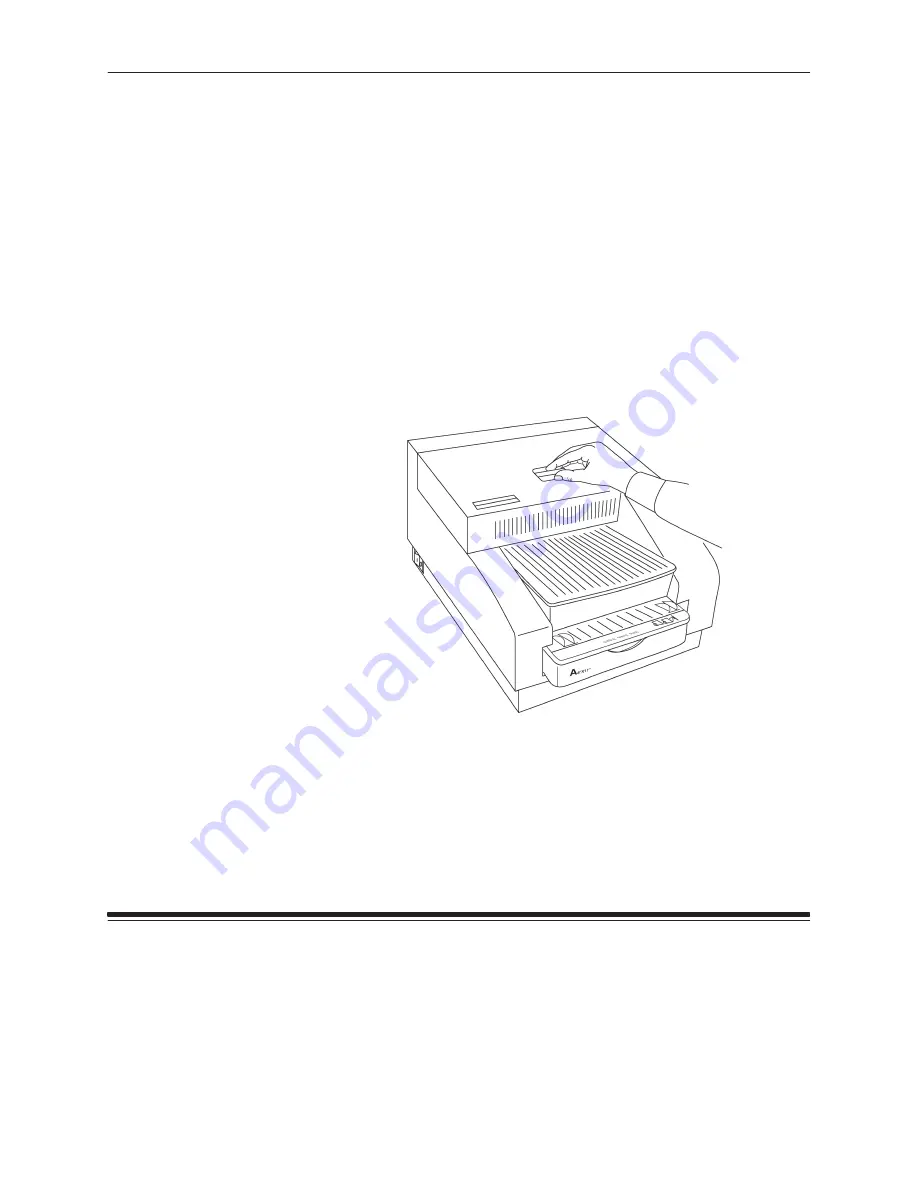
Cleaning the Thermal Head

It is important to clean the printhead when you are installing the printer,
and periodically afterward to remove dust and debris. Dirt can usually be
removed easily by following the head cleaning instructions below.

Clean the printhead each time you replace the ribbon to avoid lines or
streaks in your prints. You may need to clean it more often if your site is
particularly dusty. A cleaning pad is provided with each ribbon spool.

NOTE: If a cleaning pad is not available, use the alternate cleaning

method described in Chapter 4. You can order extra cleaning
pads by contacting Kodak Parts Services at 1–800–431–7278.
The part number for 160 of these pads is TL3127.

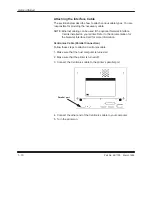
1. Turn the printer off.

2. Open the printer cover.

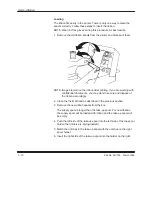
3. Remove the ribbon spools carefully if a ribbon is loaded in the printer.

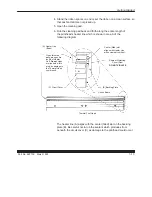
NOTE: When handling thermal ribbon, hold it by the ends of the white plastic

spools. Wearing lint-free gloves is recommended. Fingerprints on the
ribbon web may severely reduce image quality.

Содержание XLS 8400 PS

Страница 1: ...Part No 4B1709 User s Guide KODAK XLS 8400 PS Printer...

Страница 2: ......

Страница 3: ...Regulatory Information x Safety Regulations xi 1 Getting Started 1 1 Checking Contents 1 1 Removing the Shipping Pins 1 2 Finding a Location 1 3 Components of the Printer 1 4 Reviewing the Components...

Страница 4: ...efaults 1 40 Specifying Port Information 1 42 Specifying the Mode 1 46 Making a Test Print 1 47 Printing from Computer Applications 1 48 Job Scheduling 1 49 Storing Prints and Transparencies 1 50 2 Ma...

Страница 5: ...Instructions 4 10 Clearing the Paper Path 4 13 Repacking the Printer 4 16 Getting Help 4 18 Appendix A Printer Specifications A 1 Size A 1 Weight A 1 Operating Environment A 1 Space Requirements A 1...

Страница 6: ......

Страница 7: ...hree color page Printed images are high contrast and long lasting A number of communication ports are provided on the printer In addition to these standard ports the optional KODAK Network Interface C...

Страница 8: ...m 8 0 x 10 0 204 x 256 mm 8 27 x 12 0 210 x 307 mm 8 0 x 10 0 204 x 256 mm 8 5 x 14 0 216 x 358 mm 8 0 x 12 0 204 x 307 mm 8 27 x 14 0 210 x 358 mm 8 0 x 12 0 204 x 307 mm 9 5 x 14 0 243 x 358 mm 8 42...

Страница 9: ...th the XLS 8400 PS Printer D KODAK XLS 8400 PS Printer Driver for MACINTOSH COMPUTERS D KODAK XLS 8400 PS Printer Driver for MICROSOFT WINDOWS 3 1 D KODAK XLS 8400 PS Printer Export Module for ADOBE P...

Страница 10: ...Demi Oblique D ITC Bookman Light Light Italic Demi Demi Italic D ITC Zapf Chancery Medium Italic D ITC Zapf Dingbats D New Century Schoolbook Roman Italic Bold Bold Italic D Palatino Roman Italic Bold...

Страница 11: ...ital Apparatus ICES 003 of the Department of Communications Cet appareil num rique respecte les limites de bruits radiol ctriques applicables aux appareils num riques de Classe B prescrites dans la no...

Страница 12: ...y one or more of the following measures D Reorient or relocate the receiving antenna D Relocate the printer with respect to the receiver D Move the printer away from the receiver D Plug the printer in...

Страница 13: ...ALEN ANWENDUNGSFALL NACHBILDET AUF DIE EINHALTUNG DER FUNKENTST RBESTIMMUNGEN GEPR FT ES IST JEDOCH M GLICH DASS DIE FUNKENST RBESTIMMUNGEN UNTER UNG NSTIGEN UMST NEN BEI ANDEREN GER TEKOMBINATIONEN N...

Страница 14: ......

Страница 15: ...e sure the following items are included Paper tray Language kit Included in this box SCSI terminator Printer users guide 1 Printer Drivers and Export Modules 3 Software users guides 2 Head cleaning pa...

Страница 16: ...S 8400 PS Printer Save the printer s packaging and these pins in case you need to ship your printer in the future CAUTION Do not use the printer until you remove the shipping pins 1 Remove the printer...

Страница 17: ...rates the necessary space requirements 17 12 plan for 201 4 to allow room for opening cover 24 plan for 371 2 to allow room for removing tray Airborne dirt particles can cause image quality problems A...

Страница 18: ...mponents in the illustrations and descriptions that follow Printer Front View The components of the printer are shown below paper tray display panel Paper tray the paper tray can hold up to 100 sheets...

Страница 19: ...splay panel indicates printer status and is described in detail later in this chapter You can select the language that you would like to read on the display panel by using the setup menu The following...

Страница 20: ...these areas you may need to purchase a power cord Ports a variety of ports is provided on the back of your printer Ethernet ports will be in place if the optional Network Interface Card is installed P...

Страница 21: ...below Power switch turn the power switch to I to turn the printer power on or to O to turn the power off power switch K number label K number label a label next to the power switch displays the printe...

Страница 22: ...transfer the color dyes to paper or transparency material CAUTION Never rub or wipe anything across the thermal head except when cleaning it Refer to the section entitled Cleaning the thermal head in...

Страница 23: ...the power cord 1 Make sure that the printer is turned off 2 Plug the appropriate end of the power cord into the inlet on the back of the printer Power cord inlet 3 Plug the other end into an AC outlet...

Страница 24: ...face Card is installed on your printer Refer to the documentation for the Network Interface Card for more information Centronics Cable Parallel Connection Follow these steps to attach a Centronics cab...

Страница 25: ...mputer directly to the printer using LocalTalk cable 1 Make sure that the host computer is turned on 2 Make sure that the printer is turned off 3 Attach one of the LocalTalk connectors to the computer...

Страница 26: ...ur site is particularly dusty A cleaning pad is provided with each ribbon spool NOTE If a cleaning pad is not available use the alternate cleaning method described in Chapter 4 You can order extra cle...

Страница 27: ...ter filled slot aligns with Heater Line when viewed from front Sealant Protecting Circuit Row DO NOT VIOLATE A Heater Line Bead Clean this area only along entire length of Heater Line Do not clean or...

Страница 28: ...oad the ribbon spool by following the loading instructions beginning on page 1 16 10 Close the printer cover 11 Turn on the printer 12 Press the print button on the display panel to make a test print...

Страница 29: ...magenta patch and one cyan patch Each color ribbon contains enough dye to generate 100 prints Refer to Chapter 3 Supplies for more information about storing and ordering ribbon Handling When handling...

Страница 30: ...ial documents you may want to secure and dispose of the ribbon accordingly 2 Clean the thermal head as described in the previous section 3 Remove the new ribbon spools from the box The supply spool is...

Страница 31: ...ing you and the barcode is on the left adhesive strip barcode 8 Make sure that the spool notches are on the right This is particularly important when you are reloading a partially used spool of ribbon...

Страница 32: ...ith the notches on the right spool holder 11 Insert the right side of the supply spool into the holder on the right 12 Remove the tape from the adhesive strip 13 Fold any excess ribbon behind the adhe...

Страница 33: ...h 1995 NOTE Keep the ribbon as straight as possible 15 Smooth the ribbon over the adhesive strip with your fingers 16 Wind the take up spool several times The first full set of dye patches is not used...

Страница 34: ...D Handle the package of paper with the cardboard stiffener sheets in place Loading The paper tray adjusts to the size of the paper you want to load Be sure not to force paper that is too long or too w...

Страница 35: ...Getting Started 1 21 Part No 4B1709 March 1995 1 Remove the paper tray from the printer 2 Push in the latches and take off the paper tray lid latch latch...

Страница 36: ...are loading by performing the following steps D Look through the opening on the side of the tray so that you can see the sensor label sensor label through opening This label indicates the current pape...

Страница 37: ...ays through the opening on the side of the tray The options on the sensor labels for the three trays are shown below Letter Adjustable Tray A4 Adjustable Tray 9 5 x 14 in Tray NOTE You do not have to...

Страница 38: ...e media length stop on the 9 5I x 14I tray 4 Remove and discard any blue stiffener sheets that remain in the paper tray 5 Remove the paper from the package NOTE Handle the paper stack by the edges to...

Страница 39: ...March 1995 Make sure that the front corners of the paper stack are under the triangular metal tabs 8 Put the paper tray lid back on 9 Make sure that the latches on the two sides of the paper tray lat...

Страница 40: ...Getting Started 1 26 Part No 4B1709 March 1995 10 Insert the paper tray in the printer until it locks into position 11 Verify that the correct paper size is listed on the display panel...

Страница 41: ...ts in place Loading You can adjust the paper tray to the size of the transparency material you want to load The printer uses a sensor on the tray to determine the correct paper size Be sure not to for...

Страница 42: ...4B1709 March 1995 Follow the instructions below to adjust the tray to the proper size and to load transparency material 1 Remove the paper tray from the printer 2 Push in the latches and take off the...

Страница 43: ...you are loading by performing the following steps D Look through the opening on the side of the tray so that you can see the sensor label sensor label through the opening This label indicates the cur...

Страница 44: ...ugh the opening on the side of the tray The options on the sensor labels for the three trays are shown below Letter Adjustable Tray A4 Adjustable Tray 9 5 x 14 in Tray NOTE You do not have to move the...

Страница 45: ...rency size you are loading A label on the bottom of the tray shows the available settings label NOTE You cannot change the media length stop on the 9 5I x 14I tray 4 Remove and discard any blue stiffe...

Страница 46: ...the orientation notch on the lower right hand side and with a blue stiffener sheet on the bottom of the stack Make sure that the front corners of the transparency stack are under the triangular metal...

Страница 47: ...1995 9 Make sure that the latches on the sides of the paper tray latch into place in the paper tray lid 10 Insert the paper tray in the printer until it locks into position 11 Verify that the correct...

Страница 48: ...ges will flash on the display panel READY media type ribbon type media type will be replaced by the size and type of media that is loaded in the paper tray For example 210X307 mm TRANS ribbon type wil...

Страница 49: ...Getting Started 1 35 Part No 4B1709 March 1995 Understanding the Display Panel Familiarize yourself with the display panel shown below A description of each item is on the following pages...

Страница 50: ...s light is lit a message will be displayed There are two types of error conditions user correctable errors and errors requiring service User correctable error when the error light is lit but is not fl...

Страница 51: ...n the printer Messages also appear when the paper tray is empty when the printer s cover is open and when errors occur Messages The printer s display panel provides information about the status of the...

Страница 52: ...lled if one exists The Cancel B button also scrolls down through the Setup menu when using the Setup button For more information refer to the section entitled Configuring the Printer in this chapter S...

Страница 53: ...will see is SETUP EXIT Selecting Options You can scroll up through the list of setup features by pressing the Print Y button or you can scroll down through the list by pressing the Cancel B button Th...

Страница 54: ...our selection Selecting Defaults Press the Setup Select button when SETUP DEFAULTS appears in the display panel to change the printer s default settings Restoring Factory Settings Use the DEFAULTS FAC...

Страница 55: ...e printer without a media type specification The new option will be in effect when you exit Setup mode MEDIA PAPER MEDIA TRANS MEDIA EXIT Select MEDIA PAPER if you want paper to be the default media t...

Страница 56: ...ALLEL menu to establish information about connecting the printer through a parallel port The new option will be in place once you exit Setup mode PARA MODE This menu specifies whether the parallel por...

Страница 57: ...cifies whether version 1 or 2 of AppleTalk will be used on the EtherTalk connection The following settings are available VER 2 VER 1 VER EXIT Select VER EXIT once you have made your selection and sele...

Страница 58: ...are available TCP IP ADDRESS TCP IP EXIT Select TCP IP ADDRESS to access a screen which allows you to enter digits for the address The address is represented as four groups of 3 digits each separated...

Страница 59: ...hether or not the printer should act as the SCSI bus initiator The only time that this option should be enabled is when an external disk drive for font storage is connected to the printer The followin...

Страница 60: ...in calibration mode The printer should run in PostScript mode when you are sending printing jobs and in calibration mode when you are sending color calibration files The following settings are availa...

Страница 61: ...processed the following message will be displayed PRINTING As printing takes place the printer moves the paper through the imaging path multiple times During this process the paper will partially exit...

Страница 62: ...up of lines generally takes less time to print than a file which is defined in bits such as a scanned image While image data is processing the following message will appear on the display panel PROCE...

Страница 63: ...hat impacts job scheduling is the network configuration in which the printer is installed When the printer is connected through more than one port the printer polls the ports in a round robin manner T...

Страница 64: ...y between 30 and 50 is ideal D Avoid exposure to high intensity light sources particularly florescent light and sunlight which are rich in ultraviolet radiation D Avoid exposure to vinyl items those m...

Страница 65: ...rmal head each time you load a new ribbon or if you notice image quality problems Refer to the thermal head cleaning procedure detailed in Chapter 1 Getting Started D Clean the roller bar D Clean the...

Страница 66: ......

Страница 67: ...rinter accessories and their catalog numbers These items can be purchased through your printer dealer or distributor Accessory Catalog Number KODAK Network Interface Card NIC for KODAK XLS 8600 PS Pri...

Страница 68: ...through your printer dealer or distributor NOTE Paper is shipped in packages of 100 sheets Paper Type Catalog Number KODAK EKTATHERM XLS Print Paper 8 5 x 11 216 x 281mm for use with the KODAK Letter...

Страница 69: ...Letter Adjustable Tray 868 4623 8 0 x 10 204 x 256mm Image area KODAK EKTATHERM XLS Print Paper 210 x 307mm 8 27 x 12 for use with the KODAK A4 Adjustable Tray 875 1596 8 0 x 10 204 x 256mm Image area...

Страница 70: ...THERM XLS Print Paper 210 x 358mm 8 27 x 14I for use with the KODAK A4 Adjustable Tray 807 5640 8 0 x 12I 204 x 307mm Image area KODAK EKTATHERM XLS Print Paper 9 5 x 14I 243 X 358mm for use with the...

Страница 71: ...our printer dealer or distributor NOTE Transparency material is shipped in packages of 100 sheets Transparency Type Catalog Number KODAK EKTATHERM XLS Transparency Material 8 5 x 11 216 x 281mm for us...

Страница 72: ...XLS Transparency Material 8 5 x 12 216 x 307mm for use with the KODAK Letter Adjustable Tray 853 4059 8 0 x 10 204 x 256mm Image area KODAK EKTATHERM XLS Transparency Material 210mm x 307mm 8 27 x 11...

Страница 73: ...RM XLS Transparency Material 8 5 x 14 216 x 358mm for use with the KODAK Letter Adjustable Tray 852 9679 8 0 x 12 204 x 307mm Image area KODAK EKTATHERM XLS Transparency Material 210mm x 358mm 8 27 x...

Страница 74: ...rtially used ribbons in their original wrappers to protect them from dust and dirt when they are not loaded in the printer Dust and dirt specs on the ribbon show up as much larger spots on prints When...

Страница 75: ...ut curling High relative humidity tends to cause paper to curl toward its image side Low relative humidity tends to cause paper to curl away from its image side Low relative humidity also tends to inc...

Страница 76: ...Avoid exposure to temperatures higher than 100_F 38_C D Keep the bottom stiffener board in place when handling stacks of paper to avoid fingerprints on the printing surface D Avoid storing loose stack...

Страница 77: ...EADY will be displayed Following is an alphabetical list of the most common error messages that appear on the printer s LCD display CHANGE RIBBON The printer is unable to advance the ribbon because th...

Страница 78: ...The printer senses that the tray is empty or the wrong paper is loaded The message specifies the requested paper size LOAD RIBBON Ribbon Type The printer checks the ribbon s barcode and detects that t...

Страница 79: ...d but the oversize ribbon is not loaded For these situations you must change the ribbon or press Cancel to cancel the job Receiver Type Mismatch If you send a print job from a computer and request a m...

Страница 80: ...in the tray you will be notified of a mismatch There are two size mismatch situations D If the image size will fit on the loaded media you can either load the correct media size or press the Print bu...

Страница 81: ...all cables and cords are plugged in properly Printer does not initialize D Parallel connection only The host computer must be running before the printer is turned on 1 Turn off the printer 2 Make sure...

Страница 82: ...ity between printer and host D Follow instructions for Printer does not initialize D Disconnect the communications cable from the back of the printer and try a test print If this does not work service...

Страница 83: ...rinter D Restart the printer If the problem persists service is required Edges of transparency material curl on dense prints D Put prints in transparency sleeves D Try using the Printer Driver or Expo...

Страница 84: ...D Check to see if the ribbon is jammed Display panel says CHECK TRAY but tray is not empty D Open the printer cover remove tray and inspect for paper jam Display panel says LOAD TRANS or LOAD PAPER bu...

Страница 85: ...han loading a whole package Media stored in the wrapper lasts longer D Wrap partial stacks of media in its original plastic wrap squeeze out the air and tape the wrap shut This will protect the paper...

Страница 86: ...ation about ordering extra cleaning pads 1 Turn the printer off 2 Open the printer cover 3 Remove the ribbon spools carefully if a ribbon is loaded NOTE When handling the thermal ribbon hold it by the...

Страница 87: ...nt Protecting Circuit Row DO NOT VIOLATE A Heater Line Bead Clean this area only along entire length of Heater Line Do not clean or wipe below this area as damage to the Thermal Head could result C Ci...

Страница 88: ...procedure drying time is longer than when using a head cleaning pad Make sure that you let the printhead dry completely 10 Reload the ribbon spool once the printhead is completely dry by following th...

Страница 89: ...R PAPER PATH or CHECK TRAY message on the display Follow these steps to clear the paper path 1 Open the printer cover NOTE If you can t open the cover restart the printer by turning it off and on Ther...

Страница 90: ...Correcting Problems 4 14 Part No 4B1709 March 1995 2 Gently pull media up if it is caught inside the printer Power Error 3 Remove the paper tray if the media is caught in the paper tray area...

Страница 91: ...o 4B1709 March 1995 4 Look in the tray area through the tray insertion slot 5 Reach inside the paper tray area and gently pull the jammed media out Power Error NOTE If you cannot remove the paper or t...

Страница 92: ...pack the paper tray in its original box 2 Open the printer cover 3 Remove the ribbon spools from the printer and discard them or store them in their original box 4 Insert the shipping pins as follows...

Страница 93: ...Put appliance filament tape over the cover of the printer The tape must cover the latch and run down both sides of the printer all the way to the bottom 8 Put the printer in its original plastic bag...

Страница 94: ...itional technical information For technical support you can also call 1 800 23KODAK 1 800 235 6325 between 9 00 a m and 8 00 p m Eastern Standard Time on regular business days if you D have questions...

Страница 95: ...s 24 9 kg Operating Environment Ambient operating temperature 59_ to 86_F 15_ to 30_C Relative humidity 20 to 76 Space Requirements Minimum space required with tray inserted Width 17 inches 43 2 cm De...

Страница 96: ...Printer Specifications A 2 Part No 4B1709 March 1995 Power Requirements Voltage Frequency US Canada 90 to 250v 47 to 60Hz Power Consumption 250 watts maximum...

Страница 97: ...d SCSI disk drive to the printer you can use the software utilities available for your system to download fonts and store them on the disk Follow the steps below to attach a SCSI disk drive to the pri...

Страница 98: ...t disk when working from a Windows system follow the instructions provided by your font vendor WARNING Initializing the disk reformats it therefore all data stored on it will be lost This procedure sh...

Страница 99: ...ur Printer B 3 Part No 4B1709 March 1995 A Kodak XLS 8400 disk icon will appear on the desktop and the following window will open immediately 4 Double click on the Utilities folder The following windo...

Страница 100: ...pear 2 Click on the OK button A message will appear stating that the LaserWriter Font Utility is checking the characteristics of the current printer 3 Pull down the File menu and select Initialize Pri...

Страница 101: ...rints per hour For example increasing the printer s memory to 64 MB while running in raster mode allows you to print one 9 1 2I x 14I job and process a second job of the same size Without that much me...

Страница 102: ...the wrist portion of a grounding strap to your wrist 3 Attach the other end of the grounding strap to the metal plate on the back of the printer CAUTION It is important that you use a grounding strap...

Страница 103: ...of the printer and prepare to insert the SIMM 1 Use the Phillips head screwdriver to remove the five screws on the plate at the lower portion of the back of the printer NOTE There are a total of ten s...

Страница 104: ...Part No 4B1709 March 1995 2 Hold on to the two black handles on the metal plate and slowly pull the drawer out about three inches 3 Unlatch the ribbon cable in the front center of the drawer by pushi...

Страница 105: ...Customizing Your Printer B 9 Part No 4B1709 March 1995 4 Gently pull the ribbon cable out of the socket 5 Lift the ribbon cable slightly and slowly pull the drawer out an additional 3 inches...

Страница 106: ...SIMM 1 Locate the SIMM receptacles on the left side of the drawer 2 Hold the SIMM at a 45_ angle and position the bottom of the SIMM in the first empty receptacle adjacent to the other installed card...

Страница 107: ...complete the installation by closing the printer 1 Hold on to the black handles on the back of the printer and slide the drawer in approximately three inches 2 Reconnect the ribbon cable by pressing i...

Страница 108: ...B 12 Part No 4B1709 March 1995 4 Close the drawer the rest of the way 5 Replace the five screws that you removed 6 Plug in the printer and turn it back on 7 Verify that the Power light is lit on the...

Страница 109: ...ing the interface cable 1 10 B Back of printer 1 6 Barcode 4 1 4 2 Black handles on back of printer B 8 B 11 Buttons 1 38 not responding 4 8 C Cable attaching 1 10 Calibration mode specifying through...

Страница 110: ...r printer B 1 D Defaults selecting through the display panel 1 40 Dirt on prints 4 8 Display panel 1 5 1 35 buttons 1 38 indicator lights 1 36 items with asterisks 1 39 languages for 1 5 1 40 selectin...

Страница 111: ...included with printer viii Formatting a font disk B 2 Frame type specifying through the display panel 1 43 Frequency A 2 Front of the printer 1 4 G Getting help 4 18 Getting started 1 1 Grounding str...

Страница 112: ...1 34 problems 4 5 Initializing a font disk B 2 INSERT TRAY message 4 2 Inserting the shipping pins 4 16 Inside view of printer 1 8 Installing additional memory B 5 Interface cables 1 10 type used duri...

Страница 113: ...8 LOAD TRANS message 4 2 with transparency material loaded 4 8 LocalTalk cable 1 11 Location finding for the printer 1 3 M Maintaining the printer 2 1 Making a test print 1 47 Maximum image sizes vi 3...

Страница 114: ...r feeding problems 4 7 handling 1 20 humidity problems 4 9 jams 4 1 4 13 loading 1 20 ordering 3 2 path clearing 4 13 sizes 3 2 storing 3 9 Paper tray 1 4 adjusting the size 1 22 1 29 Paper trays orde...

Страница 115: ...1 6 closing the back B 11 components 1 4 configuring 1 39 cover problems opening 4 13 front view 1 4 initialization 1 34 inside view 1 8 installing memory in B 5 maintaining 2 1 mismatches 4 3 openin...

Страница 116: ...pots on 4 7 storing 1 50 streaks lines or spots on 4 6 Problems 4 1 PVC 1 50 R Radio frequency interference ix Radio reception interference with ix x Receivers 1 15 Regulatory information x Relative h...

Страница 117: ...r 1 7 SERVICE REQ message 4 2 Setup menus 1 39 Setup mode 1 38 1 39 Setup Select button 1 38 1 39 Shipping pins inserting 4 16 removing 1 2 Shipping the printer 4 16 Side of printer 1 7 Size of the pr...

Страница 118: ...rmal head 1 8 cleaning 1 12 alternate method 4 10 cleaning pads 3 1 Transparencies storing 1 50 Transparency material 1 27 curl 4 7 handling 1 27 loading 1 27 ordering 3 5 sizes 3 5 storing 3 10 Trans...

Отзывы: