background image

5

3.  HDMI® Input

This port is used to connect the HDMI® (High-Definition Multimedia Interface) connector. It is 
compatible with HD DVD, Blu-Ray, and other protected content playback.
NOTE: If the USB and/or microSD™ inputs are used at the same time as the HDMI®, the HDMI® will 
take priority. 

4.  DC Input


This port is used to connect the power adapter (not included). It is used both to provide direct power to 
the projector and to charge the internal battery.
NOTE: the power adapter may become warm or hot while in use. Never cover or attempt to touch the 
adapter while it is connected to a power source.

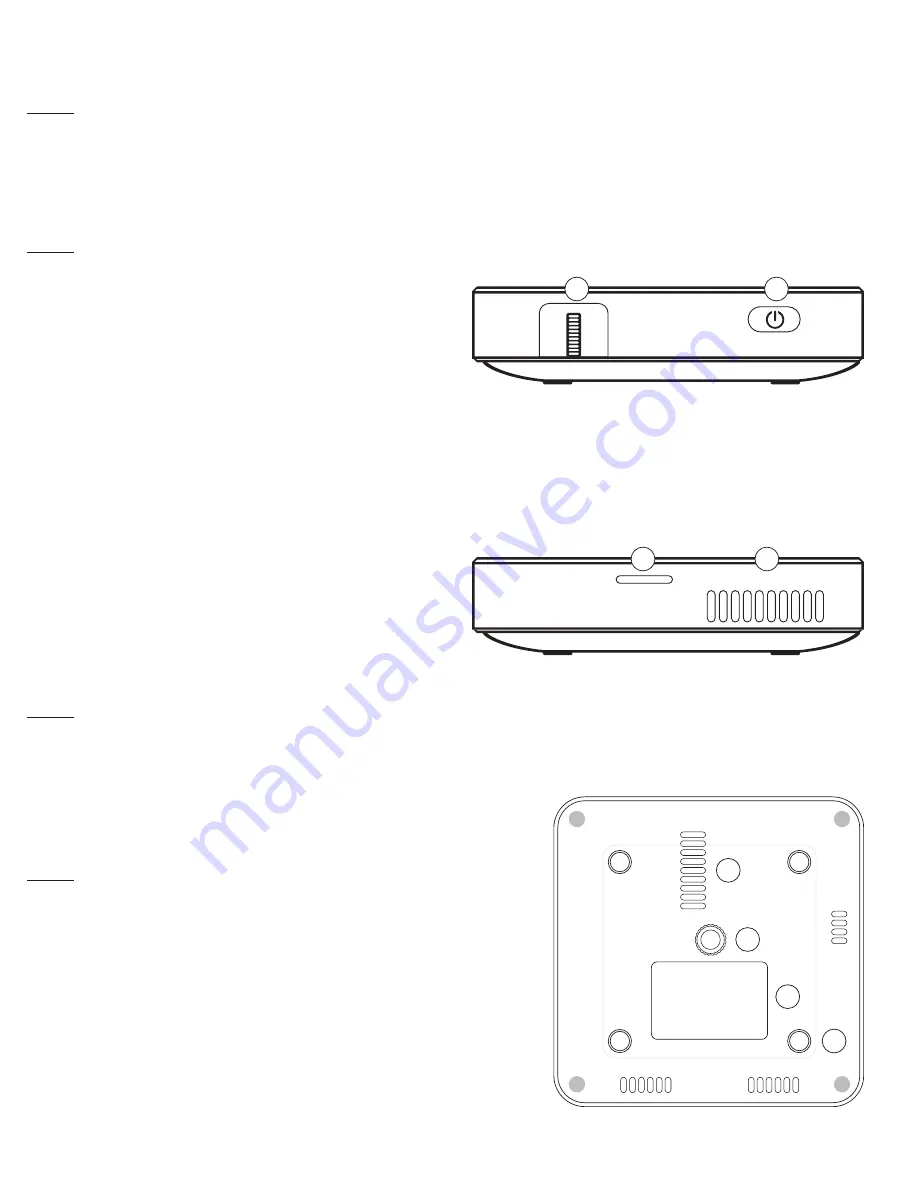
RIGHT SIDE

1.   Power  Button

Press and hold this button for 5 seconds to turn the 
projector on or off. Press this button once to view the current charge.

2.  Focus Wheel

Turn the focus wheel to adjust the image focus of the projector.

LEFT SIDE

1.   MicroSD™  Slot

This slot allows you to insert a microSD™ card, giving 
you access to your files directly from the projector. 

2.  Air Outlet Vent

When the projector is in use, warm air will exit from this vent.
NOTE: Always take care that the air vents are never blocked by paper, clothing, or any other 
obstruction. Blocking the vents may result in overheating of the projector.

BOTTOM VIEW

1.   Air Inlet Vent

When the projector is in use, cool air will enter this vent.
NOTE: Always take care that the air vents are never blocked 
by paper, clothing, or any other obstruction. Blocking the 
vents may result in overheating of the projector.

2.  Tripod Dock

This dock allows the projector to be mounted onto a tripod.

3.  Rating Label

The specifications of the projector can be found here.

4.  Non-Slip Feet

These rubber feet provide additional traction to the projector, 
allowing it to be more stable when on a surface. 

1

2

1

2

1

2

4

3

Содержание Pocket Portable Projector

Страница 1: ...KODAK Pocket Portable Projector User Manual 3 H 3 W 0 8 D 8 cm 8 cm 2 cm Please read all directions before using the product and retain this guide for reference...

Страница 2: ...TION BOX CONTENTS SAFETY PRECAUTIONS FEATURES SETUP OPERATION CARE AND MAINTENANCE DISPOSAL SPECIFICATIONS CUSTOMER SERVICE WARRANTY CONTENTS 1 2 3 4 5 6 7 8 9 10 11 3 3 3 4 4 5 6 10 10 11 12 12 12 13...

Страница 3: ...in any place where it may come into contact with smoke The residue from smoke may cause build up on critical parts of the projector resulting in damage or decreased performance Do not use damaged pow...

Страница 4: ...by the 4 lights on the side of the control panel When the projector is powered on the lights will flash B Each light represents 25 charge 1 light indicating low charge and 4 lights indicating full ch...

Страница 5: ...wheel to adjust the image focus of the projector LEFT SIDE 1 MicroSD Slot This slot allows you to insert a microSD card giving you access to your files directly from the projector 2 Air Outlet Vent Wh...

Страница 6: ...ojector A Turn on the Projector Press and hold the power button for 5 seconds to turn on the projector B Adjust the Focus Wheel Open a still image and carefully rotate the focus wheel until the image...

Страница 7: ...ming devices and more a Connect one end of the HDMI cable to the projector b Connect the other end of the HDMI cable to the external device NOTE Some devices may require an adapter in order to connect...

Страница 8: ...ys Each computer is different and may require a different setup To set up Windows 7 for external displays follow the instructions below a Open the start menu and select the Control Panel b Select Appe...

Страница 9: ...he projector via HDMI an adapter is needed not included a Go to the System Preferences menu and select Displays b Select the Arrangements tab Make sure that Mirror Displays is checked c After checking...

Страница 10: ...oSD Use the and buttons to highlight the format you wish to access Then tap the confirm button to select D Use the and buttons to cycle through the list of files Select the file you wish to play with...

Страница 11: ...t either Movies or Images B Tap the confirm button to gain access to the control panel C Use the to highlight the Images option Then use the confirm button to select Images D You will then be prompted...

Страница 12: ...er reuse of parts and recycling The symbol of the crossed out bin indicates that the product should not be placed in municipal waste Check local regulations for disposal of electronic products Do not...

Страница 13: ...including any accessories included in the original packaging as supplied and distributed new by an authorized retailer is warranted by C A Marketing Inc the Company to the original consumer purchaser...

Страница 14: ...roduct or part is exchanged any replacement item becomes your property while the replaced item becomes the Company s property Refunds can only be given if the original Product is returned This Warrant...

Страница 15: ...AID BY YOU TO THE COMPANY OR ANY OF ITS AUTHORIZED RESELLERS FOR THE PRODUCT AT ISSUE IN THE LAST YEAR FROM YOUR PURCHASE THIS LIMITATION IS CUMULATIVE AND WILL NOT BE INCREASED BY THE EXISTENCE OF MO...

Страница 16: ...he USB Trident Logo is a registered trademark of USB Implementers Forum Inc in the United States and or other countries All other products brand names company names and logos are trademarks of their r...

Отзывы: