Kodak HERO 2.2 Скачать руководство пользователя страница 83

www.kodak.com/go/aiosupport

76

KODAK HERO 2.2 All-in-One Printer

Connecting to 
Internet telephone 
service 
(Voice-Over-Internet 
Protocol or VOIP)

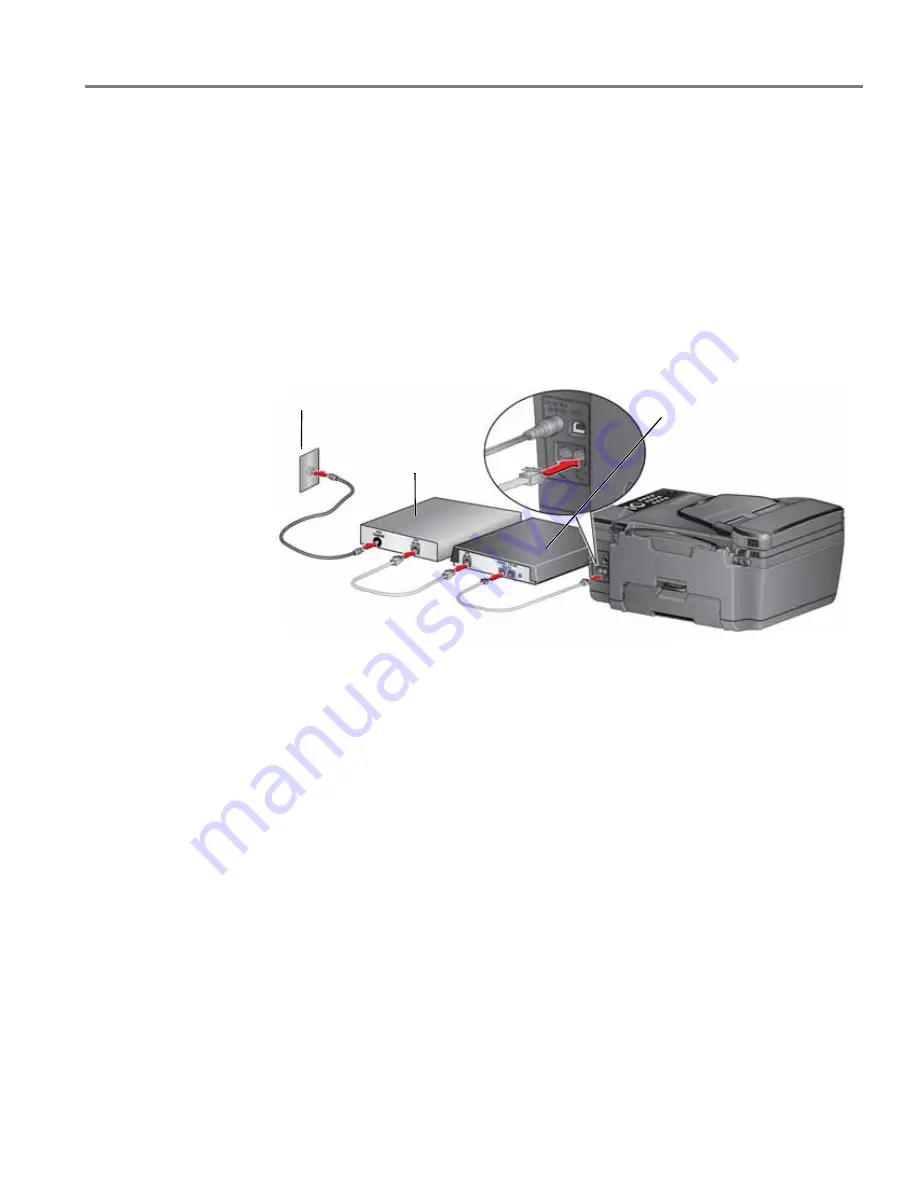
If you have Internet telephone service, you should already have a cable 
modem/router connected to the cable outlet with a coaxial cable. You will also need 
an Analog Telephone Adapter (ATA) to connect your printer for faxing. 

NOTE:  Sometimes the cable modem/router has a built-in ATA. Contact your cable 

telephone service provider for more information. 

1. Connect an RJ-45 (also called CAT 5) cable from the cable modem/router to the 

WAN port on the Analog Telephone Adapter (ATA). 

2. Connect one end of the phone cord that came with the printer (RJ-11 telephone 

cord) to one of the phone input ports on the ATA and the other end to the LINE 
IN port on the back of your printer. 

Coaxial 

RJ-45 cable 

RJ-11 

Cable outlet

Cable 

Analog Telephone 

modem/router

Adapter (ATA)

(CAT 5 cable)

telephone cord

cable

Содержание HERO 2.2

Страница 1: ...KODAK HERO 2 2 All in One Printer Extended User Guide...

Страница 2: ...Eastman Kodak Company Rochester NY 14650 Eastman Kodak Company 2012 Kodak Hero and Perfect Touch are trademarks of Eastman Kodak Company Specifications are subject to change without notice August 2012...

Страница 3: ...USB to a wireless connection 13 3 Online Printer Management Tool Accessing the Online Printer Management Tool 15 Using the Online Printer Management Tool 16 Configuring printer settings 16 Changing th...

Страница 4: ...ided documents 42 Automatic two sided printing 42 Manual two sided printing 43 Printing forms from the control panel 44 Printing pictures 45 Viewing pictures on a memory card 45 Finding pictures on a...

Страница 5: ...a photo 63 Two sided copying 64 Manual two sided copying 64 8 Scanning Before you begin scanning 65 Changing the scan settings for scanning from the printer control panel 65 Loading originals for scan...

Страница 6: ...87 Dialing a recently faxed number 88 Sending a fax from your computer 88 Sending a fax from a computer running WINDOWS OS 88 Sending a fax from a computer running MAC OS 88 Receiving a fax 89 Receivi...

Страница 7: ...ginals 110 Fax system 110 Paper types supported 110 Paper sizes supported 111 Ink cartridges 111 Connectivity 112 Software support 112 Physical specifications 112 Warranty 113 System requirements 113...

Страница 8: ...4 ADF tray extender 14 Duplexer 5 Right paper edge guide 15 Line in phone port 6 Control panel 16 Ext out phone port 7 Scanner glass 17 USB port 8 Scanner lid 18 Power cord connection port 9 Power bu...

Страница 9: ...faxing maintenance tasks and file transfer 5 Cancel button Stops the current operation and returns to the menu 6 Numeric keypad Used to dial a phone number or a Quick Dial number for faxing to enter i...

Страница 10: ...t and scan make 3D pictures from picture pairs taken to create 3D pictures print from video send images to or print images from FACEBOOK Social Network FLICKR PHOTOBUCKET PICASA Photo Management Syste...

Страница 11: ...ome Center Software 1 Open Home Center Software 2 Select Order Supplies on a computer with WINDOWS OS or select the Tools tab then click Order Supplies on a computer with MAC OS 3 Select the item s yo...

Страница 12: ...low power sleep mode after being idle for a default delay time of 1 hour You can increase the delay time to low power in 0 5 hour increments up to 4 hours Increasing the delay time may result in reduc...

Страница 13: ...opriate for your network setup Connecting to a non WPS wireless router To connect your printer to your wireless network you need to know the network name also called the Service Set Identifier SSID Yo...

Страница 14: ...hen press OK If you don t see your network in the list or if you want to change your network select Rescan for Wireless Networks then press OK NOTE If the name of your network is not listed make sure...

Страница 15: ...n On a computer with MAC OS be sure to select the option to check for newer versions NOTE If you do not have the CD a Go to www kodak com go aiodownloads b In the results list click the link for KODAK...

Страница 16: ...r CD drive and follow the on screen instructions When the software checks for updates if a newer version exists install the newer version On a computer with MAC OS be sure to select the option to chec...

Страница 17: ...ading zeros in front of that number For example To set up your IP Address on the printer 1 Press 2 Press to select Network Settings then press OK 3 Press to select Advanced IP Address Setup then press...

Страница 18: ...Printer Name Printer Hostname Connected Network SSID Speed IP Address Type Network Subnet Security Authentication Channel Region Radio on off MAC Address If the printer is connected to your network yo...

Страница 19: ...install the KODAK All in One Printer Software for the newer model NOTE When you install the new software the printer driver for the ESP Office 2150 Printer will be uninstalled and updates for the ESP...

Страница 20: ...nter from the list c Select Network Wireless Wi Fi then click Next When your printer is detected driver installation begins d When driver installation is complete click Done If your wireless all in on...

Страница 21: ...be on the same network The Online Printer Management Tool is not available if your printer is connected to a computer with only a USB cable With the Online Printer Management Tool you can view printe...

Страница 22: ...nline Printer Management The Online Printer Management Tool opens From a computer or mobile device NOTE Your computer or mobile device must be connected to the same network as your printer 1 Get the I...

Страница 23: ...Configuring printer settings 1 Open the Online Printer Management Tool see Accessing the Online Printer Management Tool page 15 2 Select the Settings tab 3 Select Device General Date Time or Reset an...

Страница 24: ...ing the printer name 1 Open the Online Printer Management Tool see Accessing the Online Printer Management Tool page 15 2 Select the Network tab 3 Select General Friendly Name 4 Highlight the text in...

Страница 25: ...he fax phone book 1 Open the Online Printer Management Tool see Accessing the Online Printer Management Tool page 15 2 Select the Settings tab 3 Select Fax Phone Book To add a phone book entry 1 Type...

Страница 26: ...the check box for an existing entry in the Phone Book 2 Click Delete then click Yes Changing fax settings 1 Open the Online Printer Management Tool see Accessing the Online Printer Management Tool pag...

Страница 27: ...r printer you can send the scans directly from the printer to an email recipient To do so you must first set up a profile for yourself and define the email address es to which you want to send scans C...

Страница 28: ...e your initials and your email provider such as LR Hotmail or LR Gmail This name will appear on the printer control panel for you to select when you start a scan to be sent through email 6 In the From...

Страница 29: ...server name or the IP address of your email service provider in the Email Server field b Type the port number of your email server in the Port Number field NOTE Locate this information in the email a...

Страница 30: ...ail messages select the Copy sender for all email messages sent from the printer check box 11 Click Test Profile to confirm that the printer can access your account If the printer can access your acco...

Страница 31: ...ss the printer uses defaults subject line body and scan settings that you set up under email options 1 Open the Online Printer Management Tool see Accessing the Online Printer Management Tool page 15...

Страница 32: ...the scan settings that will be used for all scans sent to email NOTE You can enter a Filename Prefix of your choice 6 Click Save then click OK You can now send a scan to an email address from the pri...

Страница 33: ...the network name of the folder including the path information and the name of the computer where it is located To learn more about sharing folders see the information in the links below For computers...

Страница 34: ...pport Adding a network folder profile 1 Open the Online Printer Management Tool see Accessing the Online Printer Management Tool page 15 2 Select the Settings tab 3 Select Scan To Network Folder Netwo...

Страница 35: ...it numeric PIN your choice You will need to enter this PIN each time you access your profile when scanning to a network folder 8 Click Test Profile to confirm that the printer can access the network f...

Страница 36: ...s that you set up under scan settings 1 Select Scan To Network Folder Scan Settings 2 Select the scan settings that will be used for all scans sent to a network folder NOTE You can enter a Filename Pr...

Страница 37: ...for copying documents and photos and for printing photos Changing Copy Document and Copy Photo settings 1 Open the Online Printer Management Tool see Accessing the Online Printer Management Tool page...

Страница 38: ...rt Changing Print Photo settings 1 Open the Online Printer Management Tool see Accessing the Online Printer Management Tool page 15 2 Select the Settings tab 3 Select Copy Print Print Photo 4 Make the...

Страница 39: ...p WINDOWS XP OS Select Start Programs Kodak KODAK AiO Printer Tools then click Cloud Printing Setup WINDOWS VISTA and 7 OS Select WINDOWS icon All Programs Kodak KODAK AiO Home Center Printer Tools th...

Страница 40: ...ons for KODAK Email Print Service 2 If necessary sign in to your GOOGLE Account 3 Click Settings next to your printer name Make sure the check box next to Enabled is selected Changing the Email addres...

Страница 41: ...the drop down list select Allowed Users 3 To add an email address to the allowed users click Add 4 Type the email or domain information then click the Save icon NOTE To delete an email or domain clic...

Страница 42: ...n pigment based inkjet printers When handling photo paper Hold the paper by the edges avoid placing your fingerprints on it Do not touch the glossy side of photo paper Store paper flat away from direc...

Страница 43: ...x 11 in 22 x 28 cm Legal 8 5 x 14 in 22 x 36 cm A4 8 3 x 11 7 in 21 x 30 cm A5 5 8 x 8 3 in 15 x 21 cm A6 4 1 x 5 8 in 11 x 15 cm B5 6 9 x 9 8 in 18 x 25 cm NOTE Do not load paper smaller than 4 x 6...

Страница 44: ...city of the paper tray is 100 sheets of plain paper Click to view a video that demonstrates loading plain paper 1 Lift the paper input tray 2 Move the left paper edge guide to the far left 3 Pull out...

Страница 45: ...ray 2 Move the left paper edge guide to the far left 3 Insert the paper short side first into the input tray with the logo side facing toward the tray and the glossy side toward you IMPORTANT Always l...

Страница 46: ...T Do not load envelopes with cutout or clear windows 1 Remove any paper from the tray 2 Move the left paper edge guide to the far left 3 Insert the envelope s into the tray with the flap away from you...

Страница 47: ...y feeds the originals into the printer when you begin copying scanning or faxing NOTE Keep the scanner glass clean Any dirt or smudges on the glass will appear as marks on the copy See Cleaning the sc...

Страница 48: ...the ADF 1 Remove any originals from the scanner glass 2 Move the ADF paper edge guides outward and pull out the ADF extender 3 Fan and stack the originals then insert them face up in the ADF IMPORTANT...

Страница 49: ...ng The duplexer can print two sided documents automatically on plain paper in standard sizes letter 8 5 x 11 in 22 x 28 cm A4 8 3 x 11 7 in 21 x 30 cm B5 6 9 x 9 8 in 18 x 25 cm NOTE The paper width m...

Страница 50: ...Two sided printing can only be done on media that can absorb ink on both sides such as plain paper or two sided photo paper Do not print two sided on bar coded photo paper the bar code is on the back...

Страница 51: ...two sided check box 5 Click Print 6 When the even pages have finished printing follow the instructions on the control panel to reload the printed pages in the paper input tray 7 Press on the control...

Страница 52: ...s then follow the on screen instructions On a computer with MAC OS or WINDOWS OS you can print pictures from any picture editing or photo management software Viewing pictures on a memory card When you...

Страница 53: ...ile leaving the adapter in the printer Using default settings to print a picture Unless you change the default settings the default for printing pictures is one 4 x 6 in 10 x 15 cm picture To change t...

Страница 54: ...t Photos Option Settings Description View Photos Scroll through the pictures on the memory card press OK to select the picture for printing press to display the Print Photos Options menu Find Photos P...

Страница 55: ...f the selected print size is smaller than the paper in the paper tray the printer automatically arranges the pictures to best fit the paper size Plain Paper Quality Normal default Good quality output...

Страница 56: ...o the default settings on your printer unless otherwise specified by the tag from the camera NOTE Refer to your camera user guide to determine whether your camera supports tagged pictures may also be...

Страница 57: ...ting Settings 4 Press to select Print Size then press to select 4 x 12 5 Press IMPORTANT To prevent loss of data from your memory card camera or portable drive do not remove it from the printer while...

Страница 58: ...connected to a wireless network and with a USB cable select the USB connected printer no number after the printer name 6 Follow the on screen instructions on your computer Transferring pictures to a...

Страница 59: ...s page 5 Printing using Google Cloud Print Print on the go from your smartphone computer or tablet using Google Cloud Print enabled apps Before you can use Google Cloud Print make sure your printer is...

Страница 60: ...ts and pictures to your printer from anywhere using any device capable of sending email NOTE Before you can use KODAK Email Print your printer must be registered to Google Cloud Print see Registering...

Страница 61: ...r iPod Touch device 2nd generation 1 Make sure your device is connected to the same Wi Fi network as your printer 2 Open the KODAK Pic Flick App on your device NOTE For best results with an iPad use t...

Страница 62: ...ate move pan zoom or crop the picture 5 Press Select Device then select your KODAK All in One Printer 6 Select the print size 7 Press Back then select Send To print a picture or document using KODAK D...

Страница 63: ...ce the original face down on the scanner glass For more information on loading originals see Loading originals page 40 Copying a document You can copy a document using the default settings or you can...

Страница 64: ...the size of the paper in the paper tray and automatically reduces or enlarges the original so that the copy fits on the paper 20 to 500 Reduces up to 20 or enlarges up to 500 of the original size Pla...

Страница 65: ...al document on the scanner glass see Loading originals page 40 2 Press 3 Press to select Copy Document then press OK 4 Press to select Copy Size 5 Press or to select an enlargement or reduction percen...

Страница 66: ...the factory default settings see Resetting factory defaults page 103 or defaults that you have set on the printer see Save as Defaults at the bottom of the table under Adjusting the settings and copy...

Страница 67: ...ress OK 5 Press to select an option then press or to change the setting Copy Photo Option Settings Description Quantity 1 default to 99 The number of copies that print Color Black White Makes a black...

Страница 68: ...to default The printer detects photo paper in the paper tray and sets Best quality automatically Brightness Normal 3 to 3 Normal is default Lightens or darkens the copy Normal is no change from the or...

Страница 69: ...a photo 1 Lift the scanner lid and place the photo face down in the right front corner of the scanner glass IMPORTANT Do not load photos in the Automatic Document Feeder ADF 2 Close the lid 3 Press 4...

Страница 70: ...nner lid and place the photo face down in the right front corner of the scanner glass IMPORTANT Do not load photos in the Automatic Document Feeder ADF 2 Close the lid 3 Press 4 Press to select Copy P...

Страница 71: ...r into the paper tray 2 Place your original on the scanner glass see Using the scanner glass page 40 3 Press 4 Press to select Copy Document then press OK 5 If necessary press to make changes to the c...

Страница 72: ...ter make sure that the printer is connected to the computer using a USB cable or wireless network see Networking Your Printer page 6 If you want to scan to an email address or to a shared network fold...

Страница 73: ...ments select the Document tab then select an option for each setting c To adjust settings for scanning pictures select the Picture tab then select an option for each setting Setting Options Scan As Bl...

Страница 74: ...150 200 300 600 Quality When connected to a computer with WINDOWS OS Best for E mail Normal High Maximum When connected to a computer with MAC OS a slider bar with Least Medium Best Automatically Det...

Страница 75: ...e Loading originals page 40 Scanning from the printer control panel When you scan a document or picture s from the control panel you have the following options Scan to Computer scans to a file or to H...

Страница 76: ...ireless or Ethernet network The scanned file is sent to the computer on the wireless or Ethernet network Scan What Document default Sets the scan settings for scanning a document see Changing the scan...

Страница 77: ...or scanning a picture see Changing the scan settings for scanning from the printer control panel page 65 Document Sets the scan settings for scanning a document see Changing the scan settings for scan...

Страница 78: ...g to network folder You can scan your original and immediately send the scanned file to a network folder directly from the printer NOTE You must first use the Online Printer Management Tool to set up...

Страница 79: ...t Pictures if it is not selected then click OK 6 Click the X in the top right corner to close the Printer Tools window 7 In the Home Center window select Scan Documents and Pictures 8 Make sure that P...

Страница 80: ...Tool page 15 2 Select the Applications tab 3 Select Applications Webscan in the left pane 4 Load the original see Loading originals for scanning page 68 5 Select the type of scan you want a Select Pi...

Страница 81: ...ur telephone system type The instructions for setting up your printer for faxing differ depending on the type of telephone service you have Determine the type of telephone service you have and connect...

Страница 82: ...rinter and the other end into the wall phone jack Connecting to a Digital Subscriber Line DSL If you have DSL telephone service connect one end of the phone cord that came with the printer into the LI...

Страница 83: ...g NOTE Sometimes the cable modem router has a built in ATA Contact your cable telephone service provider for more information 1 Connect an RJ 45 also called CAT 5 cable from the cable modem router to...

Страница 84: ...ect your printer in one of the following ways based on the devices you have connected to the same phone line If you share the line with an answering machine or telephone 1 Connect one end of the phone...

Страница 85: ...Entering fax sender information Fax sender information appears in the header of any fax that you send from your all in one printer Typically this is your name or your business name and your fax number...

Страница 86: ...you can touch Answer now to answer the call manually Rings to Answer 1 to 6 default is 4 The number of times that your phone will ring before the printer picks up the call If you use a dedicated phon...

Страница 87: ...ll waiting for the duration of the fax preventing incoming calls from interrupting your fax transmission The usual code to disable call waiting is the default 70 If the call waiting disable code is di...

Страница 88: ...ration to from number of pages and more about the last 30 faxes sent and or received To print a Fax Activity Log press OK Load letter or A4 paper then press Dialing Mode Tone default Pulse Determines...

Страница 89: ...When Auto Answer is on the printer picks up all incoming faxes automatically To answer calls manually turn off Auto Answer See Receiving a fax manually page 89 1 Press 2 Press to select Fax Settings...

Страница 90: ...ur ten most frequently used fax numbers as Quick Dial numbers You will be able to dial them quickly and they will be displayed at the top of your phonebook a Press to select Quick Dial then press OK b...

Страница 91: ...on the control panel to enter text and or numbers The number keys on the numeric keypad represent a number and several characters For example the number 2 key also represents the letters A B C and a b...

Страница 92: ...rmation person to whom you are sending fax number your name etc 1 Press 2 Press to select Fax Settings then press OK 3 Press to select Print Fax Cover Page then press OK 4 Load letter or A4 paper then...

Страница 93: ...elect Standard default for most documents Fine for documents with fine print Photo for photographs 5 Press to select Color or Black White 6 Press to select Brightness Adjust the brightness setting acc...

Страница 94: ...the fax will print in black and white Using Quick Dial to send a fax 1 Press 2 Press to select Send Fax then press OK 3 Press the number on the keypad that corresponds to the desired Quick Dial entry...

Страница 95: ...dialog box make sure that KODAK HERO 2 2 AiO Fax is selected then click Properties or Preferences 3 Select a paper size letter or A4 from the drop down menu then select a resolution and orientation as...

Страница 96: ...lected for the fax settings see Rings to Answer in the table under Selecting fax settings page 79 However you may choose to receive the fax sooner by pressing either START button Whether the fax is co...

Страница 97: ...nfirmation page after sending every fax or After Fail Only to print only if the fax transmission fails 5 Press OK NOTE The name and fax number of receivers will not appear on your confirmation page if...

Страница 98: ...d For recycling and or disposal information contact your local authorities In the US go to the Electronics Industry Alliance at www eia org or go to www kodak com go recycle General care and cleaning...

Страница 99: ...backing CAUTION Do not use harsh or abrasive cleaners on any part of the printer Do not spray liquid directly on the glass Do not use paper based wipes on the document backing as they can scratch it...

Страница 100: ...sponge slightly moistened with mild soap and warm water 6 Dry the document backing with a chamois or soft lint free cloth NOTE If the document backing needs further cleaning use isopropyl rubbing alco...

Страница 101: ...out of ink the printer LCD displays a message stating that the black or color ink cartridge needs replacing IMPORTANT Do not use non Kodak brand or refilled ink cartridges Click to view a video that d...

Страница 102: ...aiosupport 3 Pinch the tab on the ink cartridge 4 Lift the ink cartridge out of the printhead 5 Remove the new ink cartridge from its bag IMPORTANT To prevent the printhead from drying out insert the...

Страница 103: ...dak com go aiosupport 96 KODAK HERO 2 2 All in One Printer 6 Remove the cap 7 Insert the ink cartridge into the printhead 8 Press down on the ink cartridge tab until you hear a click 9 Close the acces...

Страница 104: ...ntenance procedure Replace the printhead only if you receive a new printhead from Kodak Click to view a video that demonstrates replacing the printhead To replace the printhead 1 Make sure the printer...

Страница 105: ...www kodak com go aiosupport 98 KODAK HERO 2 2 All in One Printer 4 Unlatch the existing printhead by lifting the button 5 Lift the printhead out of the carriage 6 Remove the new printhead from its bag...

Страница 106: ...Maintaining Your Printer 99 www kodak com go aiosupport 7 Remove the cap 8 Install the new printhead in the carriage 9 Push firmly against the target label of the printhead until you hear a click...

Страница 107: ...the black ink cartridge into the printhead 11 Press down on the ink cartridge until you hear a click 12 Repeat steps 10 11 for the color ink cartridge 13 Close the access door The printer detects the...

Страница 108: ...r is connected to the Internet 2 Connect the printer to the computer with a USB cable Ethernet cable or wirelessly if not currently connected 3 Open Home Center Software then select Printer Tools NOTE...

Страница 109: ...screen instructions To update the firmware 1 Make sure that your computer is connected to the Internet 2 Connect the printer to the computer with a USB cable Ethernet cable or wirelessly if not curren...

Страница 110: ...artridges so you know when it s time to order replacement cartridges Use 30 Series ink cartridges NOTE You can order ink cartridges online Open Home Center Software and select Order Supplies or go to...

Страница 111: ...ter then reconnected or if power to the printer was interrupted If you are using a wireless connection make sure the Wi Fi connectivity LED remains lit the printer is connected to your wireless networ...

Страница 112: ...y For best results use KODAK Paper or a paper with the COLORLOK Technology logo on the package Make sure the paper is loaded correctly See Loading plain paper page 37 and Loading photo paper page 38 C...

Страница 113: ...nformation available Kodak Service Number located inside the printer when you open the access door Printer model number located on the front of the printer Computer model operating system and version...

Страница 114: ...nish the task On The printer is ready Wi Fi status light What it means Off The Wi Fi radio is either turned off or is turned on but not connected to a wireless network Blinks continuously The Wi Fi ra...

Страница 115: ...to 99 Print sizes 2 x 3 in 5 x 8 cm 3 5 x 5 in 9 x 13 cm 4 x 6 in 10 x 15 cm 4 x 7 in 10 x 18 cm 4 x 8 in 10 x 20 cm 4 x 12 in 10 x 30 cm Panoramic 5 x 7 in 13 x 18 cm 8 x 10 in 20 x 25 cm US Letter 8...

Страница 116: ...cm Panoramic 5 x 7 in 13 x 18 cm 8 x 10 in 20 x 25 cm US Letter 8 5 x 11 in 22 x 28 cm A4 8 3 x 11 7 in 21 x 30 cm Quality Automatic Brightness 3 to 3 Scanner type Contact Image Sensor CIS Scan sizes...

Страница 117: ...itations 6 9 to 8 5 in wide 18 to 22 cm wide 9 8 to 11 7 in long 25 to 30 cm long Fax modem 33 6 kbps V 34 Fax resolution 200 x 100 standard 200 x 200 fine 300 x 300 photo Fax phonebook 60 numbers Qui...

Страница 118: ...28 cm Index card stock 4 x 6 in index cards 10 x 15 cm 5 x 7 in index cards 13 x 18 cm Iron on transfers A4 8 3 x 11 7 in 21 x 30 cm US Letter 8 5 x 11 in 22 x 28 cm Envelopes C5 6 4 x 9 in 16 x 23 c...

Страница 119: ...t Third party image management software optical character reader OCR support for documents Media support Plain paper photo paper envelopes greeting cards card stock and labels Scanner support TWAIN an...

Страница 120: ...f of purchase Computer Minimum Operating System WINDOWS 7 VISTA or XP SP2 or later CPU INTEL CELERON Processor Clock speed 1 2 GHz Memory 512 MB RAM Available hard disk space 500 MB available Interfac...

Страница 121: ...e that extends beyond the product s base in all directions This product will not operate properly if tilted or at an angle When storing or transporting this product do not tilt or stand it on its side...

Страница 122: ...e display gets on your hands wash them thoroughly with soap and water Ink cartridge safety Keep all ink cartridges out of the reach of children If ink gets on your skin wash with soap and water If ink...

Страница 123: ...off and on the user is encouraged to try to correct the interference by one or more of the following measures Reorient or relocate the receiving antenna Increase the separation between the equipment...

Страница 124: ...Hereby Eastman Kodak Company declares that this KODAK all in one wireless printer is in compliance with the essential requirements and other relevant provisions of Directive 1999 5 EC German complian...

Страница 125: ...nion do not discard this product as unsorted municipal waste Contact your local authorities or go to www kodak com go recycle for recycling program information ENERGY STAR Qualified To conserve energy...

Страница 126: ...emanufactured Products parts and materials are warranted for the remaining warranty term of the original Product or 90 days after the date of repair or replacement whichever is longer Limitations This...

Страница 127: ...u specific rights and you may have other rights which vary from state to state or by jurisdiction Your statutory rights are not affected Outside the United States and Canada In countries other than th...

Отзывы: