


9
www.kodak.com/go/aiosupport
6
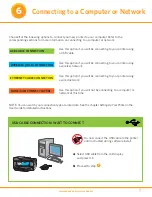
You can connect your printer at a later time.
a)
Select
None
from the LCD display and press OK.
b)
Proceed to step
7
.
ETHERNET CABLE CONNECTION (WIRED)
NONE (CAN CONNECT LATER)
a)
Select
Ethernet cable
from the LCD display
and press OK.
b)
Connect the Ethernet cable into the Ethernet port
on the back of the printer.
c)
Connect the other end of the Ethernet cable into an
available port on your Ethernet router or hub.
d)
Proceed to step
7
.
b)
c)
1
2
5
jkl
8
tuv
0
4
ghi
7
pqrs
3
def
6
mno
9
Symbols
Space
#
Network
START
Cancel
Zoom
Menu
OK
All-in-One Printer
9
1
2
5
8
4
7
3
6
9
Space
0
abc
jkl
tuv
ghi
pqrs
def
mno
wxyz
Symbols
#
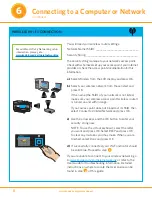
Connecting to a Computer or Network
(continued)
Содержание ESP 9 ALL-IN-ONE PRINTER - SETUP BOOKLET
Страница 17: ...All in One Printer print copy scan fax 9 User Guide ...
Страница 28: ...Getting Help 4 Kodak ESP 9 Printer User Guide ...
Страница 82: ...Copying 58 Kodak ESP 9 Printer User Guide ...
Страница 130: ...Troubleshooting 106 Kodak ESP 9 Printer User Guide ...
Страница 146: ...Glossary 122 Kodak ESP 9 Printer User Guide ...
Страница 148: ...If you need to call Customer Support 124 Kodak ESP 9 Printer User Guide ...
Страница 157: ... 1K3289 1K3289 1K3289 B ...


