Kodak D4600 Скачать руководство пользователя страница 18

 2-10

November 2014

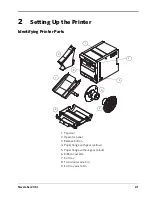
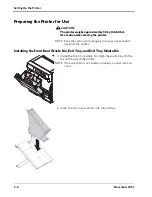
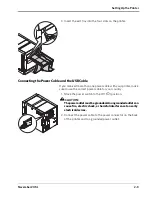
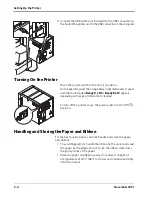
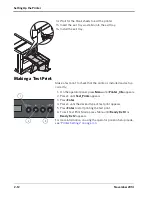
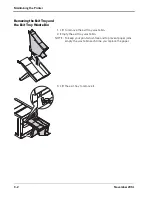
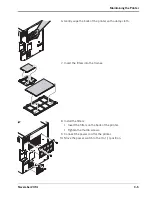
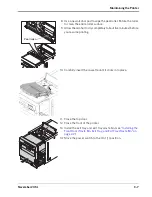
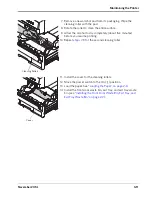
Setting Up the Printer

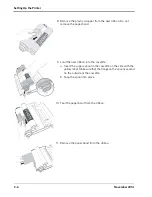
7. Squeeze the tabs at the end of the spool to remove the flanges. 

Save the flanges from the used paper roll.

8. Remove the plastic wrapper from the new paper roll. Do not 

remove the tape from the new paper roll.

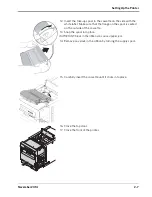
9. Squeeze the tabs on the yellow flange and align the lugs on the 

flange with the notches in the new paper roll. Insert the yellow 
flange into the roll.

10. Squeeze the tabs on the black flange and insert the flange into 

the other end of the paper roll.

NOTE: If you do not attach the flanges properly, the paper roll will 

not fit into the printer.

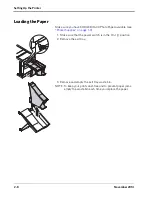
11. Match the coloured flanges with the slots of the same colour 

on the printer, then carefully lower the paper roll into the slots.

12. Remove the tape from the paper roll.

Содержание D4600

Страница 1: ...November 2014 D4600 Duplex Photo Printer User s Guide ...

Страница 2: ...TM MC MR Licensed from Eastman Kodak Company Kodak Kodak Alaris Inc 2400 Mount Read Blvd Rochester N Y 14615 2014 Kodak Alaris Inc All rights reserved P N 4J8241_en gb ...

Страница 3: ...aper 2 8 Making a Test Print 2 12 3 Maintaining the Printer Performing Routine Maintenance 3 1 Removing the Exit Tray and the Exit Tray Waste Bin 3 2 Removing the Front Door Waste Bin 3 3 Cleaning the Exterior 3 3 Cleaning the Filters 3 4 Cleaning the Thermal Print Head and the Peel Roller 3 6 Cleaning the Platen and Pinch Rollers 3 8 Cleaning the Cleaning Rollers 3 10 Cleaning the Capstan Roller ...

Страница 4: ...n 5 12 Recovering from a Power Interruption 5 15 Appendix A Safety and Regulatory Information Important Safety Information A 1 Safety Labels A 2 Regulatory and Safety Compliance A 4 Safety A 4 Electromagnetic Compatibility EMC A 4 Disposal A 5 Acoustic Level A 5 ...

Страница 5: ...ntally and a slitter that cuts the paper vertically for sizes smaller than 8 in 20 3 cm Printer Specifications Dimensions Width 33 66 cm 13 25 in Depth with exit tray 78 74 cm 31 in Depth without exit tray 50 48 cm 19 875 in Height 40 cm 15 75 in Weight without ribbon and paper 30 kg 66 14lbs Operating environment Temperature 15 to 35 C 59 to 95 F Relative humidity 20 to 86 non condensing Power vo...

Страница 6: ... 15 2 x 15 2 cm 6 x 12 in 15 2 x 30 5 cm 6 8 x 4 8 in 17 27 x 12 2 cm 6 8 x 9 6 in 17 27 x 24 4 cm 7 x 5 in 17 8 x 12 7 cm 8 x 4 in 20 3 x 10 2 cm 8 x 6 in 20 3 x 15 2 cm 8 x 8 in 20 3 x 20 3 cm 8 x 10 in 20 3 x 25 4 cm 8 x 11 7 in 20 3 x 29 72 cm 8 x 12 in 20 3 x 30 5 cm ...

Страница 7: ...iling edge waste KODAK D4600S Duplex Photo Ribbon Catalogue Number 177 0973 Contents 2 ribbons 25 4 cm 10 in Capacity 300 20 3 x 25 4 cm 10 x 8 in prints KODAK D4600L Duplex Photo Ribbon Catalogue Number 135 2459 Contents 2 ribbons 30 5 cm 12 in Capacity 250 20 3 x 30 5 cm 12 x 8 in prints KODAK D4600 Photo Paper for the United States Canada Latin America and Asia Catalogue Number 163 8428 Content...

Страница 8: ...g 66 14lbs Use caution when moving the printer Shipping the printer with paper and ribbon installed can cause damage to the printer 1 Remove the paper and ribbon from the printer 2 Remove the exit tray and the front door waste bin 3 Repack the printer front door waste bin and exit tray in the original packing box See the packing unpacking instructions included with the box Getting Help Help with y...

Страница 9: ...Printer Identifying Printer Parts 1 Top door 2 Operator panel 3 Release button 4 Paper flange with gear yellow 5 Paper flange without gear black 6 Ribbon cassette 7 Exit tray 8 Front door waste bin 9 Exit tray waste bin 1 2 3 4 7 5 6 9 8 ...

Страница 10: ...OTE Keep the carton and packaging in case you ever need to transport the printer Installing the Front Door Waste Bin Exit Tray and Exit Tray Waste Bin 1 Install the front door waste bin Align the waste bin with the rail on the side of the printer NOTE If the waste bin is not inserted properly a paper jam can occur 2 Insert the exit tray waste bin into the exit tray ...

Страница 11: ...power cable with your printer make sure to use the correct power cable for your country 1 Move the power switch to the Off position CAUTION Thepoweroutletmustbegrounded Anungroundedoutletcan cause fire electric shock or harmful interference to nearby electrical devices 2 Connect the power cable to the power connector on the back of the printer and to a grounded power outlet ...

Страница 12: ... Ready 8 x 12 appears depending on the size of ribbon that is loaded To turn off the printer move the power switch to the Off position Handling and Storing the Paper and Ribbon For the best quality prints carefully handle and store the paper and ribbons To avoid fingerprints handle the ribbon by the spool ends and the paper by the edges Do not touch the ribbon material or the glossy sides of the p...

Страница 13: ...release button Pull the front of the printer forward until it stops 3 Open the top door of the printer 4 Are you loading the ribbon for the first time 5 Pull up on the handle to remove the ribbon cassette Support the cassette with two hands 6 Place the cassette on a flat surface 7 Remove the used ribbon from the cassette Dispose of the used ribbon appropriately IMPORTANT Images remain on the ribbo...

Страница 14: ...per band 9 Load the new ribbon into the cassette a Insert the supply spool in the cassette on the side with the yellow label Make sure that the flange on the spool is seated on the outside of the cassette b Snap the spool into place 10 Tear the paper band from the ribbon 11 Remove the paper band from the ribbon ...

Страница 15: ... that the flange on the spool is seated on the outside of the cassette 13 Snap the spool into place IMPORTANT Slack in the ribbon can cause a paper jam 14 Remove any slack in the ribbon by turning the supply spool 15 Carefully insert the cassette until it clicks into place 16 Close the top door 17 Close the front of the printer ...

Страница 16: ... Photo Paper available see Printer Supplies on page 1 3 1 Make sure that the power switch is in the On position 2 Remove the exit tray 3 Remove and empty the exit tray waste bin NOTE To keep your prints dust free and to prevent paper jams empty the waste bin each time you replace the paper ...

Страница 17: ... Pull the waste bin towards you Lift it up and out of the printer c Empty the waste bin NOTE To keep your prints dust free and to prevent paper jams empty the waste bin each time you replace the paper 5 Are you loading paper for the first time 6 Remove the used paper roll Yes No Go to step 8 Continue with step 6 ...

Страница 18: ...ow flange and align the lugs on the flange with the notches in the new paper roll Insert the yellow flange into the roll 10 Squeeze the tabs on the black flange and insert the flange into the other end of the paper roll NOTE If you do not attach the flanges properly the paper roll will not fit into the printer 11 Match the coloured flanges with the slots of the same colour on the printer then care...

Страница 19: ...ns blue 13 Insert the front door waste bin Align it with the rail on the side of the printer NOTE If the waste bin is not inserted properly a paper jam can occur The printer loads the paper Two blank sheets are advanced This portion of the roll may have fingerprints from handling This does not decrease the print capacity of the roll Depending on the size of ribbon that is loaded the operator panel...

Страница 20: ... installed and set up correctly 1 On the operator panel press Menu until Printer_Info appears 2 Press until Test_Prints appears 3 Press Enter 4 Press until the desired type of test print appears 5 Press Enter to start printing the test print 6 To exit Test Print Mode press Menu until Ready 8 x 10 or Ready 8 x 12 appears For more information on using the operator panel in Setup mode see Printer Set...

Страница 21: ...thermal print head and peel rollers see page 3 6 platen roller see page 3 8 pinch roller see page 3 8 cleaning rollers see page 3 10 Make sure you have the KODAK Thermal Printer Cleaning Kit available This kit contains 10 individually packaged alcohol pads CAUTION Alcohol is a flammable liquid It can cause eye irritation and dry skin Wash your hands with soap and water following any maintenance pr...

Страница 22: ...ExitTrayand the Exit Tray Waste Bin 1 Lift to remove the exit tray waste bin 2 Empty the exit tray waste bin NOTE To keep your prints dust free and to prevent paper jams empty the waste bin each time you replace the paper 3 Lift the exit tray to remove it ...

Страница 23: ... to prevent paper jams empty the waste bin each time you replace the paper Cleaning the Exterior 1 Remove the exit tray and exit tray waste bin see Removing the Exit Tray and the Exit Tray Waste Bin on page 3 2 2 Remove the front door waste bin see Removing the Front Door Waste Bin on page 3 3 3 Move the power switch to the Off position 4 Wipe the exterior of the printer exit tray and waste bins w...

Страница 24: ... the Filters 1 Move the power switch to the Off position 2 Disconnect the power cord for the printer 3 Loosen the thumb screws for both filters on the back of the printer 4 Remove the filters from the frames 5 Carefully vacuum both sides of the filters ...

Страница 25: ... the back of the printer with a damp cloth 7 Insert the filters into the frames 8 Install the filters Insert the filters on the back of the printer Tighten the thumb screws 9 Connect the power cord for the printer 10 Move the power switch to the On position ...

Страница 26: ...pproximately five minutes after you open the top door before cleaning it Fingerprints can damage the thermal head Never touch it with your bare hands or fingers 4 Move the power switch to the Off position 5 Pull up on the handle to remove the ribbon cassette Support the cassette with two hands 6 Place the cassette on a flat surface 7 Remove a new alcohol pad from its packaging Move the pad along t...

Страница 27: ...dry completely about five minutes before you resume printing 10 Carefully insert the cassette until it clicks into place 11 Close the top door 12 Close the front of the printer 13 Install the exit tray and exit tray waste bin see Installing the Front Door Waste Bin Exit Tray and Exit Tray Waste Bin on page 2 2 14 Move the power switch to the On position Peel roller ...

Страница 28: ... normal operation Wait approximately five minutes after you open the top door before cleaning it Fingerprints can damage the thermal head Never touch it with your bare hands or fingers 4 Move the power switch to the Off position 5 Pull up on the handle to remove the ribbon cassette Support the cassette with two hands 6 Place the cassette on a flat surface 7 Remove an alcohol pad from its packaging...

Страница 29: ...e 12 Allow the alcohol to dry completely about five minutes before you resume printing 13 Carefully insert the cassette until it clicks into place 14 Close the top door 15 Close the front of the printer 16 Install the exit tray and exit tray waste bin see Installing the Front Door Waste Bin Exit Tray and Exit Tray Waste Bin on page 2 2 17 Move the power switch to the On position Pinch roller ...

Страница 30: ...e Exit Tray Waste Bin on page 3 2 2 Remove the front door waste bin see Removing the Front Door Waste Bin on page 3 3 3 Move the power switch to the Off position CAUTION To prevent damage to the printer do not pull abruptly on the paper 4 Manually rewind the paper onto the roll 5 Remove the roll of paper 6 Remove the cover for the cleaning rollers Cover ...

Страница 31: ...bout five minutes before you resume printing 10 Repeat steps 7 9 for the second cleaning roller 11 Install the cover for the cleaning rollers 12 Move the power switch to the On position 13 Load the paper See Loading the Paper on page 2 8 14 Install the front door waste bin exit tray and exit tray waste bin see Installing the Front Door Waste Bin Exit Tray and Exit Tray Waste Bin on page 2 2 Cleani...

Страница 32: ...al print head becomes extremely hot during normal operation Wait approximately five minutes after you open the top door before cleaning it Fingerprints can damage the thermal head Never touch it with your bare hands or fingers 5 Pull up on the handle to remove the ribbon cassette Support the cassette with two hands 6 Place the cassette on a flat surface 7 Insert a 1 x 2 in 2 5 x 5 cm piece of tape...

Страница 33: ...mference of the roller is cleaned completely Use a clean piece of tape each time 12 Repeat steps 7 11 for the right side of the nip and capstan rollers 13 Carefully insert the cassette until it clicks into place 14 Close the top door 15 Close the front of the printer 16 Install the exit tray and exit tray waste bin see Installing the Front Door Waste Bin Exit Tray and Exit Tray Waste Bin on page 2...

Страница 34: ......

Страница 35: ... extended periods Store prints at a relative humidity between 30 50 Avoid exposure to high intensity light sources particularly fluorescent light and sunlight which are rich in ultraviolet radiation Avoid exposure to vinyl items those made of polyvinyl chloride PVC and any plastic that contains plasticiser If you use transparent sleeves make sure they are not PVC based Operator Panel Lights Light ...

Страница 36: ...oll To scroll through printer settings Setting options scroll To scroll forwards or backwards through setting options Enter Open Front Door To initiate an action or accept a change or unlock the front door NOTE When the front of the printer is closed and paper and ribbon are loaded the front door is locked ...

Страница 37: ...x 12 The printer is on and ready to make prints 10 x 8 or 12 x 8 represents the size of ribbon that is loaded Printer Info Printed Total number of prints printed Paper Left Remaining paper shown as a percentage Donor Left Remaining ribbon shown as a percentage Firmware Main firmware version number FPGA FPGA version number Table Print parameter table version number Serial Printer serial number Mode...

Страница 38: ...rial number counts errors and firmware information Wait Time Wait Time The amount of time the Printer waits for the next print Time Out The amount of time the Printer waits for the next print before printing a single sided print Maintenance Clear Chad Clear a paper jam from the slitter See Clearing a Paper Jam from the Slitter on page 5 11 Display Level 1 Display Level 2 Description ...

Страница 39: ...nt head see page 3 6 2 Clear any debris from the paper path see page 5 11 Prints have horizontal streaks Thermal print head is dirty Peel roller is dirty Platen roller is dirty Pinch roller is dirty 1 Clean the thermal print head including the peel rollers see page 3 6 2 Clean the platen roller see page 3 8 3 Clean the pinch roller see page 3 8 Prints have vertical streaks Thermal print head is di...

Страница 40: ...ath see page 5 11 An abnormal noise occurs during paper feeding Computer does not recognise the printer USB cable is not connected correctly or it is damaged Check that the USB cable is connected correctly and not damaged Data transfer stops and the operator panel displays Data error Problem Description or Cause Possible Solution Enter Open Front Door Message Description or Cause Possible Solution...

Страница 41: ...the remaining paper Load new paper see page 2 8 Ready Loading The printer is preparing to load paper No action is necessary Paper jam The paper is jammed in the paper path Clear the paper jam from the paper path see page 5 6 then reload the paper If the error persists turn the printer off and then on again 7011 MECHA ERROR There is a paper jam at the slitter Clear the paper jam from the exit path ...

Страница 42: ...n position 2 Remove the exit tray from the front of the printer 3 Remove and empty the exit tray waste bin NOTE To keep your prints dust free and to prevent paper jams empty the waste bin each time you replace the paper 4 Open the front of the printer Press the release button Pull the front of the printer forward until it stops 5 Open the top door of the printer ...

Страница 43: ...each time you replace the paper CAUTION To prevent damage to the printer do not pull abruptly on the paper 8 Use both hands to manually rewind the paper onto the roll CAUTION The thermal print head becomes extremely hot during normal operation and fingerprints can damage it Never touch the thermal print head Do not allow any objects to fall onto the thermal print head 9 Wait approximately five min...

Страница 44: ... 13 Load the paper See Loading the Paper on page 2 8 Clearing a Type A Paper Jam If a Paper Jam message appears on the operator panel with an error code that contains the letter A in the third position of the code i e 4CA1 follow this procedure 1 Move the power switch to the On position 2 Remove the exit tray from the front of the printer 3 Remove and empty the exit tray waste bin NOTE To keep you...

Страница 45: ...n the handle to remove the ribbon cassette Support the cassette with two hands 7 Place the cassette onto a flat surface 8 Remove the front door waste bin a Grasp the waste bin by the handle b Pull the waste bin towards you Lift it up and out of the printer 9 Empty the waste bin NOTE To keep your prints dust free and to prevent paper jams empty the waste bin each time you replace the paper ...

Страница 46: ...er onto the roll CAUTION Be careful not to damage or mark any rollers 11 Cut off damaged or printed areas of the paper 12 Look inside the printer and carefully remove any pieces of paper 13 Carefully insert the cassette until it clicks into place 14 Close the top door 15 Close the front of the printer 16 Load the paper See Loading the Paper on page 2 8 ...

Страница 47: ... this procedure 1 Move the power switch to the On position 2 Remove the exit tray from the front of the printer 3 Remove and empty the exit tray waste bin NOTE To keep your prints dust free and to prevent paper jams empty the waste bin each time you replace the paper 4 Open the front of the printer Press the release button Pull the front of the printer forward until it stops 5 Open the top door of...

Страница 48: ... do not pull abruptly on the paper 8 Manually rewind the paper onto the roll 9 Press Enter on the Operator Panel 10 Remove the front door waste bin a Grasp the waste bin by the handle b Pull the waste bin towards you Lift it up and out of the printer 11 Empty the waste bin NOTE To keep your prints dust free and to prevent paper jams empty the waste bin each time you replace the paper Enter Open Fr...

Страница 49: ...he top door 17 Close the front of the printer 18 Load the paper See Loading the Paper on page 2 8 Clearing aPaper Jam from the Slitter If a 7011 MECHA ERROR message appears on the operator panel follow this procedure 1 Press Menu on the operator panel 2 Press until MAINTENANCE displays 3 Press Enter CLEAR CHAD appears on the operator panel 4 Press Enter 5 Wait for the slitter to move out of positi...

Страница 50: ...ter a Press the release button b Pull the front of the printer forward until it stops 2 Open the top door of the printer 3 Pull up on the handle to remove the ribbon cassette Support the cassette with two hands 4 Place the cassette on a flat surface 5 Cut off any damaged areas of the ribbon ...

Страница 51: ...e tape at the center and at each end of the ribbon IMPORTANT Slack in the ribbon can cause a paper jam Wind the repaired end of the ribbon onto the take up spool Make sure that you remove any slack in the ribbon 8 Carefully insert the cassette until it clicks into place Tape ...

Страница 52: ...5 14 November 2014 Troubleshooting 9 Close the top door 10 Close the front of the printer ...

Страница 53: ...the thermal print head is left in this position If a power outage occurs 1 Move the power switch to the On position 2 Remove the exit tray from the front of the printer 3 Open the front of the printer Press the release button Pull the front of the printer forward until it stops 4 Open the top door of the printer 5 When power is restored a Power cycle the printer b Follow the procedure for Clearing...

Страница 54: ......

Страница 55: ...ter with a damaged power cable Always unplug the power cable from the printer before cleaning or when the printer is not in use If the printer has been dropped or damaged make sure a qualified service person examines the printer before you use it Do not block the filter openings on the printer cabinet Do not expose the printer to moisture or water Do not allow any foreign objects or liquids to fal...

Страница 56: ...2 November 2014 Safety and Regulatory Information Safety Labels Please observe the important safety warnings that are posted on the printer CAUTION HOT SURFACE To prevent burns use caution in these areas ...

Страница 57: ...Safety and Regulatory Information November 2014 A 3 CAUTION SHOCK HAZARD DO NOT OPEN ...

Страница 58: ...red to correct the interference at his or her own expense This device complies with Industry Canada licence exempt RSS standard s Operation is subject to the following two conditions 1 this device may not cause interference and 2 this device must accept any interference including interference that may cause undesired operation of the device Le présent appareil est conforme aux CNR d Industrie Cana...

Страница 59: ...s Disposal of this material may be regulated due to environmental considerations For disposal or recycling information please contact your local authorities In the USA contact the Electronics Industry Alliance at www eiae org In the European Union this symbol indicates that when the last user wishes to discard this product it must be sent to appropriate facilities for recovery and recycling Refer ...

Страница 60: ......

Отзывы: