background image

17

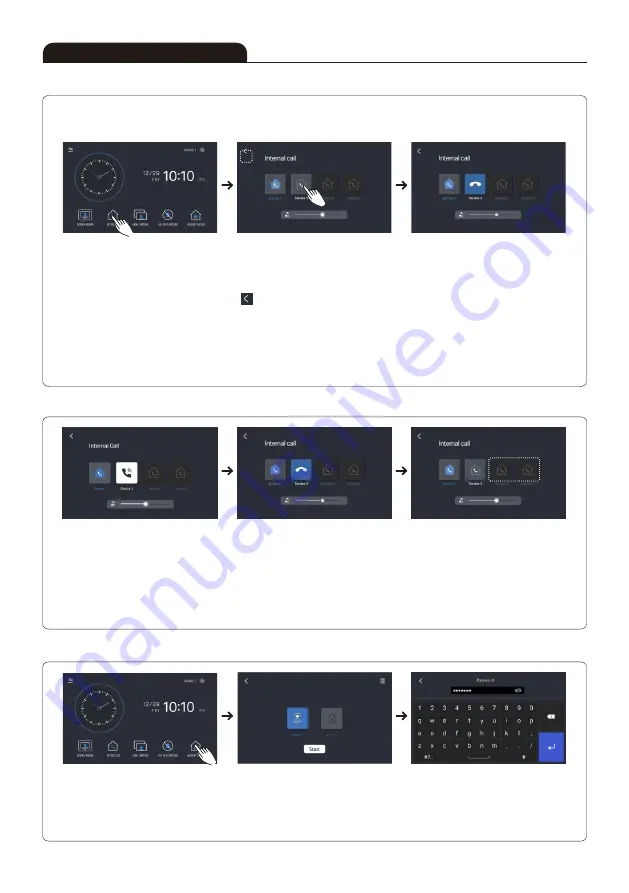
■ Extension Calling & Receiving Function

■ Receiving from the Other Monitor

-  In case of extended monitors, you can perform extension calling.

   To perform extension calling, you MUST set each device's numbering at the "Setting"

   From ID #1 to #4 is available to register, you MUST register in order.

When  pressing  extension  call 

button, the menu for extension call 

will be displayed.

Device  number  is  automatically 

shown  If  there's  a  same  device 

number  already,  'ID  Collision'  will 

be shown at 'Device 1' 

When  extension  calling  from  other 

monitors or interphones, extension calling 

melody will be rung.Calling devices icon 

will be changed to calling icon. Press 

calling icon then calling gets connected. 

When  touching  other  buttons  in  the 

middle of the described function hereby, 

you will hear BUZZ sound to alarm you. 

(Extension calling time : 30 secs) 

Whole devices calling or each calling is 

available at this stage. When pressing a 

device button, that device calling will be 

in operation. While calling, icon will be 

changed. When pressing "Home icon" at

'    ', call will be cancelled. In case of 

extension interphone, the chosen interphone 

& its extended monitor will be calling 

together. When calling the interphone of 

own monitor that you are handling, simply 

press the device number of itself. When 

calling the whole devices, all will be rung. 

(Extension calling time : 30 secs)

Extension  calling  icon  is  shown. 

Press  home  button  and  calling 

will  be  off.  When  touching  other 

buttons  in  the  middle  of  the 

described function hereby, you will 

hear BUZZ sound to alarm you. 

(Extension talk time : 180 secs) 

When  the  connection  with  calling 

device is made, calling icon will be 

changed into extension calling icon. 

By pressing home icon, calling will 

be off. When touching other buttons 

in  the  middle  of  the  described 

function hereby, you will hear BUZZ 

sound to alarm you. When only one 

device  is  connected  while  calling 

the whole devices, the rest will be 

automatically off.

(Extension talk time : 180 secs)

The  icon  when  there's  no  device 

connected.

How to Operate

■ Absent Mode Function

·When pressing absent mode button, 

the  screen  for  sensor  button  will  be 

displayed. (Sensor : Magnet sensor)

 ※ After setting the absent mode, you must first release the absent mode to prevent an emergency alarm sound.

·Select and activate the sensor button 

associated  with  the  product,  then 

press the start button. Absent mode is 

started according to the set time.

·Enter  the  password  to  release  the 

crime prevention sensor after operation. 

(The initial password is set to '0000')

Содержание KCV-S701IPOE

Страница 1: ...SMART IP VIDEOPHONE U S E R M A N U A L KCV S701IPOE Thank you for purchasing our product Read safety instructions and manual carefully before using the product APP Download...

Страница 2: ...ot install it slanted place of water leakage which can a short circuit Fix the product on the wall safely according to the installation guideline to prevent any damage or injury Don t put any stuff in...

Страница 3: ...picture distortion may occur Do not drop this product Glass is used for monitor and might break or cause other circuit inferiority In such case immediately turn down the power switch and call to cons...

Страница 4: ...ached screws 2 Connect wiring to terminal on the back of door camera referring to product connection diagram 3 Hang door camera on metal wall hanger frame and fix door camera on metal wall hanger fram...

Страница 5: ...by 7W 20 Full load Operating Temperature 0 40 LCD 7 color LCD Communication Systerm Handsfree Type Wiring Door Camera RJ45 UTP5 Mount Type Surface mount Dimension mm 197 W x 176 H x 23 D mm Door Camer...

Страница 6: ...ion Back Back MIC Power Switch LCD Terminal Speaker RJ 45 Connector Mic Camera Lens LED Call button Speaker NC COM NO RX RX TX TX POE2_48V POE2_48V POE2_48V POE2_48V B Camera 1 2 Selection switch A B...

Страница 7: ...z POE CLOUD SERVER UTP CAT5E Mobile phone Internet CLOUD SERVER Mobile phone Internet Sensor 2 Sensor 1 2 2 2 3 DOOR CAMERA MONITOR Sensor 2 3 DOOR CAMERA 2 Wire 1 5 50Meter 80Meter 1 pair short 1 pai...

Страница 8: ...start screen where all functions of the product can be run Press menu icon in Home screen to run desired functions Menu setting Display device number Monitoring button Internal call button Button for...

Страница 9: ...sitivity 1 2 Highly recommend to use in default MIC Sensitivity 1 2 Highly recommend to use in default Auto Image Capture When you select ON automatic screen capture available as per visitor s call Al...

Страница 10: ...changed PIN number Setting Device Direct to IP CCTV Setting Screen Brand Select the CCTV Brand IP Enter the CCTV IP address Account Enter the account connected to CCTV Password Enter the passwords con...

Страница 11: ...ecommended Spec of Smart Phone Andriod 8 0 version or higher iOS 11 4 version or higher Recommended Network Delay Time KCV S701IPOE AP within 50msec KCV S701IPOE CLOUD within 100msec In case that dela...

Страница 12: ...01IPOE you must install APP called KOCOM Home to your Android Phone iPhone Please scan APP QR code on page 1 of this manual Or you can download by following procedures Android Google playstore KOCOM H...

Страница 13: ...members through the app and use the same Start KOCOM Home APP pressing Add device Device is registered Main screen after registration KCV S701IPOE is recognized automatically and press Add Call in KO...

Страница 14: ...14 Instructions for Operation Door open in KOCOM Home APP To check more menu press button Tap the key shape icon Press Confirm to approve the door opening Activate the door open button pressing...

Страница 15: ...button while talking with visitors calling will be off Press door open button then you can open the door Talking time 180 secs Door opening time Default 0 2 seconds you can change at the Settings End...

Страница 16: ...tions for Operation CCTV Monitoring With the CCTV connected press CCTV button from the call screen then CCTV can be monitored NOTICE Some CCTV may have compatibility issues so the image won t be displ...

Страница 17: ...ogether When calling the interphone of own monitor that you are handling simply press the device number of itself When calling the whole devices all will be rung Extension calling time 30 secs Extensi...

Страница 18: ...pears after tapping button on Other setting screen At the image view screen you can see stored images Press left or right arrow button then you can see other images Press delete button and deletion ca...

Страница 19: ...19 Memo...

Страница 20: ...rsuant to part 15 of the FCC Rules These limits are designed to provide reasonable protection against harmful interference in a residential installation This equipment generates uses and can radiate r...

Отзывы: