


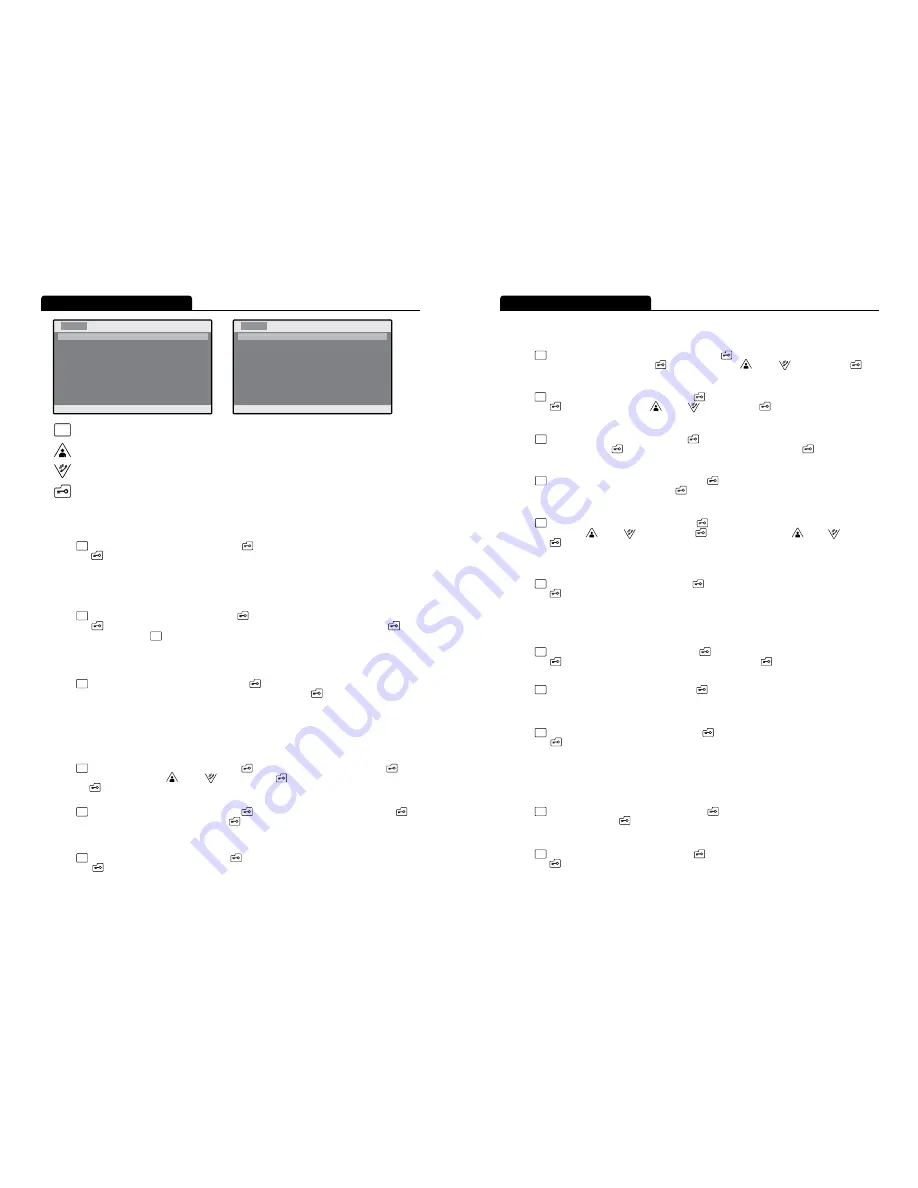
MENU Button ▶ Move Menu to Save Mode Set ▶ SELECT Button
▶ Move to desired menu mode from MOVIE(Video)/ CAMERA(Capture) ▶ SELECT Button
1. Absence Set :
- Door camera image is automatically recorded or captured when there is call during absence.
- Absence Indication with LED (Red Blink)
MENU Button ▶ Move Menu to Absence Set ▶ SELECT Button ▶ Move to required Mode at YES(Set)/ NO(Release)
▶ SELECT Button
2. Play Folder:
- Play or Delete stored Video/ Image/ Album File.
- Files in the IMAGE and ALBUM folder are able to check with Preview Screen, and is displayed in full screen when
select the desired file.
3. Save Mode Set :
Select either Video Record Mode or Image Capture Mode for Door Camera Image Recording during absence hour.
4. Digital Frame:
- Display the desired picture without turn off the LCD screen at Standby Screen.
- Time Set : 30 Minute/ 1 Hour
–
It may shorten LCD Screen life when it is set to ‘On’ for long hour.
- Max. Resolution : 2560X2048 Pixel, and unable to recognize above this resolution.
FIXED - Display 1 selected photo file.
MENU Button ▶ Move Menu to Digital Frame ▶ SELECT Button ▶ Move to FIXED Mode ▶ SELECT Button
▶Move [>] Position to desired file using UP /DOWN ▶ SELECT Button ▶ Move to desired Mode from 30MIN/1HOUR
▶SELECT Button ▶ Full Screen Display
ON
–
Display every 10 second/picture for all picture files in the Album Folder
MENU Button ▶ Move Menu to Digital Frame ▶ SELECT Button ▶ Move Menu to ON Mode ▶ SELECT Button
▶Move to desired mode from 30MIN/1HOUR ▶ SELECT Button ▶ Full Screen Display
5. Rec Time : It selects the time to record the image when it is set to MOVIE from Save Mode Set.
MENU Button ▶ Move Menu to Rec Time ▶ SELECT Button ▶ Move to desired mode from 30SEC/2MIN/5MIN
▶ SELECT Button
6. Monitoring Time Set :
- It sets each of the Door camera’s monitoring time.
- CAM1 (1 Min./3 Min./5 Min.), CAM2 (3 Min./30 Min./1 Hour)
MENU Button ▶ Move Menu to Monitoring Time Set ▶ SELECT Button ▶ Move Menu to desired mode from
C1[1M/3M/5M], or C2[3M/30M/1H] ▶ SELECT Button ▶ Select time using UP /DOWN ▶ SELECT Button
7. Melody set : It selects the melody sound of Door camera 1,2 and Interphone.
MENU Button ▶ Move Menu to Melody set ▶ SELECT Button ▶ Move Menu to desired mode from C1[3], C2[2], IP[5]
▶ SELECT Button ▶ Change Melody using UP /DOWN ▶ SELECT Button
8. Time Set : It sets current time. <YY/MM/DD HR : MN>
MENU Button ▶ Move Menu to Time Set ▶ SELECT Button ▶ Move Menu to desired Time Set mode from
2010/09/28 09 : 30 ▶ SELECT Button ▶ Adjust Date & Time using UP/DOWN ▶ SELECT Button
9. Languages Set : It selects the language to use. <English/French/Spanish/Russian/Korean>
MENU Button ▶ Move Menu to Languages Set ▶ SELECT Button ▶ Move Menu to desired mode from
English/French/Spanish/Russian/Korean ▶ SELECT Button
10. CAM Adjust : It sets CONTRAST & COLOR of the Door Camera’s image.
MENU Button ▶ Move Menu to CAM Adjust ▶ SELECT Button ▶ Door camera image is turned on
▶Adjust using CONTRAST UP /DOWN ▶ SELECT Button ▶ Adjust using COLOR UP /DOWN
▶ SELECT Button
11. Over Write : When it exceeds the SD CARD capacity during setup, it overwrites starting from the oldest files.
When it is released, it will not store file if it exceeds the SD CARD capacity.
MENU Button ▶ Move Menu to Over Write ▶ SELECT Button ▶ Move Menu to desired mode from YES(Set)/NO(Release)
▶ SELECT Button
12. SD Card Info :
- Display the total capacity information
- Display the remained capacity information
- SD CARD Format
MENU Button ▶ Move Menu to SD Card Info ▶ SELECT Button ▶ Move Menu to SD CARD FORMAT
▶ SELECT Button ▶ Move Menu to desired mode from YES/NO ▶ SELECT Button
13. System Info : It displays the version of Main Board, Memory Board, and Signal Type of Door Camera.
MENU Button ▶ Move Menu to System Info ▶ SELECT Button
14. F/W Upgrade : When video image storage module F/W is changed, it copies the distributed BIN file to SD CARD for upgrade.
(There must be only the latest distributed BIN file in the SD CARD for F/W upgrade.)
MENU Button ▶ Move Menu to F/W Upgrade ▶ SELECT Button ▶ Move Menu to desired mode from YES(Set)/NO(Release)
▶ SELECT Button
15. Motion Rec Set : It automatically record or capture when there is change in the image of Door Camera during monitoring state.
Record/Capture works according to the setup state from Save Mode Set“M” is displayed at the top side of screen when
Motion Rec Set is selected. Stored file can be viewed from Play Folder, and its fine name format is made as
“mYYMMDD-TIME” type (ex: m20100916-083011).
HIGH : High Sensitivity, NORMAL : Normal Sensitivity, LOW : Low Sensitivity
MENU Button ▶ Move Menu to Motion Rec Set ▶ SELECT Button ▶ Move Menu to desired mode from
HIGH/NORM/LOW/NO ▶ SELECT Button
16. Default Set: Initialize the Menu set value.
MENU Button ▶ Move Menu to Default Set ▶ SELECT Button ▶ Move Menu to desired mode from YES/NO
▶ SELECT Button
MENU Setting
7
6
MENU Setting
MENU
MENU
MENU Button ▶ Move Menu to Play Folder ▶ SELECT Button ▶ Move to desired mode from VIDEO/ IMAGE/ ALBUM
▶ SELECT Button ▶ Select file from List, move to desired mode menu from (Play) or (Delete) ▶SELECT Button
(Move to upper menu - MENU Button )
MENU
MENU
MENU
MENU
MENU
MENU
MENU
MENU
MENU
MENU
MENU
MENU
MENU
MENU
MENU
MENU
MENU
MENU
KOCOM
Color videophone
1. Absence Set
2. Play Folder
3. Save Mode Set
4. Digital Frame
5. Rec Time
6. Monitoring Time Set
7. Melody set
8. Time Set
9. Languages Set
10. CAM Adjust
MENU
KOCOM
Color videophone
11. Over Write
12. SD Card Info
13. System Info
14. F/W Upgrade
15. Motion Rec Set
16. Default Set
[ YES ]
[ NO ]
[ NO ]
[ CAMERA ]
[ OFF ][30MIN]
[ 30SEC ]
C1[1M] C2[3M]
C1[1] C2[3] IP[2]
2010/09/28 09:30
[ ENGLISH ]
Menu / Cancel Button : Each Menu Setup Button, Move to upper Menu while in Menu Mode
UP Button : UP button to move to MENU mode
DOWN Button : DOWN button to move to MENU Mode
SELECT Button : SELECT button to move to MENU Mode


