background image

6

kobalttools.com

SAFETY INFORMATION

WARNING

RISK OF FIRE OR EXPLOSION

WHAT COULD HAPPEN

HOW TO PREVENT IT

This tool is capable of generating 
sparks which can result in ignition 
of flammable materials. 

Wiping or cleaning rags and other flammable waste materials that 
may have been used on the tool must be placed in a tightly closed 
metal container, and disposed of  in a proper manner.

Do not spray flammable or combustible materials near an open 
flame or sources of ignition such as cigarettes, motors, and 
electrical equipment.
Do not spray or clean with flammable liquids. For use with 
water-based liquids only.
Do not spray or clean with liquids having a flash point less than 
38°C (100°F).
Paint or solvent flowing through the equipment is able to result in 
static electricity. Static electricity creates a risk of fire or explosion 
in the presence of paint or solvent fumes. All parts of the spray 
system, including the pump, hose assembly, spray gun, and 
objects in and around the spray area shall be properly grounded 
to protect against static discharge and sparks. Use only 
conductive or grounded high-pressure airless paint sprayer hoses 
specified by the manufacturer.

Verify that all containers and collection systems are grounded to 
prevent static discharge.

Connect to a grounded outlet and use grounded extension cords. 
Do not use a 3 to 2 adapter.

Do not use a paint or a solvent containing halogenated 
hydrocarbons. See operating instructions for examples of these 
types of materials.

Keep spray area well ventilated. Keep a good supply of fresh air 
moving through the area. Keep pump assembly in a well ventilated 
area. Do not spray pump assembly.

Do not smoke in the spray area.

Do not operate light switches, engines, or similar spark producing 
products in the spray area.

Keep area clean and free of paint or solvent containers, rags, and 
other flammable materials.

Know the contents of the paints and solvents being sprayed. Read 
all Safety Data Sheet (SDS) and container labels provided with 
the paints and solvents. Follow the paint and solvent 
manufacturer’s safety instructions.

Fire extinguisher equipment shall be present and working.

Содержание SGY-APS41

Страница 1: ... RECEIPT HERE Serial Number Purchase Date kobalttools com Questions problems missing parts Before returning to your retailer call our customer service department at 1 888 3KOBALT 1 888 356 2258 8 a m 8 p m EST Monday Friday MODEL SGY APS41 Français p 34 Español p 69 AIRLESS PAINT SPRAYER ITEM 0232741 ...

Страница 2: ...n I y l b m e s s A Operating Instructions 17 Spraying Techniques 23 Care and Maintenance 25 Troubleshooting 29 Warranty 31 Exploded View 32 COMPONENTS SPECIFICATIONS Motor Size 5 8 HP Max Pressure 3 000 PSI Voltage 120 V 60 Hz ETL Power Cord Length 28 in 0 73 m Nozzle Size Included 517 and 513 Sprayer Width 250 310 mm Flow Rate 0 28 GPM 1 06 L Min Maximum Hose Pressure 3 300 PSI 22 8 Mpa ...

Страница 3: ...ime Tube 1 D Spray Gun Housing 1 E Internal Gun Filter 1 F Pressure Control Knob 1 G Fluid Outlet 1 H Prime Spray Valve Switch 1 I Inlet Screen 1 J Spray Guard 1 K High Pressure Fluid Hose 1 L Spray Tip 2 M Single Seal Tip 1 N Pressure Release Button 1 O Wrench 1 P Inlet Screen Holder 1 Q Plastic Bristle Cleaning Brush 1 R Hex Key 1 S Safety Lock 1 ...

Страница 4: ...d chromium from chemically treated lumber Your risk from these exposures varies depending on how often you do this type of work To reduce your exposure to these chemicals work in a well ventilated area and wear appropriate approved safety equipment such as respirators or dust masks which are specially designed to filter microscopic particles Wash hands after handling WARNING PAINT SPRAYER HAZARDS ...

Страница 5: ...result in fire or explosion WARNING RISK OF EYE OR HEAD INJURY WHAT COULD HAPPEN HOW TO PREVENT IT Tool attachments can become loose or break and fly apart becoming projectiles or propelling other objects at the operator or bystanders in the work area Make sure all attachments are properly assembled and securely fastened before use Always use the tool at a safe distance from others in the work are...

Страница 6: ... around the spray area shall be properly grounded to protect against static discharge and sparks Use only conductive or grounded high pressure airless paint sprayer hoses specified by the manufacturer Verify that all containers and collection systems are grounded to prevent static discharge Connect to a grounded outlet and use grounded extension cords Do not use a 3 to 2 adapter Do not use a paint...

Страница 7: ...lt in a risk of electric shock All wiring electrical connections and system grounding must comply with the National Electrical Code NEC and with any local codes and ordinances A qualified electrician should be consulted if there is any doubt as to whether an outlet box is properly grounded Do not expose to rain store indoors A ground fault interrupter GFI protected circuit is recommended for all o...

Страница 8: ...ard Do not spray without nozzle tip guard in place Only use a nozzle tip specified by the manufacturer Use caution when cleaning and changing nozzle tips In the case where the nozzle tip clogs while spraying follow the manufacturer s instructions for turning off the unitand relieving the pressure before removing the nozzle tip to clean Do not leave the unit energized or under pressure while unatte...

Страница 9: ...k of bursting if the tool is damaged Poor quality improper or damaged attachments can detach or fly apart during operation sending projectiles through the work area and causing serious injury Never operate tools while using drugs or alcohol Do not overreach or stretch to operate the tool Keep proper footing at all times when handling tools Slipping tripping and or falling are major causes of serio...

Страница 10: ...LATION HAZARD WHAT COULD HAPPEN HOW TO PREVENT IT Paint spraying tools generate paint vapors which can be harmful to the lungs and respiratory system Some materials give off vapors which could cause serious injury with prolonged exposure Always wear a properly fitting facemask or respirator rated for the application when using such tools Always work in a clean dry well ventilated area Be aware of ...

Страница 11: ...ay tip L internal gun filter E and single seal tip M 7 The spray guard J holds the spray tip L and allows for change of spray pattern direction 8 The spray tip L orifice size determines the flow rate Included are two tips 513 and 517 Selecting Proper Spray Tip Size This tool comes with two spray tip sizes 513 and 517 The lifespan of a spray tip varies depending on the types of materials being spra...

Страница 12: ...stains lacquers and enamels along with some lighter oil based paints e z i s p i T 517 Designed to be used with paint and acrylics both oil based and latex Note ALWAYS of the paint sprayer Heavier materials will require a larger tip size Lighter materials such as stains and enamels may require a smaller tip size Most spray material labels indicate the suggested or recommended tip size for proper s...

Страница 13: ...ufacturer has added a lightweight coating of oil to protect the motor and internal paint sprayer to prevent any oil debris from contaminating your paint and or stain Be sure to use the correct spray tip L for the particular painting application See table on Coating Selection to determine the proper tip size Proper maintenance after each use is essential for optimal performance It is recommended th...

Страница 14: ...ob F to lowest PSI below roll by turning counterclockwise 4 Turn nut on spray guard J then remove spray guard J and spray tip L from spray gun housing D Hi Spray Low Spray Prime Clean Roll 5 F 2 4 D J L 6 H 6 Turn prime spray valve switch H to prime position PRIME SPRAY ...

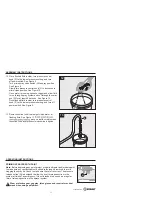
Страница 15: ... hose end not included and tighten turning counterclockwise Connect the other end of garden hose not included to water spigot and tighten by turning counterclockwise Note If garden hose connection is unavailable follow Step 8B and use water instead of cleaning solvents 3 2 1 8a B B I 7 B C C 8b For Oil Based Paint Place suction tube B in mineral spirits or other compatible cleaning solvents not in...

Страница 16: ...10 Slowly turn pressure control knob F clockwise to prime clean position 10 F Hi Spray Low Spray Prime Clean Roll 11 Once motor is running allow fluid to flow through sprayer system and out through the prime tube C into a waste pail for at least 45 seconds This flushing will remove any debris or oil in the system C 11 ...

Страница 17: ... turn off power switch See Figure 5 process reattach inlet screen to suction tube and turn counterclockwise to tighten 13 Remove suction tube from spigot clean water or flushing fluid See Figure 13 B I 13 OPERATING INSTRUCTIONS PRIMING SPRAYER WITH PAINT Note Before beginning any paint project properly stir paint and or strain paint to make sure any contaminants or debris are thoroughly removed to...

Страница 18: ...ressure in the machine See Figure 1 Turn pressure control knob F to the lowest pressure setting 2 Separate prime tube C from suction tube B and place prime tube into a waste pail See Figure 2 2 B C C 1 F Hi Spray Low Spray Prime Clean Roll H PRIME SPRAY 3 Place suction tube B into paint bucket See Figure 3 3 B ...

Страница 19: ...lowly turn pressure control knob F clockwise until motor begins to run 4 A 5 F Allow paint to flow through sprayer system and out through the prime tube C for 15 seconds 6 Turn down pressure control knob F and turn off sprayer 2 1 Hi Spray Low Spray Prime Clean Roll 6 F ...

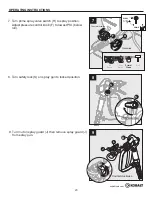
Страница 20: ... pressure control knob F to lowest PSI below roll H Hi Spray Low Spray Prime Clean Roll 7 F Clockwise 8 Turn safety lock S on spray gun to locked position Lock Lock clockwise 8 S S PRIME SPRAY 9 D J L Counterclockwise 9 Turn nut on spray guard J then remove spray guard J from spray gun Counterclockwise ...

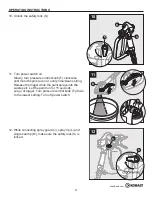
Страница 21: ... until prime clean setting Release the trigger while the paint sprays into the waste pail Let the paint run for 15 seconds Let go of trigger Turn pressure control knob F down to the lowest setting Turn off power switch 10 Counterclockwise S D S 12 While connecting spray guard J spray tip L and single seal tip M make sure the safety lock S is locked Lock Lock clockwise 12 S S ...

Страница 22: ... jammed L 14 Adjust the spray tip L so the arrow on the housing is facing forward The sprayer is now primed and ready for use Lock Lock S Counterclockwise 14 Counterclockwise S M Adjusting Spray Pattern Vertical Or Horizontal Spray 1 To adjust spray angle set safety lock to locked position Loosen nut on spray guard J Turn 3 3 2 1 1 J spray guard to vertical or horizontal position Position spray ti...

Страница 23: ...ttern which occurs when too much or too little paint is sprayed in a single area To properly set your spray pattern start the sprayer at the lowest possible PSI pressure setting and gradually increase the PSI pressure setting until you reach an even and consistent spray pattern 2 Hand tighten nut on spray guard J Unlock safety lock and continue to spray 2 1 2 J Proper Spray Diagram Increase pressu...

Страница 24: ...ed at which you spray across the surface as consistent as possible Repeat the above process until you have reached the bottom of the surface you intend to paint Note When working on outside structures or where there is an eave or overhang properly cover the eave or overhang before spraying the surface area you wish to paint When painting outdoor structures spray horizontally When spraying moulding...

Страница 25: ...he material you are using to prevent buildup of paint and or debris 5 Before starting the following day less than 48 hour period clean just the tip of gun with a non wire bristle brush Note If using water based paint leave the tip of the gun in water only for a short period of time under 48 hours Exposure to water for an extended period of time can be corrosive to the internal components of the no...

Страница 26: ... other end of garden hose not included to water spigot and tighten by turning counterclockwise If no garden hose connection is available use water in a 5 gallon bucket NEVER let the clean water bucket run out of clean water 7 Turn power switch on and allow excess paint to flow out of prime tube C into waste pail 8 the system 9 sure both tubes are in the clean water bucket Waste Pails Clean Water R...

Страница 27: ...5 Depress trigger on spray gun BEFORE turning the machine on This will decrease the possibility of high pressure buildup in the system and any overspray 6 7 DO NOT release the trigger The trigger should remain depressed allowing water to continuously spray 8 the system 9 STAGE 2 Cleaning Sprayer and Components Before Storage 4 3 2 1 E R 1 1 Fill 5 gallon bucket with water 2 Unscrew spray gun handl...

Страница 28: ...ay gun handle 10 Tighten safety screw at base of handle housing using hex key R 11 Set prime spray valve switch H to prime clean position 12 Place prime tube C into waste pail 13 Turn power switch on and allow water to flow though spray system until water coming out of prime tube C is clear Note It may take several gallons of water depending on the type of paint used Continue to refill clean water...

Страница 29: ...squeeze spray gun housing D trigger Continue squeezing trigger and turn prime spray valve switch H to spray position 9 10 turn power switch off and set safety lock to locked position Note Place a plastic bag not included over bottom of the suction tube B using a PROBLEM POSSIBLE CAUSE CORRECTIVE ACTION Motor does not run sprayer does not spray 1 Machine is not plugged in 2 Power switch is turned o...

Страница 30: ...material supplier to make sure single seal tip size is compatible 6 Check suction tube Reconnect if loose 7 Check suction tube Replace if damaged Prime spray valve is set but does not allow 1 Prime spray valve is damaged or connection to prime spray valve is damaged 1 Contact local paint repair store or local retailer for suitable replacement components Spray gun housing leaks 1 Incorrect connecti...

Страница 31: ...d by others or the unauthorized use of nonconforming parts the damage is due to normal wear damage is due to abuse including overloading of the tool beyond capacity improper maintenance neglect or accident or the damage is due to the use of the use of the tool after partial failure or use with improper accessories of unauthorized repair or alteration have other rights that vary from state to state...

Страница 32: ...0 42 44 45 46 47 48 49 50 51 52 53 119 56 1 6 0 6 62 63 64 65 67 68 69 70 72 73 74 75 72 76 77 78 79 80 82 84 85 86 87 88 89 90 91 92 93 94 97 98 99 100 101 89 105 106 12 71 107 108 102 103 104 30 43 95 66 81 P G K Q H C B I 110 111 21 22 23 24 25 26 27 28 29 83 58 112 113 114 116 57 115 R F O PART DESCRIPTION 1 K 3 4 5 6 7 8 9 10 11 12 13 G 15 16 17 18 19 20 21 22 23 Spray Gun High Pressure Fluid...

Страница 33: ... Screen Holder Gasket Screw Screw Mat Connect Nut Support Components Wrench Connector Plastic Bristle Cleaning Brush DESCRIPTION PART 47 46 48 49 50 51 52 53 C B 56 57 58 I 60 61 62 63 64 65 66 67 68 69 70 71 72 73 74 75 76 77 78 79 80 81 82 83 84 85 Steel Ball Dw 12 7 Input Seat Input Washer O ring 17x1 8 Paint Input Adaptor Pressure Alu Joints Lock Ring Components Hose Clamp 16 25 Prime Tube Suc...

Отзывы: