background image

kobalttools.com

17

OPERATING INSTRUCTIONS

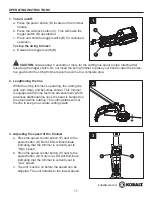
2.  Lengthening the line


While the string trimmer is operating, the cutting line 
gets worn down and becomes shorter. This trimmer 
is equipped with bump feed line advancement, which 
advances additional line once the head is bumped on 
the ground while rotating. The cutting blade will cut 
the line to keep an accurate cutting swath.

2

3.  Adjusting the speed of the trimmer

a.  Press the speed control button (P) next to the 

power button (D). Both LEDs will illuminate, 
indicating that the trimmer is currently set to  
“High” speed.

b.  Press the speed control button (P) next to the 

power button (D). Only one LED will illuminate, 
indicating that the trimmer is currently set to  
“Low” speed.

c.  The unit must be on before the speed can be 

adjusted. The unit defaults to the lowest speed.

3

P

D

1.  To turn on/off: 

a.  Press the power button (D) located on the trimmer 

handle. 

b.  Press the side lock button (C). This will make the 

trigger switch (B) operational.

c.  Press and hold the trigger switch (B) for continued 

operation.

To stop the string trimmer:

a.  Release the trigger switch (B).

        CAUTION: Always allow 5 seconds or more for the cutting line spool to stop rotating after 
releasing the trigger switch. Do not invert the string trimmer or place your hands under the protec-
tive guard until the string trimmer spool has come to a complete stop.

1

D

B

C

Содержание KST 140XB-06

Страница 1: ...Español p 43 Questions problems missing parts Before returning to your retailer call our customer service department at 1 888 3KOBALT 1 888 356 2258 8 a m 8 p m EST Monday Friday ATTACH YOUR RECEIPT HERE Serial Number Purchase Date KOBALT and the K Design are registered trademarks of LF LLC All Rights Reserved ...

Страница 2: ... Assembly Instructions Operating Instructions Care and Maintenance Troubleshooting Warranty Replacement Parts List 2 3 4 5 7 9 10 16 18 19 20 21 SPECIFICATIONS Type Cordless battery powered Battery 80 V Lithium Ion Speed 5 000 RPM low 5 500 RPM high Cutting path 14 in and 16 in 355 60 mm and 406 4 mm Line diameter 0 080 in 2 mm Cutting capacity Dual line ...

Страница 3: ... 1 H Guard 1 I Charger 1 J Tube 1 K Lower tube 1 L Spool cover preassembled to spool housing 1 PART DESCRIPTION QUANTITY M Spool preassembled to spool housing 1 N Spool cap preassembled to spool housing 1 O Spool housing 1 P Speed control button 1 Q Release button 1 R Positioning hole 1 S Trimmer line 1 T Attachment knob 1 U Harness holder 1 A C B D P E I F T K H G S Q R L M O N J U ...

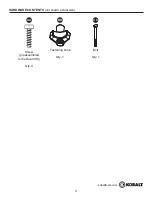
Страница 4: ...kobalttools com 4 HARDWARE CONTENTS not shown actual size Screw preassembled to the Guard H Qty 4 Fastening knob Qty 1 Bolt Qty 1 AA BB CC ...

Страница 5: ...amp locations Read the Operator s Manual To reduce the risk of injury user must read and understand operator s manual before using this product Eye Protection Wear eye protection with side shields that are marked to comply with ANSI Z87 1 when operating this equipment Safety Alert Precautions that involve your safety Ricochet Thrown objects can ricochet and result in personal injury or property da...

Страница 6: ...nual thoroughly and understand it completely If you do not understand the warnings and instructions in this Owner s Manual do not use this product Call 1 888 356 2258 for assistance The operation of any power tool can result in foreign objects being thrown into your eyes which can result in severe eye damage Before beginning power tool operation always wear safety goggles or safety glasses with si...

Страница 7: ...ar lightweight footwear Wear protective footwear that will protect your feet and improve your footing on slippery surfaces Keep firm footing and balance Do not overreach Overreaching can result in loss of balance Do not allow to be used as a toy Do not use tool if switch does not turn it on or off Any tool that cannot be controlled with the switch is dangerous and must be repaired Keep all bystand...

Страница 8: ...ies in order not to short the battery with conducting materials such as rings bracelets and keys The battery or conductor may overheat and cause burns For best results your battery tool should be charged in a location where the temperature is more than 50 F but less than 100 F To reduce the risk of serious personal injury do not store outside or in vehicles Under extreme usage or temperature condi...

Страница 9: ...oposition 65 Some dust created by power sanding sawing grinding drilling and other construction activities contains chemicals known to the state of California to cause cancer birth defects or other reproductive harm Some examples of these chemicals are Lead from lead based paints Crystalline silica from bricks and cement and other masonry products Arsenic and chromium from chemically treated lumbe...

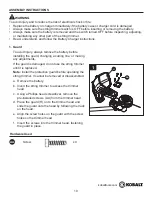
Страница 10: ...battery before installing the guard changing a cutting line or making any adjustments If the guard is damaged do not use the string trimmer until it is replaced Note Install the protective guard before operating the string trimmer It cannot be removed or disassembled a Remove the battery b Invert the string trimmer to access the trimmer head c Using a Phillips head screwdriver remove the pre insta...

Страница 11: ...en until there is no movement in the handle c The front handle can be adjusted to a suitable position 2 WARNING BB CC J E Hardware Used Fastening knob Bolt x 1 x 1 BB CC 3 Installing an attachment to the power head a Loosen the attachment knob T on the coupler b Push in the release button Q located on the lower tube K Align the button with the positioning hole R on the power head coupler F c Slide...

Страница 12: ... damage WARNING Attachment compatibilities This 80 volt powerhead is compatible with universal gas attachments 4 Cutting line on the string trimmer When the cutting line needs replacing rewind the spool M with 0 080 in trimmer line not included CAUTION To avoid injury always remove the battery before installing the guard changing a cutting line or making any adjustments 4 M ...

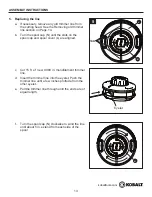
Страница 13: ...til the slots on the spool cap and spool cover L are aligned Slots c Cut 15 ft of new 0 080 in monofilament trimmer line d Insert the trimmer line into the eyelet Push the trimmer line until a few inches protrude from the other eyelet e Pull the trimmer line through until the ends are of equal length Eyelet f Turn the spool cap N clockwise to wind the line until about 5 in extend from each side of...

Страница 14: ... the spool M spool cover L or spool housing O e Align the tabs of the spool cover L with the posts on the spool housing O Push the spool cover L until the tabs securely snap into the posts M N S O L Tabs Posts 6 6 Removing old trimmer line a Firmly press in the tabs on each side of the spool cover L b Remove the spool cover from the spool housing O L O Tabs ...

Страница 15: ...cks into place You should hear a click once it is installed Note The battery can only be installed one way IMPORTANT The battery is not charged when it is purchased Before using the trimmer for the first time place the battery in the battery charger and charge Make sure to read all safety precautions and follow the instructions on Page 7 9 Q 8 8 Adjusting the cutting swath The trimmer is currently...

Страница 16: ... and the switch is in the OFF position before inspecting adjusting or performing maintenance on any part of the string trimmer Read understand and follow the instructions on Page 7 ASSEMBLY INSTRUCTIONS OPERATING INSTRUCTIONS To avoid injury Do not squeeze the trigger while the string trimmer is facing up Do not carry the string trimmer with your finger on the trigger switch to avoid unintentional...

Страница 17: ...d control button P next to the power button D Only one LED will illuminate indicating that the trimmer is currently set to Low speed c The unit must be on before the speed can be adjusted The unit defaults to the lowest speed 3 P D 1 To turn on off a Press the power button D located on the trimmer handle b Press the side lock button C This will make the trigger switch B operational c Press and hol...

Страница 18: ... the area being cut with consistent speed and height Use only the tip of the cutting line to do the trimming especially near walls and fences Trimming with the side of the cutting line may overload the motor wear out the line faster and break the line more often Do not rest the trimmer spool on the ground while trimming This will cause spool wear and battery drain If the grass is higher than 6 in ...

Страница 19: ...g to the instructions included with your model Motor runs but string head does not move 1 Trimmer damaged 1 Do not use the string trimmer Call 1 888 3KOBALT 1 888 356 2258 for technical service Trimmer smokes during operation 1 Trimmer damaged 1 Do not use the string trimmer Call 1 888 3KOBALT 1 888 356 2258 for technical service If you still have questions or an unresolved issue after going throu...

Страница 20: ...rchase for a free replacement or refund or call 1 888 3KOBALT 1 888 356 2258 for warranty service This warranty is void if defects in materials or workmanship or damages result from repairs or alterations which have been made or attempted by others or the unauthorized use of nonconforming parts the damage is due to normal wear damage is due to abuse including overloading of the tool beyond capacit...

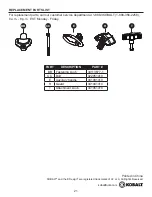
Страница 21: ...88 3KOBALT 1 888 356 2258 8 a m 8 p m EST Monday Friday PART DESCRIPTION PART BB Fastening knob 34113877 1 CC Bolt 322051410 E Auxiliary handle 341081410 H Guard 341041410 T Attachment knob 341061410 Printed in China KOBALT and the K Design are registered trademarks of LF LLC All Rights Reserved BB CC E H T ...

Отзывы: