background image

47

CUIDADO Y MANTENIMIENTO


Todos los mantenimientos debe realizarlos una persona calificada solamente. 


•  Al realizar una reparación, utilice solo piezas de repuesto idénticas a las de fabricación. El uso de 

cualquier otra pieza puede crear un peligro o causar daños en el producto.


•  Para asegurarse de que su hijo no se lesione accidentalmente, revise y mantenga con frecuencia 

el automóvil para niños.

•  Compruebe si el contenido del paquete está completo antes del ensamblaje. Si encuentra que falta 

algún contenido del paquete, llame al 1-888-356-2258.

• 

Compruebe si los tornillos están flojos y las piezas están dañadas durante la reparación.

•  Compruebe con frecuencia si cada pieza está intacta al instalarla o utilizarla.

•  Al desensamblar, siga las instrucciones cuidadosamente para evitar daños innecesarios.

•  Revise el producto y el cargador regularmente. Compruebe si los cables, los enchufes, las 

cubiertas y otras piezas están dañados. Si están dañados, deje de usarlos inmediatamente hasta 

que se reparen adecuadamente.

•  Antes de limpiar o realizar cualquier tarea de mantenimiento, retire la batería del producto. 

•  Use paños limpios para eliminar la suciedad, el polvo, el aceite, la grasa, etc. Use solo un paño 

suave y seco para limpiar las piezas de plástico, nunca use detergente ni alcohol.

•  Tenga cuidado de no dañar los componentes electrónicos cuando limpie el producto. No enjuague 

con agua. Limpie con un paño seco.

SOLUCIÓN DE PROBLEMAS

Si continua teniendo dudas o algún otro asunto sin resolver tras haber consultado esta guía de 

resolución de problemas o simplemente desea hablar con un experto en productos Kobalt, llame al      

servicio de atención al cliente de Kobalt al 1-888-356-2258.

PROBLEMA

CAUSA POSIBLE

ACCIÓN CORRECTIVA

El automóvil para 

niños no funciona.

1. El nivel de carga de las 

    baterías está bajo.
2.   El automóvil para niños 

ha dejado de trabajar para 

proteger los circuitos internos.

1. Cargue la batería.

2.  Apague el automóvil para niños, espere que 

la herramienta se enfríe y luego vuelva a 

encenderla.

Содержание 2557197

Страница 1: ...6 Español p 26 Questions problems missing parts Before returning to your retailer call our customer service department at 1 888 3KOBALT 1 888 356 2258 8 a m 8 p m EST Monday Sunday ATTACH YOUR RECEIPT HERE Serial Number Purchase Date SM20247 40V KID CAR ...

Страница 2: ......

Страница 3: ...3 72 MPH Runtime with 2 ah battery 50 minutes Weight without battery 42 5 lbs Charge time with 2 ah battery 60 Minutes Battery model KB 240C 06 Charger model KRC 40 06 Item Temperature Kid Car Storage Temperature Range 32 F 0 C 113 F 45 C Kid Car Operation Temperature Range 32 F 0 C 113 F 45 C Battery Charging Temperature Range 39 F 4 C 104 F 40 C Charger Operation Temperature Range 39 F 4 C 104 F...

Страница 4: ...RIPTION QUANTITY A Windshield 1 B Sideview Mirrors 2 C Car body 1 D Headlight 2 E Front guard 1 F Wheel 4 G Car door 2 H Side roll bar frame 2 I Seat 1 J Roll bar light frame 4 PACKAGE CONTENTS A B C D E F G H I J ...

Страница 5: ...4 HARDWARE CONTENTS not shown actual size Washer Nut Spring Front wheel shaft Rear wheel shaft Wrench Screw 4x12mm Screw 3x12mm Screw 4x12mm ...

Страница 6: ...your safety The following signal words and meanings are intended to explain the levels of risk associated with this product SYMBOL SIGNAL MEANING DANGER Indicates an imminently hazardous situation which if not avoided will result in death or serious injury WARNING Indicates a potentially hazardous situation which if not avoided could result in death or serious injury CAUTION Indicates a potentiall...

Страница 7: ...onable protection against harmful interference in a residential installation This equipment generates uses and can radiate radio frequency energy and if not installed and used in accordance with the instructions may cause harmful interference to radio communications However there is no guarantee that interference will not occur in a particular installation If this equipment does cause harmful inte...

Страница 8: ...ttery Permanent damage to the battery could occur or cause serious injury Ensure the battery locks into place Without proper battery installation the battery could fall out and injure a child if the vehicle tips over To prevent unintentional starting ensure the power switch is in the off position before connecting switch could cause the product to unintentionally power on Make sure the power switc...

Страница 9: ...air person using only identical replacement parts This will ensure that the safety of the product is maintained Do not modify or attempt to repair the kid car or the battery pack as applicable except as indicated in the instructions for use and care WARNING To ensure your child is safe while driving you must pay attention to the follow warning The assembly and adjustment of the product must be com...

Страница 10: ... cannot be used in rain or water Please do not drip water or liquids on the car or remote control Move the kid car and remote away from potential fire hazards The kid car stops running when it encounters an obstacle Please clear the obstacle before attempting to drive the kid car Do not use indoors to avoid damage to furniture or household items When the remote batteries are low the kid car will s...

Страница 11: ...eel 6 AA M10 anti loose nut of wheel 4 BB Spring 2 CC Front wheel shaft 1 L Rear wheel shaft 1 S Shaft bearing for wheel 2 DD Wheel cover 4 EE Wrench 2 UU Drive connector rear wheel 2 FF 4 x 12 mm screw 10 VV 3 x 12 mm screw 2 XX ASSEMBLY INSTRUCTIONS ...

Страница 12: ...ew 6 YY Spring plastic parts 2 MM Drive motors assembly 2 II Side roll bar frame 2 HH Roll bar light frame 1 R Sideview mirrors 2 GG Windshield 1 O Car door 2 KK ASSEMBLY INSTRUCTIONS All screws can be tightened or loosened by a Phillips screwdriver ...

Страница 13: ...ew holes of the car body and make the steering rod go through the hole in the center of the ront wheel shaft L Fix the shaft by 8 screws VV Put an M10 washer of wheel AA on each side of the shaft Install the shaft bearing of wheel DD into the center of the front wheel Install the wheel Put an M10 washer of wheel AA on each side of the shaft Then put the nut BB on Then use the wrench UU to tighten ...

Страница 14: ...stic parts MM and at the same time make the rear wheel shaft S go through the hole of plastic parts 1b Installing rear wheel Note Install the rear wheel on one side first then install the other side Install the Driven connector FF into the rear wheel and fix it with three screws YY S 1b CC MM S FF 1b YY ...

Страница 15: ...s time the nut BB can not be fully tightened Press down shock proof plastic parts and at the same time press down the shaft and pull firmly until it is installed in place Install the other rear wheel in the same way No need to pull the shaft Install L drive on the left side and R drive on the right side consistent with letters L and R on the kid car 1b AA BB L R 1b L R ...

Страница 16: ...l cover After installing rear wheels on both sides turn the car over and insert the motor connection 2 Installing car door Loosen the screw on the instrument panel Insert the door into the groove Insert the steel sheet of the car door into the instrument panel and tighten the screw 2 1b Motor connection EE EE ...

Страница 17: ...o the instrument panel and tighten the screw 2 3 Installing side roll bars and roll bar lights Connect the wire in the side roll bar with the wire in the roll bar light frame and then insert the two sides in parallel Fix it with two screws XX Note f Be sure the 3 XX XX ...

Страница 18: ...he left and right frame and installation direction Carefully make the other wire pass through the hole on the car body and insert the wire joint 4 Installing seat Align the hook behind the seat with the right position in the car align seat screw holes with body screw holes use two screws VV to fix 4 VV 3 ...

Страница 19: ...uptly hitting the steering wheel during the assembly process 6 Installing the windshield and sideview mirror Align the windshield with the right groove then firmly press down Align the rearview mirrow with the right hole then firmly press down 7 Installing and removing the battery pack Open the hood of the kid car to insert or remove the battery pack Note Add the screws back to the hood after batt...

Страница 20: ...ard If the driver s foot is removed from the pedal the car will not move forward P Park Position The car will not move forward or backward in the park position R Reverse Position When the driver s foot is applied to the pedal the car will move in reverse When the driver s foot is removed from the pedal the car will not move in reverse c Steering wheel Press the middle button you can hear the horn ...

Страница 21: ...rease volume The mode button Switch between AUX mode USB mode and TF mode 2 Install the battery of remote control Loosen the screw and open the cover Install two AAA 1 5V dry batteries Tighten the screw Note Pay attention to the polarity of the battery when installing Warning The above steps should be done by adults Do not mix old and new batteries or different types of batteries The exhausted bat...

Страница 22: ...on and turn on You will see a red light which signals a successful pairing of your remote to the kid car c After 10 seconds the remote control goes into standby mode in order to continue you can press any button d Button Description Forward Reverse Left Right S Speed P Stop Press the S button to set the speed The bottom LED light indicator is the low speed setting the middle LED light indicator is...

Страница 23: ... the wires plugs shells and other parts are damaged If they are damaged stop using immediately until they are repaired properly Before cleaning or performing any maintenance remove the battery from the product Use clean cloths to remove dirt dust oil grease etc Use only a soft dry cloth to clean the plastic parts never use detergent or alcohol Be careful not to damage electronic components when cl...

Страница 24: ...ree replacement or re fund or call 1 888 356 2258 for warranty service This warranty is void if defects in materials or workmanship or damages result from repairs or alterations which have been made or attempted by others or the unauthorized use of nonconforming parts the damage is due to normal wear damage is due to abuse including overloading of the tool beyond capacity improper maintenance negl...

Страница 25: ...24 REPLACEMENT PARTS LIST N GG O FF P Q R HH II JJ S BB AA EE DD L CC T KK MM ...

Страница 26: ... bar light frame HH Side roll bar frame II Drive motors assembly JJ Wheel S Rear wheel shaft BB M10 anti loose nut of wheel AA M10 washer of wheel EE Wheel cover DD Shaft bearing for wheel L Front wheel shaft CC Spring T Remote control KK Car door MM Spring plastic parts UU Wrench VV 4 x 12 mm screw XX 3 x 12 mm screw YY 4 x 12 mm screw UU VV XX YY ...

Страница 27: ...roblemas piezas faltantes Antes de regresar al vendedor llame a nuestro departamento de servicio al cliente al 1 888 3KOBALT 1 888 356 2258 de lunes a viernes de 8 a m a 8 p m hora estándar del Este ADJUNTE SU RECIBO AQUÍ SM20247 AUTOMÓVIL PARA NIÑOS DE 40 V Número de serie Fecha de compra ...

Страница 28: ...0 minutos Peso sin la batería 19 27 kg 42 5 lbs Tiempo de carga con batería de 2 Ah 60 minutos Modelo de la batería KB 240C 06 Modelo del cargador KRC 40 06 Artículo Temperatura Rango de temperatura de almacenamiento del automóvil para niños 32 F 0 C 113 F 45 C Rango de temperatura de funcionamiento del automóvil para niños 32 F 0 C 113 F 45 C Rango de temperatura de carga de la batería 39 F 4 C 1...

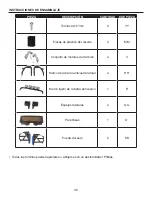
Страница 29: ...1 B Espejos laterales 2 C Carrocería del auto 1 D Faro 2 E Protección frontal 1 F Rueda 4 G Puerta del auto 2 H Marco de la barra antivuelco lateral 2 I Asiento 1 J Marco ligero de la barra antivuelco 4 CONTENIDO DEL PAQUETE A B C D E F G H I J ...

Страница 30: ...29 Arandela Tuerca Resorte Eje de las ruedas delanteras Eje de las ruedas posteriores Llave inglesa Tornillo 4x12 mm Tornillo 3x12 mm ADITAMIENTOS no se muestran en el tamaño real Tornillo 4x12 mm ...

Страница 31: ... el usuario debe leer y comprender el manual del usuario antes de usar este producto Alerta de seguridad Precauciones para su seguridad SÍMBOLO SEÑAL SIGNIFICADO PELIGRO Indica una situación de peligro inminente que si no es prevenida causará la muerte o lesiones severas ADVERTENCIA Indica una situación de peligro potencial que si no es prevenida podría causar la muerte o lesiones severas PRECAUCI...

Страница 32: ... Estos límites están diseñados para proporcionar protección razonable contra interferencias perjudiciales en una instalación residencial Este equipo genera utiliza y puede irradiar energía de radiofrecuencia y si no se instala y se usa de acuerdo con las instrucciones puede causar interferencia perjudicial para las comunicaciones de radio Sin embargo no se garantiza que no se producirán interferen...

Страница 33: ...n causar una descarga eléctrica un incendio o una explosión No permita ningún tipo de líquido en la batería o sus componentes No cargue cerca del calor o materiales inflamables Cargue solo en un área bien ventilada Cargue la batería solo en un área seca No abra el cargador El cableado y los circuitos expuestos dentro de la carcasa pueden provocar descargas eléctricas Solo los adultos pueden manipu...

Страница 34: ...a batería puede provocar irritación o quemaduras No utilice un paquete de baterías ni el automóvil para niños si están dañados o modificados Las baterías dañadas o modificadas pueden mostrar una conducta impredecible que podría provocar incendios explosiones o riesgo de lesiones No exponga el paquete de baterías ni el automóvil para niños al fuego o a una temperatura excesiva La exposición al fueg...

Страница 35: ...os está en funcionamiento No permita que los niños se paren en el asiento o se sienten en el marco ligero de la barra antivuelco o en el marco de la barra lateral No cambie la estructura de los componentes electrónicos relacionados con el automóvil para niños como el control remoto El control remoto y el automóvil no pueden usarse bajo la lluvia o en el agua No deje caer agua o líquidos sobre el a...

Страница 36: ...B Resorte 2 CC Eje de las ruedas delanteras 1 L Eje de las ruedas posteriores 1 S Cojinete de eje para la rueda 2 DD Cubierta de la rueda 4 EE Llave inglesa 2 UU Conector de tracción ruedas posteriores 2 FF Tornillo 4x12 mm 10 VV Tornillo 3x12 mm 2 XX INSTRUCCIONES DE ENSAMBLAJE ...

Страница 37: ...e 2 MM Conjunto de motores de tracción 2 II Marco de la barra antivuelco lateral 2 HH Marco ligero de la barra antivuelco 1 R Espejos laterales 2 GG Parabrisas 1 O Puerta del auto 2 KK INSTRUCCIONES DE ENSAMBLAJE Todos los tornillos pueden apretarse o aflojarse con un destornillador Phillips ...

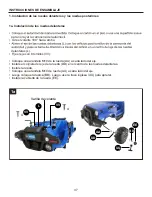
Страница 38: ...delanteras L Fije el eje con 8 tornillos VV Coloque una arandela M10 de la rueda AA a cada lado del eje Instale el cojinete del eje de la rueda DD en el centro de las ruedas delanteras Instale la rueda Coloque una arandela M10 de rueda AA a cada lado del eje Luego coloque la tuerca BB Luego use la llave inglesa UU para apretar Instale la cubierta de la rueda EE BB DD 1a AA EE UU Varilla de volante...

Страница 39: ... resorte MM y al mismo tiempo haga que el eje de la rueda pos terior S pase por el orificio de las piezas plásticas 1b Instalación de la rueda posterior Nota instale la rueda posterior en un lado primero luego instale el otro lado Instale el conector de tracción FF en la rueda posterior y fíjelo con tres tornillos YY S 1b CC MM S FF 1b YY ...

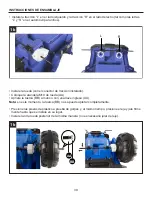
Страница 40: ...a BB no se puede apretar completamente Presione las piezas de plástico a prueba de golpes y al mismo tiempo presione el eje y jale firme mente hasta que se instale en su lugar Instale la otra rueda posterior de la misma manera no es necesario jalar del eje Instale la tracción L en el lado izquierdo y la tracción R en el lado derecho tal como las letras L y R en el automóvil para niños 1b AA BB L R...

Страница 41: ...és de instalar las ruedas posteriores en ambos lados dé la vuelta al automóvil e inserte la conexión del motor 2 Instalación de las puertas del auto Afloje el tornillo en el panel de instrumentos Inserte la puerta en la ranura Inserte la lámina de acero de la puerta del automóvil en el panel de instrumentos y apriete el tornillo 2 1b Conexión del motor EE EE ...

Страница 42: ...n de las barras antivuelco laterales y la barra de luces antivuelco Conecte el cable de la barra antivuelco lateral con el cable del marco de la barra de luces an tivuelco y luego inserte los dos lados en paralelo Fíjelo con dos tornillos XX Nota mente Asegúrese de que el marco de la barra de luces antivuelco esté instalado en su lugar antes 3 XX XX ...

Страница 43: ... junto con la dirección de instalación Con cuidado haga pasar el otro cable a través del orificio de la carrocería del automóvil e inserte la unión de cables 4 Instalación del asiento Alinee el gancho detrás del asiento con la posición correcta en el automóvil alinee los orificios de tornillos del asiento con los de la carrocería use dos tornillos VV para fijar 4 VV 3 ...

Страница 44: ...urante el proceso de ensamblaje 6 Instalación del parabrisas y el espejo lateral Alinee el parabrisas con la ranura correcta luego presione firmemente Alinee el espejo retrovisor con el orificio correcto luego presione firmemente 7 Instalación y remoción del paquete de baterías Abra el capó del automóvil para niños para insertar o retirar el paquete de baterías Nota vuelva a colocar los tornillos ...

Страница 45: ...na el pedal el automóvil para niños se moverá hacia delante Si el pie del conductor se retira del pedal el automóvil no avanzará Posición de estacionamiento P el automóvil no se moverá hacia delante o hacia atrás en la posición de estacionamiento Posición de reversa R cuando el pie del conductor presiona el pedal el automóvil se moverá en reversa c Volante Presione el botón central puede escuchar ...

Страница 46: ...iente presione prolongadamente para aumentar el volumen Botón de modo alterna entre el modo USB el modo AUX y el modo TF 2 Instale la batería del control remoto Afloje el tornillo y abra la cubierta Instale dos baterías secas AAA 1 5 V Apriete el tornillo Nota preste atención a la polaridad de la batería cuando la instale Advertencia los pasos anteriores los deben realizar adultos No mezcle baterí...

Страница 47: ...éndalo Verá una luz roja que indica un emparejamiento exitoso de su control remoto con el automóvil para niños c Luego de 10 segundos el control remoto pasa al modo en espera Para continuar puede presion ar cualquier botón d Descripción del botón Avance Retroceso Izquierda Derecha S Velocidad P Detención Presione el botón S para establecer la velocidad El indicador de luz LED inferior es la config...

Страница 48: ...tras piezas están dañados Si están dañados deje de usarlos inmediatamente hasta que se reparen adecuadamente Antes de limpiar o realizar cualquier tarea de mantenimiento retire la batería del producto Use paños limpios para eliminar la suciedad el polvo el aceite la grasa etc Use solo un paño suave y seco para limpiar las piezas de plástico nunca use detergente ni alcohol Tenga cuidado de no dañar...

Страница 49: ...plazo o reembolso sin cargo o llame al 1 888 356 2258 para obtener el servicio de garantía Esta garantía es nula si los defectos en los materiales o la mano de obra o los daños han sido causados por reparaciones o modificaciones hechas o que se hayan intentado hacer por parte de terceros o el uso no autorizado de piezas incompatibles el daño es debido al desgaste normal el daño es debido al abuso ...

Страница 50: ...49 LISTA DE PIEZAS DE REPUESTO N GG O FF P Q R HH II JJ S BB AA EE DD L CC T KK MM ...

Страница 51: ...rra antivuelco lateral II Conjunto de motores de tracción JJ Rueda S Eje de las ruedas posteriores BB Tuerca que no se afloja M10 de la rueda AA Arandela M10 de la rueda EE Cubierta de la rueda DD Cojinete de eje para la rueda L Eje de las ruedas delanteras CC Resorte T Control remoto KK Puerta del auto MM Piezas de plástico del resorte UU Llave inglesa VV Tornillo 4x12 mm XX Tornillo 3x12 mm YY T...

Страница 52: ......

Отзывы: