8
ASSEMBLY INSTRUCTIONS
WARNING
• To prevent accidental starting that could cause
serious personal injury, always remove the
battery pack from the tool when assembling
parts.
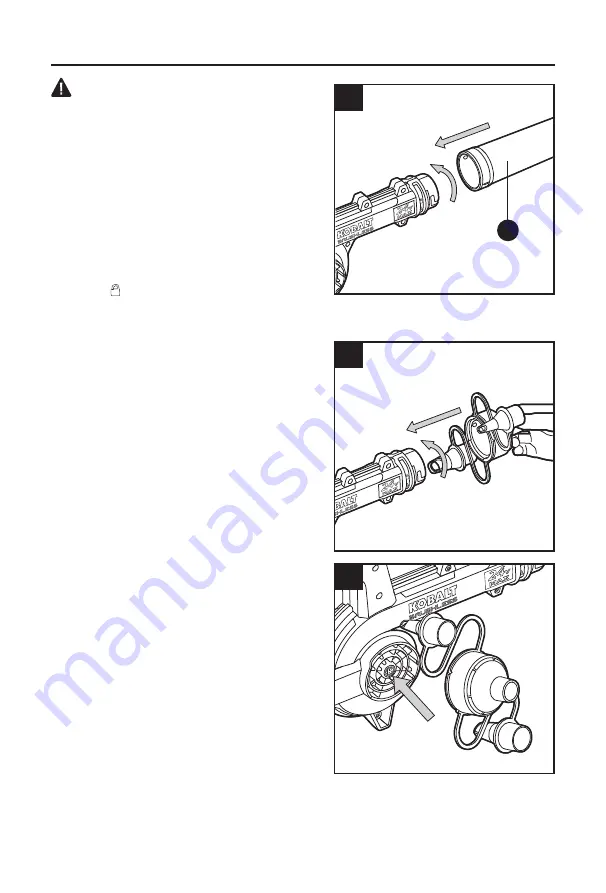
1. Assemble as Blower
Assembling the Blower Tube
a. Align the raised portions in the blower tube (E)
with the grooves on the blower housing. Push
the tube onto the blower housing.
b. Rotate the blower tube clockwise so that the
mark “
—
” on the blower tube is aligned with the
mark “ ”on the blower housing.
c. To remove the blower tube, rotate the blower
tube counterclockwise, then pull it straight out from the blower.
Assembling the Inflator/Deflator Assembly
a. Remove the blower tube.
b. Align the raised portions in the inflator/deflator
assembly (F) with the grooves on the blower
housing. Push the assembly onto the blower
housing.
c. Rotate the inflator/deflator assembly clockwise
as far as possible. Pull on the assembly to
ensure it is securely in place.
d. To remove the assembly, rotate the inflator/
deflator assembly counterclockwise, then pull it
straight out from the blower to remove it.
2. Assemble as Deflator
a. Align the raised portions on the air inlet (D) with
the grooves on the inflator/deflator assembly,
then insert the assembly onto the blower over
the air inlet (D) as shown.
b. To remove the inflator/deflator assembly, pull it
away from the blower.
The inflator/deflator assembly is equipped with
two different sized air inlet adaptors for versatile
use. Choose a suitable adaptor according to the
application.
1a
1b
2
E


