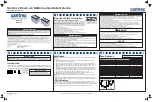
background image

3

PACKAGE CONTENTS

A

D

E

F

H

I

J

K

B

C

G

PART DESCRIPTION

PART DESCRIPTION

A

Keyless chuck 

F

LED work light

B

Adjustable torque clutch

G

Auxiliary handle

C

Gear selector

H

Belt clip 

D

Variable-speed trigger switch

I

Bit holder

E

Direction-of-rotation selector 

(forward/center-lock/reverse)

J

Screws (2)

K

Double end bit

 WARNING

• Remove the tool from the package and examine it carefully. Do not discard the carton or any 

packaging material until all parts have been examined. 

• If any part of the tool is missing or damaged, do not attach the battery pack or use the tool until 

the part has been repaired or replaced. Failure to heed this warning could result in serious injury.

Содержание 0672823

Страница 1: ... to your retailer call our customer service department at 1 888 3KOBALT 1 888 356 2258 8 a m 8 p m EST Monday Friday ATTACH YOUR RECEIPT HERE Serial Number Purchase Date ITEM 0672826 0672827 0672823 1 2 IN BRUSHLESS DRILL DRIVER MODEL KDD 524B 03 Français p 17 ...

Страница 2: ... Safety Information 4 Preparation 7 Operating Instructions 8 Care and Maintenance 15 Troubleshooting 15 Warranty 16 PRODUCT SPECIFICATIONS COMPONENT SPECIFICATION Rated voltage 24 V d c No load speed 0 550 0 2 000 RPM Chuck capacity 1 2 in Maximum torque 650 in lbs ...

Страница 3: ...ection of rotation selector forward center lock reverse J Screws 2 K Double end bit WARNING Remove the tool from the package and examine it carefully Do not discard the carton or any packaging material until all parts have been examined If any part of the tool is missing or damaged do not attach the battery pack or use the tool until the part has been repaired or replaced Failure to heed this warn...

Страница 4: ... or other reproductive harm Some examples of these chemicals are Lead from lead based paints Crystalline silica from bricks cement and other masonry products Arsenic and chromium from chemically treated lumber Your risk from these exposures varies depending upon how often you do this type of work To reduce your exposure to these chemicals Work in a well ventilated area Work with approved safety eq...

Страница 5: ...dents Do not operate power tools in explosive atmospheres such as in the presence of flammable liquids gases or dust Power tools create sparks which may ignite the dust or fumes Keep children and bystanders away while operating a power tool Distractions can cause you to lose control Electrical Safety Power tool plugs must match the outlet Never modify the plug in any way Do not use any adaptor plu...

Страница 6: ...s Loose clothes jewelry or long hair can be caught in moving parts If devices are provided for the connection of dust extraction and collection facilities ensure that these are connected and properly used Use of these devices can reduce dust related hazards Power Tool Use and Care Do not force the power tool Use the correct power tool for your application The correct power tool will do the job bet...

Страница 7: ...lated gripping surfaces when performing an operation where the cutting accessory may contact hidden wiring or its own cord Cutting accessory contacting a live wire may make exposed metal parts of the power tool live and could give the operator an electric shock Secure the work piece Clamping devices or a vise will hold the work piece in place better and more safely than holding it by hand Always w...

Страница 8: ...y Pack a Place the direction of rotation selector E in the center lock position b Press the battery release buttons to release the battery pack c Pull forward on the battery pack to remove it from the tool WARNING Battery tools are always in operating condition Therefore the direction of rotation selector E should always be locked center when the tool is not in use or when carrying the tool at you...

Страница 9: ...sult in serious damage to the drill driver 4 Direction of Rotation Selector Forward Center Lock Reverse The direction of bit rotation is reversible and is controlled by a selector located above the trigger switch D With the drill driver held in the normal operating position pointing away from you a Position the direction of rotation selector E to the left of the tool for forward rotation b Positio...

Страница 10: ...r has a keyless chuck A to tighten or release drill bits in the chuck jaws The arrows on the chuck indicate the direction in which to rotate the chuck body in order to GRIP tighten or OPEN release the chuck jaws on the drill bit 7 Adjustable Torque Clutch The torque clutch can be adjusted to 23 driving settings and 1 drilling setting Adjust the torque by rotating the torque clutch B The higher the...

Страница 11: ...th an auxiliary handle G For ease of operation you can use the handle with either the left or the right hand The handle can be rotated 90 and locked in any of three positions To install the auxiliary handle a Place the direction of rotation selector E in the center lock position b Loosen the auxiliary handle by turning the handle counterclockwise c Align the raised portion on the auxiliary handle ...

Страница 12: ...into the chuck jaws Do not insert the drill bit into the chuck jaws at an angle and then tighten the chuck as shown in Fig 9b This could cause the drill bit to be thrown from the drill driver resulting in possibly serious personal injury or damage to the chuck Removing Bits a Place the direction of rotation selector E in the center lock position b Open the chuck jaws c Remove the drill bit WARNING...

Страница 13: ...river stalls stop the tool immediately Remove the bit from the work piece and determine the reason for jamming h To stop the drill driver release the variable speed trigger switch and allow the tool to come to a complete stop Wood Drilling a For maximum performance use high speed steel or brad point bits for drilling wood b Begin drilling at a very low speed to prevent the bit from slipping off th...

Страница 14: ...rill a pilot hole first This hole should be slightly longer than the screw to be driven and just smaller than the shank diameter of the screw The pilot hole will act as a guide for the screw and will also make tightening the screw less difficult When screws are positioned close to an edge of the material a pilot hole will also help to prevent splitting of the wood e Use a countersinking bit sold s...

Страница 15: ... not included in a counterclockwise direction This will loosen the chuck for easy removal NOTICE The chuck screw has left handed threads Attach a new chuck to the spindle and tighten the chuck screw TROUBLESHOOTING WARNING Place the direction of rotation selector E in the center lock position and detach the battery pack from the drill driver before performing troubleshooting procedures PROBLEM POS...

Страница 16: ...to abuse normal wear improper maintenance neglect unauthorized repair alteration or expendable parts and accessories expected to become unusable after a reasonable period of use If you think your product meets the above guarantee criteria please return it to the place of purchase with valid proof of purchase and the defective product will be repaired or replaced at no charge This guarantee gives y...

Страница 17: ...ODÈLE KDD 524B 03 Des questions des problèmes des pièces manquantes Avant de retourner l article au détaillant appelez notre service à la clientèle au 1 888 3KOBALT 1 888 356 2258 entre 8 h et 20 h HNE du lundi au vendredi JOIGNEZ VOTRE REÇU ICI Numéro de série Date d achat ...

Страница 18: ...ge 19 Consignes de sécurité 20 Préparation 24 Mode d emploi 25 Entretien 32 Dépannage 33 Garantie 33 CARACTÉRISTIQUES DU PRODUIT COMPOSANTES CARACTÉRISTIQUES Tension nominale 24 V c c Vitesse sans charge 0 550 0 2 000 tr min Mesure du mandrin 1 2 po Couple maximal 650 lb po ...

Страница 19: ...otation serrage vissage verrouillage au centre desserrage dévissage J Vis 2 K Embout à deux extrémités AVERTISSEMENT Retirez l outil de l emballage et examinez le minutieusement Ne jetez ni la boîte ni le matériel d emballage avant d avoir examiné toutes les pièces Si une pièce de l outil est manquante ou endommagée évitez de fixer le bloc piles ou d utiliser l outil tant que la pièce n a pas été ...

Страница 20: ...res matériaux de maçonnerie Arsenic et chrome provenant du bois d œuvre traité avec des produits chimiques Les risques liés à l exposition à ces produits varient selon le nombre de fois où vous pratiquez ces activités Afin de limiter votre exposition à ces produits chimiques vous devez Travailler dans un endroit bien ventilé Vous munir de l équipement de sécurité approuvé tel que des masques antip...

Страница 21: ...n raison de la poussière et des vapeurs Gardez les enfants et les autres personnes à l écart lorsque vous utilisez un outil électrique Une distraction peut vous faire perdre la maîtrise de l outil Sécurité électrique Les fiches des outils électriques doivent correspondre à la prise Ne modifiez jamais la fiche de quelque façon que ce soit N utilisez pas d adaptateur avec les outils électriques mis ...

Страница 22: ...che Une clé de réglage oubliée sur une pièce rotative de l outil électrique peut occasionner des blessures graves Ne vous étirez pas pour étendre votre portée Gardez une posture sécuritaire et un bon équilibre en tout temps Cela vous permet de mieux maîtriser l outil électrique lorsque des situations inattendues se présentent Habillez vous convenablement Ne portez pas de vêtements amples ni de bij...

Страница 23: ...e à une autre Un court circuit entre les bornes du bloc piles pourrait causer des brûlures ou un incendie Si le bloc piles est endommagé une fuite de liquide pourrait se produire évitez tout contact avec celui ci En cas de contact accidentel rincez à grande eau En cas de contact avec les yeux consultez un médecin Le liquide provenant des piles peut causer de l irritation ou des brûlures Entretien ...

Страница 24: ...ez l habitude de vous servir de votre perceuse visseuse Gardez à l esprit qu il suffit d être négligent une fraction de seconde pour causer de graves blessures Avant d utiliser un outil familiarisez vous avec toutes ses caractéristiques et fonctions ainsi qu avec les consignes de sécurité Ne tentez pas de modifier cet outil ou de créer des accessoires qui ne sont pas recommandés pour cet outil Tou...

Страница 25: ...osition centrale verrouillée b Appuyez sur les boutons de déverrouillage du bloc piles pour dégager ce dernier c Tirez le bloc piles vers l avant pour le retirer de l outil AVERTISSEMENT Les outils à pile sont toujours en état de fonctionnement Par conséquent le sélecteur de sens de rotation E devrait toujours être verrouillé position centrale lorsque vous n utilisez pas l outil ou que vous le tra...

Страница 26: ...mise en garde peut causer des dommages importants à la perceuse visseuse 4 Sélecteur de sens de rotation vissage verrouillage au centre dévissage Le sens de rotation peut être modifié à l aide d un sélecteur situé au dessus de l interrupteur D En tenant la perceuse visseuse en position de fonctionnement habituelle soit en direction opposée à vous a Placez le sélecteur de sens de rotation E vers la...

Страница 27: ...r ou à desserrer les forets dans la mâchoire du mandrin Les flèches sur le mandrin indiquent le sens dans lequel vous devez tourner le corps du mandrin pour FERMER serrer ou OUVRIR libérer la mâchoire sur le foret 7 Embrayage à couple réglable L embrayage du couple offre 23 positions de réglage de vissage et une position de réglage de perçage Réglez le couple à l aide de l embrayage du couple B Pl...

Страница 28: ...ite La poignée peut être tournée à 90 et être verrouillée en place dans l une de trois positions Pour installer la poignée auxiliaire a Placez le sélecteur de sens de rotation E à la position centrale verrouillée b Dévissez la poignée auxiliaire en tournant la poignée dans le sens contraire des aiguilles d une montre c Alignez les nervures de la poignée auxiliaire avec les rainures situées dans la...

Страница 29: ...ien droit dans la mâchoire du mandrin Il ne faut pas insérer le foret en angle dans la mâchoire et serrer le mandrin comme le montre la figure 11b Le foret pourrait être projeté de la perceuse visseuse ce qui pourrait causer des blessures graves ou des dommages au mandrin Retrait des embouts a Placez le sélecteur de sens de rotation E à la position centrale verrouillée b Ouvrez la mâchoire du mand...

Страница 30: ...médiatement Retirez le foret de la pièce et déterminez la raison du blocage h Pour arrêter la perceuse visseuse relâchez l interrupteur à vitesse variable et attendez l arrêt complet de l outil Perçage dans le bois a Pour un meilleur rendement lorsque vous percez du bois utilisez des forets haute vitesse en acier ou des avant clous b Commencez le perçage à vitesse très lente pour empêcher le foret...

Страница 31: ... Il est recommandé de commencer par percer un avant trou Ce trou doit être légèrement plus long que la vis et légèrement plus petit que le diamètre de la tige de la vis L avant trou servira de guide pour la vis et facilitera le serrage de celle ci Lorsque les vis sont placées à proximité du bord du matériau l avant trou permettra aussi d empêcher le fendillement du bois e Utilisez un foret de frai...

Страница 32: ...errupteur en plaçant le sélecteur de sens de rotation E à la position centrale b Ouvrez la mâchoire du mandrin c Utilisez un tournevis non inclus pour retirer la vis du mandrin en la tournant dans le sens des aiguilles d une montre d Insérez une clé hexagonale de 5 16 po ou plus dans le mandrin non inclus de la perceuse visseuse puis serrez solidement la mâchoire contre la clé hexagonale e Frappez...

Страница 33: ...froidir puis remettez le en marche La lampe de travail à DEL clignote lentement La charge du bloc piles est très faible Rechargez le bloc piles GARANTIE L outil électrique est garanti pour une période de cinq 5 ans à compter de la date d achat le bloc piles et le chargeur sont garantis à l acheteur initial contre les défauts de matériaux et de fabrication pour une période de trois 3 ans à compter ...

Страница 34: ...34 Imprimé en Chine ...

Отзывы: