background image

6

48

6

4

4

5

5

1

-

4

1

-

5

1

-

3

4

x

6

35

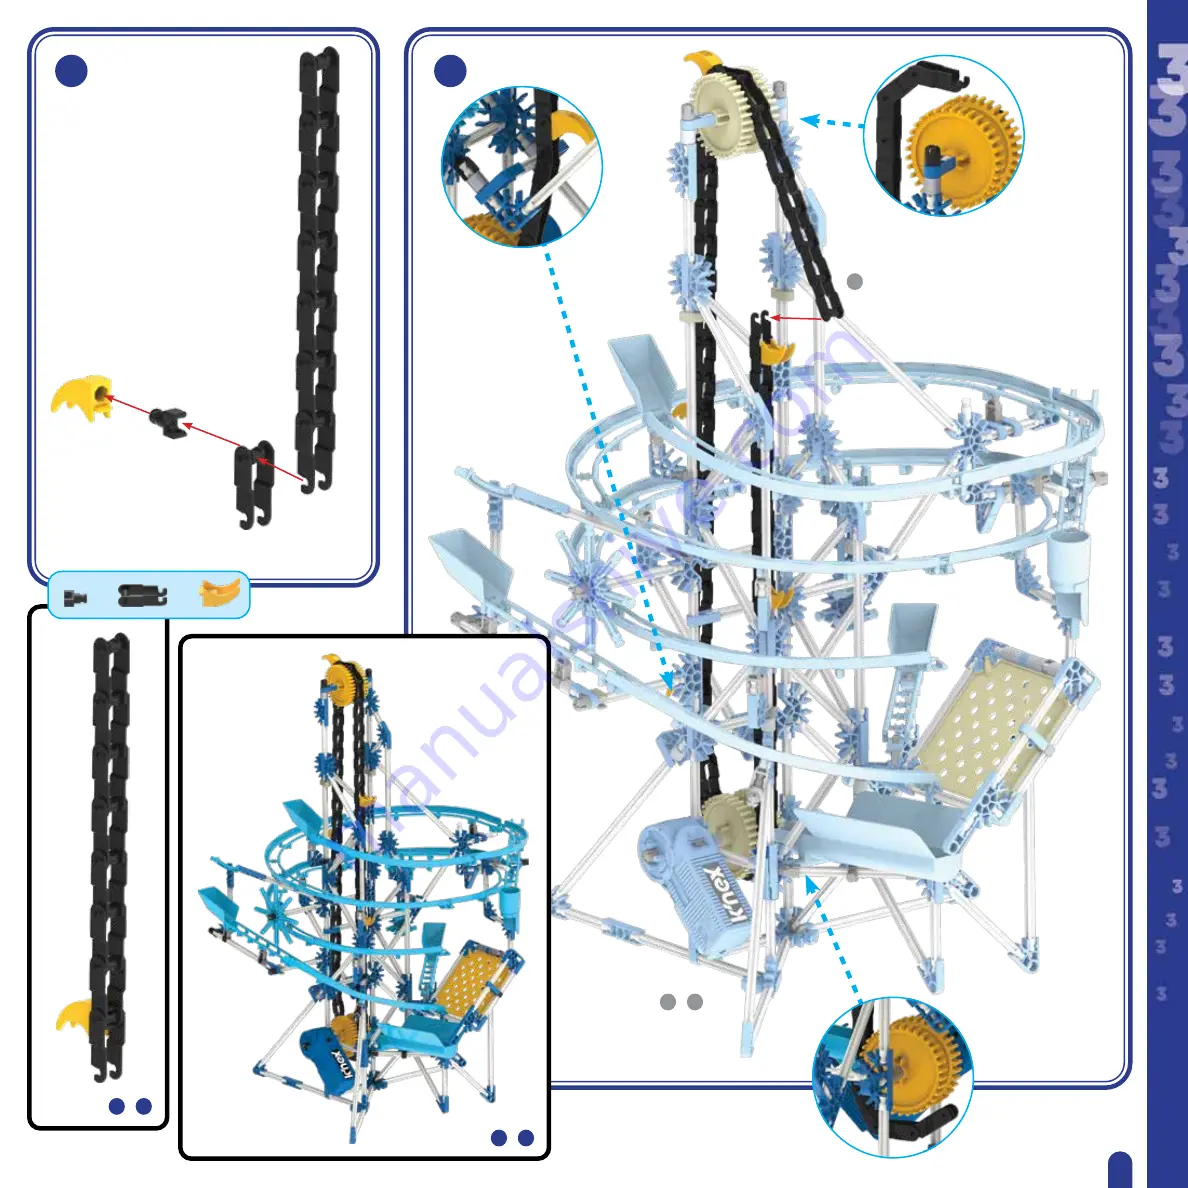
(EN) IMPORTANT: 

Attach all the chain links in 

the same direction.

(FR) IMPORTANT : 

Assure-toi de fixer tous les 

maillons de la chaîne dans le même sens.

Содержание MARBLE COASTER RUN

Страница 1: ...vel up Facile construire et monter de niveau F cil de construir y elevar de nivel Facile construire et monter de niveau F cil de construir y elevar de nivel MARBLECOASTERRUN PARCOURSDEMONTAGNES RUSSES...

Страница 2: ...DADO Paraevitarfugasdaspilhas Certifique sedequeintroduzaspilhascorrectamenteesigasempreasinstru esdofabricantedabateriaedobrinquedo N ocombinepilhasusadascompilhasnovas pilhasalcalinas padr o carbono...

Страница 3: ...s connect but not all connections points have arrows Faded colors show you this section is already built D marre ta Construction Pour commencer le mod le cherche l tape num ro 1 et suis les num ros da...

Страница 4: ...31107 848900 909013 909029 909034 909067 909047 909074 909087 909096 9090592 909534 9095211 909544 909556 3311640 3311660 3311740 3311680 3311700 3311760 3311780 3311800 3311820 3311840 3311880 331186...

Страница 5: ...2 2 5 EN TIP While you re building make sure you face your model in the same direction as the pictures show in the instructions FR CONSEIL Essaye de situer ton mod le dans le m me sens que les instru...

Страница 6: ...1 1 1 1 1 2 2 1 2 3 3 4 4 1 3 1 4 1 2 1 3 1 1 1 6...

Страница 7: ...2 1 1 1 1 1 3 2 1 1 1 1 5 5 6 6 1 5 1 6 1 4 1 5 1 1 1 7...

Страница 8: ...2 1 2 1 2 1 7 7 8 8 1 6 1 7 1 7 1 8 8...

Страница 9: ...1 1 1 3 1 1 1 1 1 9 9 10 10 1 8 1 9 1 9 1 10 Rotate model Faire pivoter le mod le ES GireModelo DE DrehedasModell IT GirailModello PT GireModel NL DraaiModel SE Roteramodellen PL Obr model 1 1 1 1 9...

Страница 10: ...1 1 1 2 2 1 11 11 12 12 1 10 1 11 1 11 1 12 10...

Страница 11: ...1 1 1 1 1 1 1 1 1 1 1 1 13 13 14 14 15 15 1 13 1 12 1 13 1 15 14 14 1 1 11...

Страница 12: ...oter le mod le ES GireModelo DE DrehedasModell IT GirailModello PT GireModel NL DraaiModel SE Roteramodellen PL Obr model Rotate model Faire pivoter le mod le ES GireModelo DE DrehedasModell IT Girail...

Страница 13: ...3 1 1 1 2 1 1 1 2 1 18 18 19 19 1 17 1 18 1 18 1 19 Rotate model Faire pivoter le mod le ES GireModelo DE DrehedasModell IT GirailModello PT GireModel NL DraaiModel SE Roteramodellen PL Obr model 1 1...

Страница 14: ...2 1 1 1 1 1 2 2 20 20 21 21 1 19 1 20 1 20 1 21 1 1 1 1 1 1 14...

Страница 15: ...3 1 1 1 2 1 1 22 22 23 23 1 21 1 23 22 22 15...

Страница 16: ...2 2 1 1 1 1 1 1 2 1 1 1 24 24 25 25 1 23 1 24 1 24 1 25 1 16...

Страница 17: ...1 2 2 26 26 1 25 1 26 17...

Страница 18: ...ivoter le mod le ES GireModelo DE DrehedasModell IT GirailModello PT GireModel NL DraaiModel SE Roteramodellen PL Obr model 27 27 27 18 EN Be sure to push the connectors on firmly until they click FR...

Страница 19: ...1 2 1 1 1 1 1 1 29 29 1 28 1 29 Rotate model Faire pivoter le mod le ES GireModelo DE DrehedasModell IT GirailModello PT GireModel NL DraaiModel SE Roteramodellen PL Obr model 19...

Страница 20: ...1 1 2 1 1 1 2 2 1 30 30 31 31 1 29 1 31 30 30 1 20...

Страница 21: ...1 21 Always join this end of the track to the previous track piece first then connect the rest of the track to the tower Joignez toujours cette extr mit du rail au morceau de rail pr c dent en premier...

Страница 22: ...1 8 1 1 1 34 34 35 35 1 33 1 35 34 34 22 Part 1 Complete Move on to the next challenge Partie 1 termin e Passez au d fi suivant...

Страница 23: ...1 2 3 2 1 1 2 1 3 1 1 1 35 1 23 LEVEL2 NIVEAU2 NIVEL2...

Страница 24: ...1 2 1 1 2 8 2 2 3 3 3 1 2 1 x2 24...

Страница 25: ...2 1 1 1 2 1 1 1 2 1 4 4 5 5 3 4 1 5 3 3 3 4 1 2 1 1 1 1 25...

Страница 26: ...2 2 2 2 2 1 1 6 6 1 6 Rotate model Faire pivoter le mod le ES GireModelo DE DrehedasModell IT GirailModello PT GireModel NL DraaiModel SE Roteramodellen PL Obr model 1 5 26...

Страница 27: ...2 1 2 1 2 2 7 7 8 8 1 8 1 6 7 7 27...

Страница 28: ...2 1 1 1 1 2 9 9 10 10 1 10 1 8 9 9 Rotate model Faire pivoter le mod le ES GireModelo DE DrehedasModell IT GirailModello PT GireModel NL DraaiModel SE Roteramodellen PL Obr model 28...

Страница 29: ...1 1 1 1 2 11 11 12 12 1 12 1 10 11 11 Rotate model Faire pivoter le mod le ES GireModelo DE DrehedasModell IT GirailModello PT GireModel NL DraaiModel SE Roteramodellen PL Obr model 29...

Страница 30: ...2 1 2 1 2 2 13 13 14 14 1 14 1 12 13 13 Rotate model Faire pivoter le mod le ES GireModelo DE DrehedasModell IT GirailModello PT GireModel NL DraaiModel SE Roteramodellen PL Obr model 30...

Страница 31: ...1 1 1 1 1 1 15 15 16 16 1 16 1 14 15 15 Rotate model Faire pivoter le mod le ES GireModelo DE DrehedasModell IT GirailModello PT GireModel NL DraaiModel SE Roteramodellen PL Obr model 31...

Страница 32: ...2 2 1 1 2 1 1 17 17 18 18 1 18 1 16 17 17 32 Part 2 Complete Move on to the next challenge Partie 2 termin e Passez au d fi suivant...

Страница 33: ...1 1 1 1 18 1 33 LEVEL3 NIVEAU3 NIVEL3 Did you install 2 AA or LR6 batteries in the motor Avez vous install 2 piles AA ou LR6 dans le moteur...

Страница 34: ...4 3 1 1 1 1 1 2 1 1 1 2 3 2 2 2 2 3 3 1 2 1 3 1 18 1 2 1 1 1 1 34...

Страница 35: ...6 48 6 4 4 5 5 1 4 1 5 1 3 4 x6 35 EN IMPORTANT Attach all the chain links in the same direction FR IMPORTANT Assure toi de fixer tous les maillons de la cha ne dans le m me sens...

Страница 36: ...10 4 2 1 4 2 6 2 4 2 2 4 2 1 3 1 4 2 6 6 8 8 7 7 6 7 6 6 8 6 6 7 1 1 1 1 1 1 1 1 1 1 1 1 1 1 1 1 1 1 1 1 1 1 1 1 1 1 1 1 36...

Страница 37: ...4 2 2 1 2 9 9 6 8 6 9 37...

Страница 38: ...1 2 2 2 1 2 11 11 6 9 10 10 10 10 6 11 38...

Страница 39: ...1 1 1 2 4 1 12 12 6 11 1 5 1 12 4 1 39...

Страница 40: ...1 2 2 13 13 1 12 1 13 40...

Страница 41: ...2 3 1 1 1 2 1 3 1 1 1 14 14 15 15 14 14 1 15 1 13 41...

Страница 42: ...1 1 1 1 1 1 1 16 16 1 16 1 15 1 1 42...

Страница 43: ...a https basicfun com how to videos PT Para obter ajuda na solu o de problemas acesse https basicfun com how to videos NL Ga voor hulp bij het oplossen van problemen naar https basicfun com how to vide...

Страница 44: ...ende Bauanleitungen f r K NEX Los geht s mit dem Bauen Um mit dem Bauen deines Modells zu beginnen suche die Nummer 1 und folge den laufenden Nummern Schau dir einfach die Abbildungen an such die Teil...

Страница 45: ...accendi il motore r PT Portugu s P gina 3 Pontos b sicos para a constru o K NEX Inicia a constru o Para come ar o teu modelo procura o 1 e segue os n meros Basta simplesmente olhares para a ilustra a...

Страница 46: ...ging Bladzijde 33 Heb je 2 AA of LR6 batterijen in de motor geplaatst Bladzijde 35 Belangrijk Maak zeker dat alle ketenschakels vastgemaakt worden in dezelfde richting Bladzijde 43 Plaats knikkers in...

Страница 47: ...delu s miejsca w kt rych musisz doda niebieskie i srebrne dystansowniki Upewnij si e u ywasz poprawne numery dystansownik w pokazane w instrukcjach a cuch Upewnij si e wszystkie ogniwa a cucha s po cz...

Страница 48: ...3009 11 V03 06 23 knex customerservice basicfun com facebook com knex basicfun com EN Product colors may vary Most models can be built one at a time FR Le produit et ses couleurs peuvent varier Les di...

Отзывы: