background image

35

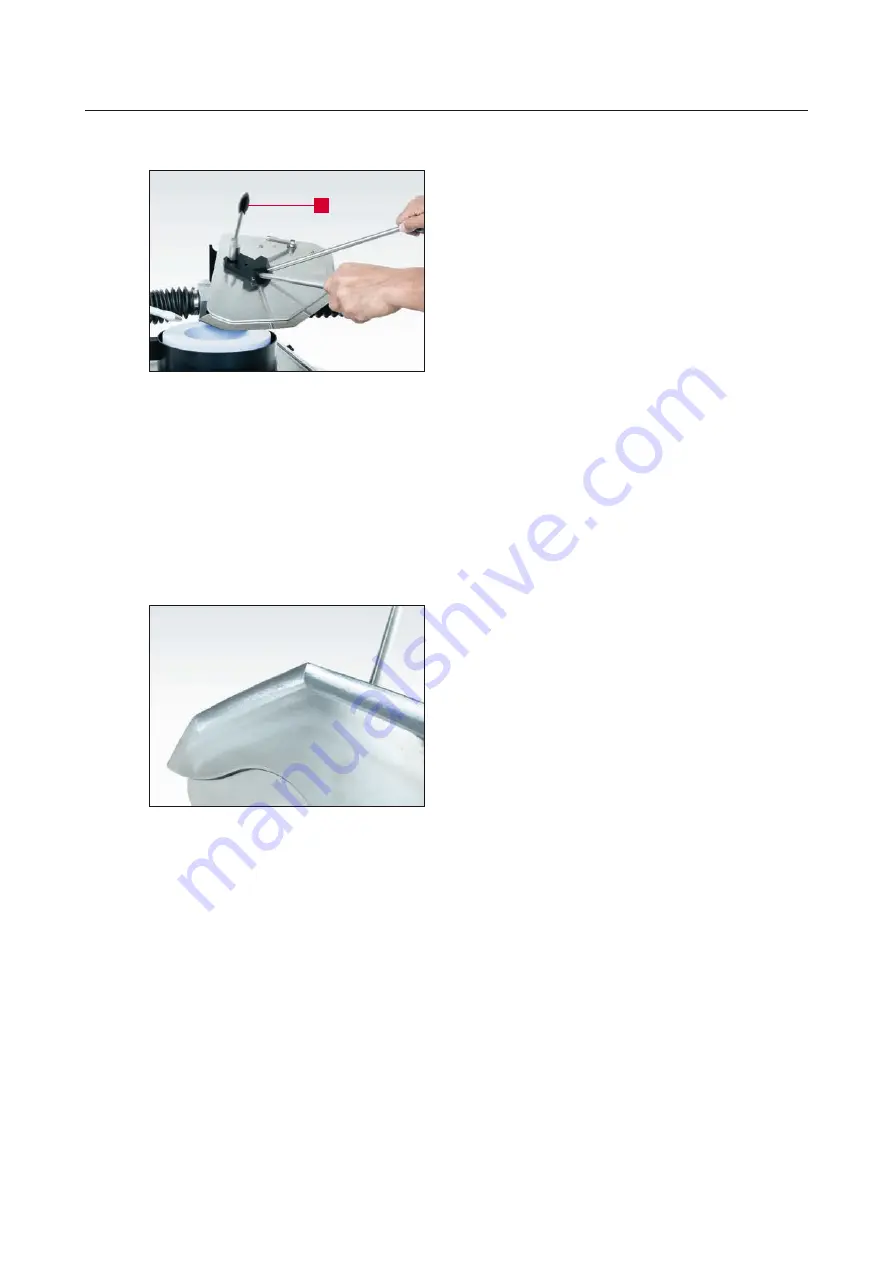
Figure 7-25

 Swiveling the cutter knife to the 

next cutting segment

Figure 7-26

 Convex pre-ground cutter knife

1

When the first segment is completely ground, 
loosen the clamping lever (7-25/1) and swivel the 
knife to the next segment.

Adjust the grinding angle (see chapter 7.1.5), 
align the cutter knife on the grinding wheel (see 
chapter 7.1.4), and tighten the clamping lever 
(7-25/1).

Grind all cutting segments as described 
 below:

Adjust grinding angle (see chapter 7.1.5).

Align the cutter knife on the grinding wheel 
(see chapter 7.1.4).

Grind cutter knives (see chapter 7.1.7).

Repeat process for each cutting segment.

The cutter knife is now pre-ground.

Before it can be deburred and polished, the fine 
grinding must be carried out on the HV 262 
 Universal Belt Grinding Unit (see chapter 9.1).

7.  Operating the HV 203

Содержание HV 203

Страница 1: ...Status 02 2022 Version 1 1 Translation Operating Instructions Universal Grinding Arm Universal Belt Grinding Unit HV 203 HV 262 ...

Страница 2: ... Instructions Date of issue of the operating instructions February 2 2022 Copyright These operating instructions as well as the operating documents remain the copyright property of KNECHT Maschinenbau GmbH They are supplied only to customers and operators of our products and belong to the machine Without our express permission these documents may neither be duplicated nor made accessible to third ...

Страница 3: ...2 4 5 Machine control system 12 2 4 6 Safety measures in normal operation 12 2 4 7 Hazards due to electrical power sources 12 2 4 8 Particular hazard areas 12 2 4 9 Maintenance servicing repair and fault rectification 12 2 4 10 Structural modifications to the grinding units 13 2 4 11 Cleaning the grinding units 13 2 4 12 Lubricants oils and greases 13 2 4 13 Relocation of the grinding machine with...

Страница 4: ...n the grinding wheel 30 7 1 5 Setting the grinding angle 31 7 1 6 Grinding linear knives tapered cutting edge 32 7 1 7 Grinding linear cutter knives convex cutting edge 34 7 2 Grinding sickle shaped knives on the grinding wheel 36 7 2 1 Attaching the SP 107 grinding plate 36 7 2 2 Clamping the knife 41 7 2 3 Positioning the knife on the grinding wheel 42 7 2 4 Setting the grinding angle 43 7 2 5 G...

Страница 5: ...e grinding angle 58 9 2 4 Mounting the grinding plate 59 9 2 5 Adjusting the swivel range of the grinding plate 60 9 2 6 Enlarging the grinding radius 60 9 2 7 Clamping cutter knives 61 9 2 8 Basic function of the HV 262 locking mechanism 62 9 2 9 Bringing the HV 262 Universal Belt Grinding Unit into adjustment position 63 9 2 10 Grinding cutter knives 64 9 2 11 Deburring and polishing cutter kniv...

Страница 6: ...ncluding troubleshooting in the work sequence as well as maintenance servicing repair Recognized technical standards for safe and professional work must be observed in addition to these operating instructions and the binding accident prevention regulations applicable in the country of use and at the place of use 1 2 Warnings and symbols in the operating instructions The operating instructions use ...

Страница 7: ...erence to a machine component illustrated in a picture the figure and position number will be given in brackets Example 7 9 1 means Figure number 7 9 position 1 Clamp the knife 7 9 1 onto the grinding plate 7 9 2 1 Important notes Figure 7 9 Clamping the knife onto the grind ing plate 1 2 ...

Страница 8: ...s in particular the section entitled Safety and the warning notes and have provided signed confirmation of this The safety awareness of the personnel at work will be monitored at regular intervals 2 1 3 Obligation on the part of the personnel All personnel working on the grinding units shall be obliged before starting work to observe basic work safety and accident prevention regulations read the o...

Страница 9: ...nly be ground if this is the case Any other use is considered as not intended KNECHT Maschinenbau GmbH is not liable for any damage resulting from this The user alone bears this risk Intended use also includes observing all instructions in the operating manual ATTENTION The grinding unit is being used improperly if e g it is installed onto grinding machines other than the KNECHT S 200 series the k...

Страница 10: ...g units ensure that all protective devices are properly mounted and in functional condition Protective devices may be removed only after the grinding units have been stopped and secured against accidental restart When delivering spare parts the protective devices must be attached by the operator as stipulated 2 4 3 Informal safety measures The operating instructions must be permanently available i...

Страница 11: ...ine In the event of a malfunction immediately stop the grinding machine and secure it against restart Rectify malfunctions immediately 2 4 7 Hazards due to electrical power sources Work on electrical systems or operating materials may only be performed by a qualified electrician in accordance with electrical regulations Defects such as damaged cables cable connections etc must be immediately recti...

Страница 12: ...and replacement parts in a safe and environmentally friendly manner 2 4 12 Lubricants oils and greases When using oils and greases follow the safety regulations applicable to the product Comply with the special regulations for the foodstuffs sector 2 4 13 Relocation of the grinding machine with grinding units Disconnect the grinding machine from any external current supply even if adjusting its po...

Страница 13: ... operation and minimal effort The device is used on the KNECHT grinding machines of the S 200 model series 3 2 HV 203 technical specifications Height 200 mm Width 725 mm Depth 140 mm Weight 17 kg Traverse path maximum cutting edge length 380 mm Maximum grinding radius 460 mm Minimum grinding radius 80 mm ATTENTION The grinding radius is not the blade radius The grinding radius of a knife can be fo...

Страница 14: ... 380 mm For this purpose the clamping of the guideway housing is opened and the fixed mounting head is fitted For grinding the cutting tool is moved linearly over the grinding wheel Sickle shaped knives up to a grinding radius of 460 mm can also be ground For this purpose lock the guideway housing and mount the rotatable mounting head To grind the cutting tool is moved concentrically over the grin...

Страница 15: ...xed mounting head with clamping lever linear knives 4 Cup grinding wheel with guard 3 4 1 Mounting head for sickle shaped knives The rotatable mounting head 3 3 1 is used to grind sickle shaped knives on the cup grinding wheel Figure 3 2 HV 203 Universal Grinding Arm 4 3 1 2 Figure 3 3 Rotatable mounting head 1 ...

Страница 16: ...sed when grinding sickle shaped knives with a grinding radius bigger than SR 200 mm on the HV 203 The spacer disc is placed on the locating bolt see chapter 7 2 1 Figure 7 33 Then the grinding plate is mounted Figure 3 4 Spacer disc 1 3 Description ...

Страница 17: ...The device is used on the KNECHT grinding machines of the S 200 model series 3 6 HV 262 technical specifications Height approx 650 mm Width approx 550 mm Depth approx 760 mm Weight 18 kg Traverse path maximum cutting edge length 260 mm Maximum grinding radius 440 mm Minimum grinding radius 55 mm Poss knife sizes 45 500 ltr The grinding radius must be within the specified range Figure 3 5 HV 262 si...

Страница 18: ...tion disc is mounted in the non rotatable position To grind the cutting tool is moved linearly over the wet grinding belt Sickle shaped knives up to a grinding radius of 440 mm can also be ground For this purpose swivel the locking fork forward the carriage is blocked The function disc is mounted in the rotatable position To grind the cutting tool is moved concentrically over the wet grinding belt...

Страница 19: ... discs for adjusting grinding angle 4 Locking fork 5 Star handles for increasing grinding radius 6 Grinding plate 7 Cutter knife 8 Locking lever 9 Hand wheel 10 Locking disc star handle 11 Locking disc Figure 3 6 HV 262 Universal Belt Grinding Unit 9 7 6 10 1 2 3 4 5 11 8 3 Description ...

Страница 20: ...refer to an independent specialist as needed Remove the packaging and shipping straps Dispose of packaging in an environment friendly manner 4 3 Transport to another installation site For transport to another installation site make sure that the space requirement is observed see chapters 3 2 and 3 6 Grinding units must be sufficiently secured during transport 4 Transport When transporting observe ...

Страница 21: ...5 3 Settings KNECHT Maschinenbau GmbH will configure the various components before delivery ATTENTION Unauthorized changes to the preset values are not permitted and can damage the grinding units and grinding machine 5 4 Initial start up of the grinding units Completely install and inspect the protective equipment before commissioning The HV 203 and HV 262 grinding units are only suitable for moun...

Страница 22: ... 6 2 2 from the right and secure it with the M10 countersunk screw 6 1 1 6 HV 203 commissioning All work must be performed by authorized trained personnel Observe the locally applicable safety and accident prevention regulations There is a risk that hands hair and clothing may be pulled in while the grinding machine is switched on Serious injury may result Wear personal protective equipment CAUTIO...

Страница 23: ...rmation as possible on the shape and size of the knife to be ground A drawing from the knife manufacturer is ideal knives that can be procured on the free market some times deviate from the original contour Photos of the entire knife and the knife inscription are also helpful ATTENTION For grinding plates with a grinding radius SR 80 335 the mounting head is mounted on the front side of the carria...

Страница 24: ...adius SR indicated on the grinding plate and the position of the mounting head on the carriage must match Loosen the carriage using a hexagon screwdriver width across flats 6 mm 7 3 1 Remove clamping lever 7 4 1 7 Operating the HV 203 Figure 7 2 Checking the position of the mounting head 1 1 ...

Страница 25: ...olt 7 5 2 of the universal grinding arm Place the grinding lever 7 6 1 on the locating bolt 7 6 2 Screw the clamping lever 7 7 1 onto the locating bolt 7 7 2 and tighten it clockwise Figure 7 6 Attaching the grinding lever 1 2 7 Operating the HV 203 2 Figure 7 5 Mounting the grinding plate 1 2 ...

Страница 26: ...worn CAUTION ATTENTION Before clamping the knife check whether the grinding plate fits the knife to be ground Compare the inscription of the grinding plate with that of the knife The use of an unsuitable grinding plate can damage the knife and grinding plate Swivel the grinding plate back using the grinding lever 7 8 1 Clamp the knife 7 9 1 onto the grinding plate 7 9 2 7 Operating the HV 203 Figu...

Страница 27: ...late forward Turn clamping lever 7 10 1 to Closed position The knife is now locked Swivel the grinding plate with the clamped knife forward onto the grinding wheel Figure 7 10 Locking the knife on the grinding plate 1 7 Operating the HV 203 ...

Страница 28: ...wer clamping lever 7 13 1 by rotating counterclockwise and move the entire grinding unit until the cutting edge of the knife is approx on the center of the grinding wheel see Figure 7 12 Retighten the lower clamping lever 7 13 1 7 Operating the HV 203 Figure 7 12 Knife position on the grinding wheel Figure 7 13 Adjusting the knife to the center of the grinding wheel 1 1 ...

Страница 29: ...Slightly loosen the clamping lever 7 14 1 until the grinding plate with the clamped knife can be moved NOTE The best grinding results are achieved by engaging the full width of the grinding wheel on the cutting edge of the knife Swivel the grinding plate with the clamped knife until the full width of the grinding wheel is engaged Tighten clamping lever 7 16 1 7 Operating the HV 203 1 1 ...

Страница 30: ...le To adjust the grinding angle place the knife on the grinding wheel Loosen the upper clamping lever 7 17 1 by turn ing it counterclockwise Turn the hand wheel 7 18 1 until the pointer 7 18 2 shows the desired angle on the angle scale 7 18 3 Retighten the upper clamping lever 7 17 1 7 Operating the HV 203 1 3 1 2 ...

Страница 31: ... grinding wheel with moderate force Grind until a small burr forms on the cutting edge When the first segment is completely ground loosen the clamping lever 7 20 1 and swivel the knife to the next segment Align the knife on the grinding wheel as described in chapter 7 1 4 and tighten the clamping lever ATTENTION When aligning the knife make sure that the knife tip does not hit the left side of the...

Страница 32: ...33 7 Operating the HV 203 Figure 7 21 Deburring and polishing linear knives on the finned brush Deburr the knives on the finned brush See the technical documentation for the S 200 chapter 7 7 ...

Страница 33: ...e the knife evenly over the grinding wheel with moderate force Grind until a small burr forms on the cutting edge Now reduce the grinding angle on the hand wheel 7 24 1 by 5 and grind until the first chamfer is only approx 3 mm wide Reduce the grinding angle by 5 again and grind until the second chamfer is approx 3 mm wide Repeat the process until approx 5 is reached Figure 7 22 Switching on the g...

Страница 34: ...e on the grinding wheel see chapter 7 1 4 and tighten the clamping lever 7 25 1 Grind all cutting segments as described below Adjust grinding angle see chapter 7 1 5 Align the cutter knife on the grinding wheel see chapter 7 1 4 Grind cutter knives see chapter 7 1 7 Repeat process for each cutting segment The cutter knife is now pre ground Before it can be deburred and polished the fine grinding m...

Страница 35: ... can be procured on the free market some times deviate from the original contour Photos of the entire knife and the knife inscription are also helpful ATTENTION For grinding plates with a grinding radius SR 80 335 the mounting head is mounted on the front side of the carriage For grinding plates with a grinding radius SR 200 460 the mounting head must be mounted on the rear side of the carriage se...

Страница 36: ... 1 is pointing vertically downwards Move the grinding unit forward see chapter 7 1 3 until the mounting head 7 30 1 is positioned above the grinding wheel Align the carriage in the center of the right grinding surface Swivel the carriage backward until the mounting head 7 31 1 points upwards Move the grinding unit backward Figure 7 29 Clamp carriage lightly Figure 7 30 Positioning the mounting hea...

Страница 37: ...g plate 7 34 1 on the locating bolt 7 34 2 of the universal grinding arm NOTE If the grinding plate has several locating holes mount it so that the cutting segment at the knife tip is ground first Figure 7 33 Placing the spacer disc onto the locating bolt Figure 7 34 Mounting the grinding plate Figure 7 32 Tightening the clamping screw 7 Operating the HV 203 2 1 2 1 2 ...

Страница 38: ...nding lever on the grinding plate Screw the clamping lever 7 35 1 onto the mounting head and tighten it Remove the M12 star handle 7 36 1 from the grinding plate Place the grinding lever 7 37 1 onto the screw of the grinding plate and tighten it clockwise with the M12 star handle 7 37 2 7 Operating the HV 203 2 1 ...

Страница 39: ...y onto the locating bolt thread 7 38 1 and tighten it clock wise using the M12 star handle 7 38 2 NOTE If the grinding lever is screwed directly onto the locating bolt no spacer disc 7 33 1 is necessary 7 Operating the HV 203 Figure 7 38 Mounting the grinding lever on the locating bolt 1 2 ...

Страница 40: ... whether the grinding plate fits the knife to be ground Compare the inscription of the grinding plate with that of the knife The use of an unsuitable grinding plate can damage the knife and grinding plate Swivel the grinding plate back using the grinding lever 7 39 1 Clamp the knife 7 40 1 onto the grinding plate 7 40 2 1 1 Figure 7 39 Swiveling the grinding plate back ward Figure 7 40 Clamping th...

Страница 41: ...7 2 3 Positioning the knife on the grinding wheel The cutting edge of the knife 7 42 1 must lie approximately on the center of the grinding wheel To do so loosen the lower clamping lever 7 43 1 counterclockwise and move the entire grinding unit until the cutting edge of the knife is approx imately at the center of the grinding wheel see Illustration 7 42 1 Retighten the lower clamping lever 7 43 1...

Страница 42: ... upper clamping lever 7 44 1 by turning it counterclockwise Turn the hand wheel 7 45 1 until the pointer 7 45 2 shows the desired angle on the angle scale 7 44 3 Retighten the upper clamping lever 7 44 1 Figure 7 44 Loosening the clamping lever 7 Operating the HV 203 1 Figure 7 45 Setting the grinding angle 3 1 2 ...

Страница 43: ...rinding lever move the knife evenly over the grinding wheel with moderate force Grind until a small burr forms on the cutting edge Now reduce the grinding angle on the hand wheel 7 48 1 by 5 and grind until the first chamfer is only approx 3 mm wide Reduce the grinding angle by 5 again and grind until the second chamfer is approx 3 mm wide Repeat the process until approx 5 is reached Figure 7 46 S...

Страница 44: ...e next cutting segment Grind all cutting segments as described below Adjust grinding angle see chapter 7 2 4 Grind cutter knives see chapter 7 2 5 Repeat process for each cutting segment The cutter knife is now pre ground Before it can be deburred and polished the fine grinding must be carried out on the HV 262 Universal Belt Grinding Unit see chapter 9 2 Figure 7 49 Swiveling the cutter knife to ...

Страница 45: ...nding unit to the left until it touches both stop pins 8 1 1 8 HV 262 commissioning All work must be performed by authorized trained personnel Observe the locally applicable safety and accident prevention regulations There is a risk that hands hair and clothing may be pulled in while the grinding machine is switched on Serious injury may result Wear personal protective equipment CAUTION Figure 8 2...

Страница 46: ...Figure 8 3 Locking the belt grinding unit 1 47 Tighten the clamping lever 8 3 1 clockwise 8 HV 262 commissioning ...

Страница 47: ...ding lever 9 2 1 The function disc 9 3 1 is placed on the locating bolt 9 3 2 The nose of the function disc 9 3 3 must fit into the nose shaped recess of the mounting head 9 3 4 The toothless area of the function disc faces the operator Concentric swiveling of the grinding plate is pre vented in this position Figure 9 1 Releasing the carriage lock Figure 9 2 Removing the grinding lever Figure 9 3 ...

Страница 48: ...niversal belt grinding unit using spacer discs Spacer discs for 25 and 27 9 4 1 are located on the base plate of the belt grinding unit To set the desired grinding angle place the appropriate spacer disc 9 5 1 on the locating bolt 9 5 2 Figure 9 4 Spacer discs for adjusting grinding angle 1 9 Operating the HV 262 ...

Страница 49: ... free market some times deviate from the original contour Photos of the entire knife and the knife inscription are also helpful The grinding plate 9 6 1 is placed over the spacer disc 9 6 2 The cylindrical pin 9 6 4 of the spacer disc 9 6 2 must engage in the hole 9 6 3 of the grinding plate Turn the grinding lever 9 7 1 clockwise onto the locating bolt and tighten it Figure 9 6 Mounting the grind...

Страница 50: ...its the knife to be ground Compare the inscription of the grinding plate with that of the knife The use of an unsuitable grinding plate can damage the knife and grinding plate Swivel the grinding plate 9 8 1 backward Position the grinding plate so that the mounting area of the knife is easily accessible Clamp the knife 9 9 1 onto the grinding plate 9 9 2 Figure 9 8 Swiveling the grinding plate bac...

Страница 51: ...The two U shaped locking positions are used to adjust the knife on the grinding belt and to grind the burr The V shaped locking positions are used for convex grinding of the knife 0 adjustment position 9 11 1 1 grinding position 9 11 2 2 11 convex grinding 9 11 3 NOTE Every grinding process is started with adjustment position 0 1 Locking lever 2 Locking disc 3 Hand wheel 4 Star handle Figure 9 10 ...

Страница 52: ... the star handle 9 14 1 by turning counterclockwise The grinding unit can now be moved back and forth freely using the hand wheel Use the hand wheel to move the grinding unit clockwise towards the grinding belt until the cutting edge of the cutting segment to be ground first touches the grinding belt slightly Tighten the star handle 9 15 1 clockwise 9 Operating the HV 262 Figure 9 14 Loosening the...

Страница 53: ...cutting edge of the knife Slightly loosen the grinding lever 9 16 1 counter clockwise until the grinding plate with the clamped knife can be moved Swivel the grinding plate with the clamped knife until the full width of the grinding belt touches the cutting edge Tighten the grinding lever 9 18 1 clockwise Hold the grinding plate with your second hand so that it does not rotate when tightened Figur...

Страница 54: ...e grinding belt with your remaining four fingers until grinding position 1 is reached Release the locking lever 9 20 1 With linear cutter knives each cutting segment is ground separately 1 segment corner to corner Using the grinding lever 9 21 1 press the knife against the grinding belt 9 21 2 with moderate force and move it evenly over the grinding belt Grind until a small burr forms on the cutti...

Страница 55: ...at the process until approx locking position 7 until the entire convex edge of the knife is ground The number of infeeds can be limited by the stop screw 9 23 1 in any position For better access to the stop screw 9 32 1 unscrew the star handle and remove the hand wheel Once the first segment has been fully ground return the grinding unit to grinding position 1 by turning the hand wheel countercloc...

Страница 56: ...nding Unit into adjustment position 0 see chapter 9 1 7 Align the cutter knife on the wet grinding belt see chapter 9 1 8 Grind cutter knives see chapter 9 1 9 Repeat process for each cutting segment 9 1 10 Deburring and polishing cutter knives Deburr and polish cutter knives on the finned brush See the technical documentation for the S 200 Universal Wet Grinding Machine chapter 7 7 9 Operating th...

Страница 57: ...function disc must face in the direction of the grinding belt The toothed area of the function disc faces the operator The grinding plate can be swiveled concentrically in this position 9 2 3 Setting the grinding angle The grinding angle is set on the universal belt grinding unit using spacer discs Spacer discs for 25 and 27 9 29 1 are located on the base plate of the belt grinding unit Figure 9 2...

Страница 58: ...that can be procured on the free market some times deviate from the original contour Photos of the entire knife and the knife inscription are also helpful The grinding plate 9 31 2 is placed over the spacer disc 9 31 1 The cylindrical pin 9 31 3 of the spacer disc 9 31 1 must engage in the hole 9 31 4 of the grinding plate If the grinding plate has several locating holes mount it so that the cutti...

Страница 59: ... left edge of the grinding plate comes to rest approx 10 cm to the right of the grinding belt Tighten the grinding lever 9 33 1 clockwise 9 2 6 Enlarging the grinding radius The grinding radius of the grinding unit can be increased as necessary To do so loosen the two star handles 9 34 1 on the base plate Pull the device towards the opera tor until it stops Re tighten the star handles Figure 9 33 ...

Страница 60: ...s must be worn CAUTION ATTENTION Before clamping the knife check whether the grinding plate fits the knife to be ground Compare the inscription of the grinding plate with that of the knife The use of an unsuitable grinding plate can damage the knife and grinding plate Swivel the grinding plate 9 35 1 back as far as it will go It is now secured against rotating Position the grinding plate in such a...

Страница 61: ...o U shaped locking positions are used to adjust the knife on the grinding belt and to grind the burr The V shaped locking positions are used for convex grinding of the knife 0 adjustment position 9 38 1 1 grinding position 9 38 2 2 11 convex grinding 9 38 3 NOTE Every grinding process is started with adjustment position 0 1 Locking lever 2 Locking disc 3 Hand wheel 4 Star handle Figure 9 37 Lockin...

Страница 62: ...n the star handle 9 41 1 by turning counterclockwise The grinding unit can now be moved back and forth freely using the hand wheel Use the hand wheel to move the grinding unit clockwise towards the grinding belt until the cutting edge of the cutting segment to be ground first touches the grinding belt slightly Tighten the star handle 9 41 1 clockwise Figure 9 40 Bringing the grinding unit into adj...

Страница 63: ... belt with your remaining four fingers until grinding position 1 is reached 9 44 3 Release the locking lever 9 44 1 With sickle shaped cutter knives each cutting segment is ground separately 1 segment corner to corner Using the grinding lever 9 45 1 press the knife against the grinding belt 9 45 2 with moderate force and move it evenly over the grinding belt Grind until a small burr forms on the c...

Страница 64: ...locking position 7 until the entire convex edge of the knife is ground The number of infeeds can be limited by the stop screw 9 47 1 in any position For better access to the stop screw 9 47 1 unscrew the star handle and remove the hand wheel Once the first segment has been fully ground return the grinding unit to grinding position 1 by turning the hand wheel counterclockwise to ward the operator M...

Страница 65: ...e next cutting segment Grind all cutting segments as described below Bring the HV 262 Universal Belt Grinding Unit into adjustment position 0 see chapter 9 2 9 Grind cutter knives see chapter 9 2 10 Repeat process for each cutting segment 9 2 11 Deburring and polishing cutter knives Deburr and polish cutter knives on the finned brush See the technical documentation for the S 200 Universal Wet Grin...

Страница 66: ...listed in the lubricant table for care chapter 10 1 1 10 1 1 Lubricant table Lubrication work Interflon Würth SHELL EXXON Mobil Cleaning and care of machine parts Dry clean stainless steel Stainless steel care spray Risella 917 Marcol 82 Lubricate threads and sliding surfaces Fin Grease Multi purpose grease Gadus S2 Ronex MP 10 2 Maintenance plan one shift operation Interval Assembly Maintenance t...

Страница 67: ... by a qualified specialist 11 2 Disposal After the machine has reached the end of its service life it must be disposed of by a qualified specialist The grinding units may be returned in exceptional situations and following consultation with KNECHT Maschinenbau GmbH Operating materials e g grinding wheels grinding belts finned brushes etc must be disposed of correctly ...

Страница 68: ...ice knecht eu 12 3 Spare parts If you need spare parts please use the spare parts list provided with the machine Please place your order using the format described below When ordering please always provide example Machine type HV 262 Designation of assembly distance ring 27 Item number 13 Drawing number article number 2000030 3908 Quantity 1 pc We are always happy to answer any questions 12 Servic...

Страница 69: ...gnation HV 203 Machine designation Universal Belt Grinding Unit Model designation HV 262 Applicable conforming standards DIN EN 12100 1 in particular DIN EN 12100 2 DIN EN 60204 1 ISO 13857 DIN EN 349 Responsible for documentation Peter Heine B Eng Mechanical Engineering BA Phone 49 7527 928 15 p heine knecht eu Manufacturer KNECHT Maschinenbau GmbH Witschwender Strasse 26 88368 Bergatreute German...
Страница 70: ...KNECHT Maschinenbau GmbH Witschwender Strasse 26 88368 Bergatreute Germany T 49 7527 928 0 F 49 7527 928 32 mail knecht eu www knecht eu ...

Отзывы: