background image


 5

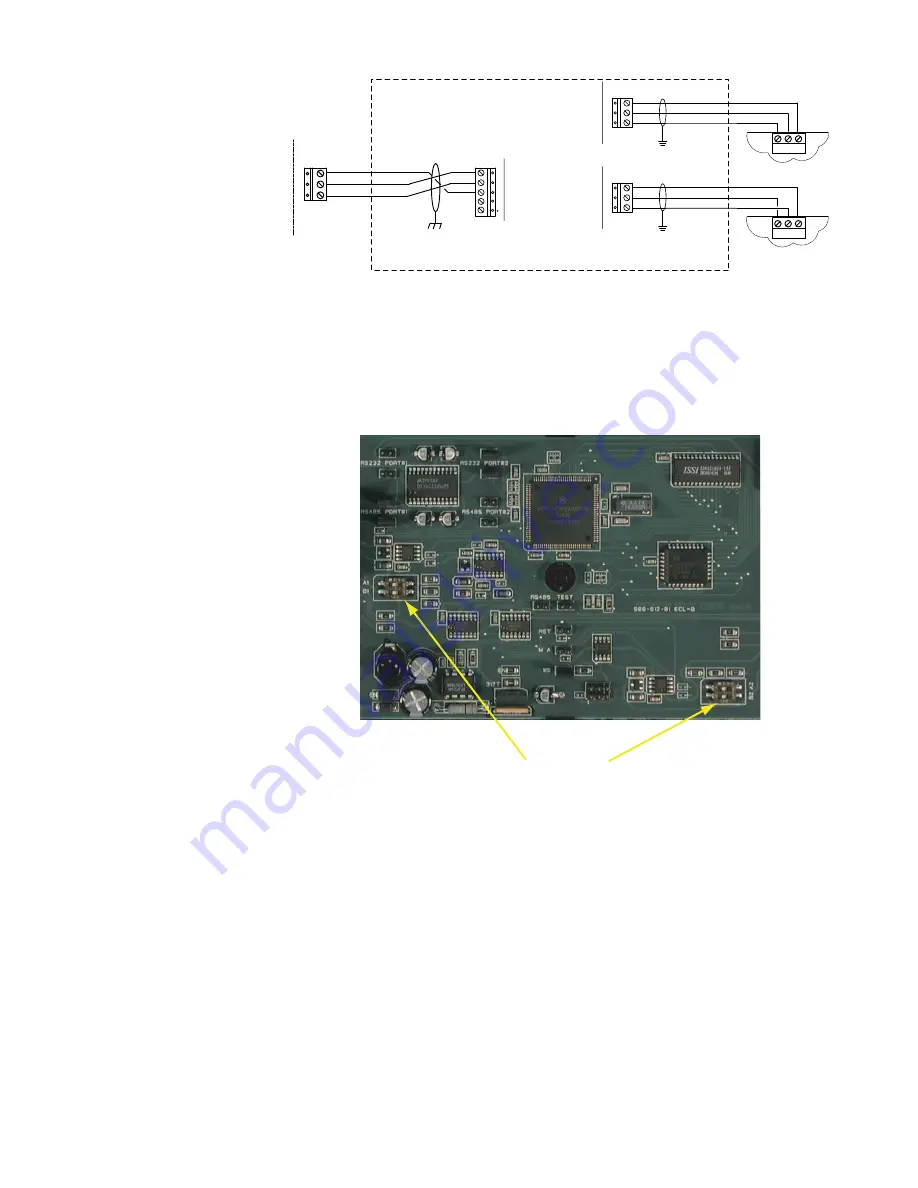
EOL (End Of Line) Setting

To set or confirm the EOL termination for the RS-485 connection, see Illustration 7 

to locate the switches for these settings.

Proceed as follows:

1. 

Remove the screw at the center of the interface that secures the cover and 

remove the cover.

2. 

Locate the appropriate switch (see Illustration 8). 

3. 

If the RS-485 connection is the End-of-Line (one set of wires under the RS-485 

terminals), verify that both switches on the RS-485 switch assembly are in the 

ON position. Otherwise, the switches should be in the OFF position.

 4.  After you set/confirm the switches, reinstall the cover and screw.

Illustration 8—RS-485 EOL Switches

KMD-5540 CommTalk Protocol Interface Installation & Operation Guide 


 Installation

RS-485 EOL 

SWITCHES

Illustration 7—KMD-5540-005 ModBus Configuration

KMC TIER 2

NETWORK

OUTPUT

KMD-5540-005 INPUT 

(COM1)

KMD-5540-005 OUTPUT

(COM 2)

GND

   A

   B

ModBus

INPUT

PANEL

- +

GND

A1
GND  GND   

B1

B2

A2

GND

CommTalk Module

- +

GND

RX2

TX2

GND

RS-232

RS-485

Содержание KMD-5540 CommTalk

Страница 1: ...1 Installation Operation Guide KMD 5540 CommTalk Protocol Interface 908 019 01C ...

Страница 2: ...on the right side Mounting Use the four mounting holes to securely mount the interface inside a UL approved Enclosed Energy Management Equipment Panel or other suitable protective enclo sure See Illustration 2 Mounting Hole Locations on page 3 Illustration 1 Controller Components GND GND A1 B1 LAMPS RDY COM PWR 24VAC GND TX1 RX1 GND A2 B2 COM RDY LAMPS GND RX2 TX2 OFF ON ON OFF ____ KMC CONTROLS C...

Страница 3: ...d B termi nals See EOL End Of Line Setting on page 5 for EOL switch setting Use 18 gauge twisted pair shielded cable with capacitance of no more than about 50 picofarads per foot for all network wiring Belden cable model 82760 meets KMC requirements Connect the nodes of the network in a daisy chain arrangement This means connecting the A terminal in parallel with all other A terminals and connecti...

Страница 4: ...X GND MICRO GATEWAY KMD 5210 OUTPUT COMPUTER PORT KMD 5540 003 INPUT COM 1 COMPUTER A COMPUTER B TX GND RX GND TX RX TX1 GND RX1 CommTalk Module Illustration 4 KMD 5540 003 Micro Gateway Configuration COMPUTER A COMPUTER B GND RX1 TX1 KMD 5210 OUTPUT COMPUTER PORT KMD 5540 003 INPUT COM1 RX TX GND RX GND TX KMD 5540 003 OUTPUT COM 2 RX TX GND CTS XXX XXX XXX YORKTALK XL INPUT PORT 2 Jumper to righ...

Страница 5: ...er the RS 485 terminals verify that both switches on the RS 485 switch assembly are in the ON position Otherwise the switches should be in the OFF position 4 After you set confirm the switches reinstall the cover and screw Illustration 8 RS 485 EOL Switches KMD 5540 CommTalk Protocol Interface Installation Operation Guide Installation RS 485 EOL SWITCHES Illustration 7 KMD 5540 005 ModBus Configur...

Страница 6: ... the interface requires very little user intervention Controls and Indicators The following sections describe the controls and indicators found on the device Network ON OFF The network ON OFF switch is located below the modular jack on the left side of the controller Use this switch to enable or disable the RS 485 network connection Alternately you may remove the RS 485 terminal block from the pin...

Страница 7: ...tory default configuration It may be necessary to re configure the KMD 5540 with HCM to establish normal communications and operation To reset the KMD 5540 proceed as follows 1 Remove the screw at the center of the the cover and remove the cover 2 Locate the jumper block next to the input pull up switches see Illustration 9 3 Remove power to the KMD 5540 4 Place a short on the RST pins Use a jumpe...

Страница 8: ...ct or incidental arising out of or related to the use of this document No part of this publication may be reproduced transmitted transcribed stored in a retrieval system or translated into any language in any form by any means without the written permission of KMC Controls Inc Printed in U S A The KMC logo and CommTalk are trademarks of KMC Controls Inc 2013 KMC Controls Inc All rights reserved KM...

Отзывы: