background image

Customer Assembly and Finishing Notes: 


KLOCKIT 

N3211 County Rd H, 

Lake Geneva, WI 53147 

Customer Service: 1-800-556-2548 

Technical Support: 1-800-556-6474 


12

Содержание Arc De Triomphe Desk Clock

Страница 1: ...Plan and Assembly Instructions For The Arc De Triomphe Desk Clock KLOCKIT N3211 County Rd H Lake Geneva WI 53147 Customer Service 1 800 556 2548 Technical Support 1 800 556 6474 1 ...

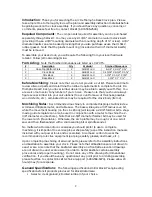
Страница 2: ...cts etc Laminated stock may be required for the clock body Item 2 Machining Notes Recommended machinery to complete this project will include a scroll saw drill press router and table saw The base will require a 3 8 radius cove bit while the movement housing on the clock body will require a 2 3 8 forstner bit a shop made guide template can also be used in conjunction with a router to machine the 2...

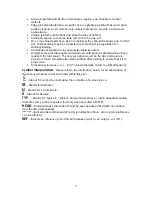
Страница 3: ...y exception would be if a trace template is provided Trace templates should be verified after printing to ensure that it is to proper size Dimensional tolerance is 1 32 unless otherwise noted or a REF dimension Symbol Interpretation Please refer to the information below for an explanation of the various symbols you will encounter within this plan Stands for center line indicating the centerline of...

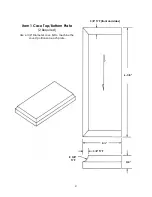
Страница 4: ...3 8 TYP front and sides Item 1 Case Top Bottom Plate 2 Required Use a 3 8 Diameter cove bit to machine the coved portions on each plate 6 1 8 2 3 8 TYP R 3 8 TYP 3 4 4 ...

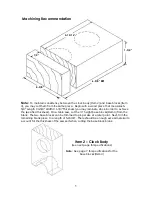
Страница 5: ...ate stock in order to achieve the specified thickness On a table saw cut the height base blocks Item 4 from the blank The two base blocks can be trimmed to proper size at a later point Next trim the remaining blank piece to a length of 5 15 16 There should be enough excess material to account for the thickness of the saw kerf when cutting the base block blank Item 2 Clock Body see next page for sp...

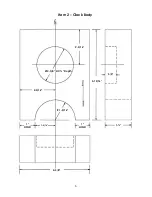
Страница 6: ...Item 2 Clock Body 2 5 16 Ø2 3 8 Џ X Depth 3 4 5 15 16 2 5 16 R 1 5 16 1 HOLD 1 HOLD 1 1 5 16 4 5 8 6 ...

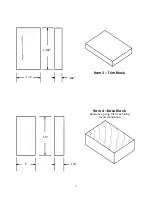
Страница 7: ...1 7 8 Item 3 Trim Block 1 3 8 Item 4 Base Block Reference page 5 for machining recommendation 1 1 1 2 7 ...

Страница 8: ...ampened cloth Allow the assembly proper time to dry Once clamping can be removed you may proceed to mount the base blocks Item 4 Once again the top and bottom end grain surfaces of the base blocks should be sealed with a thin layer of glue as described previously Glue the base blocks Item 4 to the bottom surface of the trim blocks Item 3 so that the back edges are perfectly flush The base blocks s...

Страница 9: ...r bored hole Clock inserts can be purchased separately through the Klockit catalog or website You may select from 2 13 16 diameter non alarm inserts or you may use 2 3 4 diameter inserts with the 15612 rubber gasket No matter which insert you should choose to use it is important that the mounting diameter of either insert be 2 3 8 with a depth no greater than Klockit will provide the mounting spec...

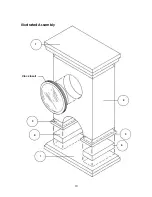
Страница 10: ...Illustrated Assembly 1 Clock Insert 2 3 3 4 4 1 10 ...

Страница 11: ...Front Elevation Assembly View 2 1 3 4 1 Side Elevation Assembly View 11 ...

Страница 12: ...Customer Assembly and Finishing Notes KLOCKIT N3211 County Rd H Lake Geneva WI 53147 Customer Service 1 800 556 2548 Technical Support 1 800 556 6474 12 ...

Отзывы: