Kleenmaid OMFFS9010 Скачать руководство пользователя страница 4

PROVISION FOR VENTILATION

INSTALLATION

The room where the Cooker is installed should have permanent

ventilation as follows:

“Ventilation must be in accordance with AS5601/AG 601 - Gas

Installations. In general, the appliance should have adequate

ventilation for complete combustion of gas, proper flueing and to

maintain temperature of immediate surroundings within safe limits.”

- Do not install in a bed-sitting room, a bathroom or shower room.

If there is another fuel burning appliance in the same room, a

higher level of ventilation will be required, you should consults

" the safety requirements".

In addition to the above, during prolonged use, opening a window

in the same room is recommended. This will avoid the build up

of excessive moisture and condensation.

4

Fig. 1

Fig. 1A

  BACK  SIDE

V

V

F

POSITIONING

Important: Fix the chain located next to the gas connection on

both sides of the cooker to the wall to prevent the cooker from

tilting.  Both chains must be securely fixed.

Make  sure  that  the  wall  surface  behind  the  Cooker  is  non-

combustable (will not catch fire).

Where a painted surface is adjacent, a fire retardent paint surface

is recommended. Wallpaper, wood, or fabric should not be used

behind or next to the cooker.

“Any adjoining wall surface (side or rear) situated within 200mm

of any hob burner must be a suitable non-combustible material

from the edge for  a  height  of  150mm  for  the  entire  length

of  the cooker.

Any combustible construction above the cooker must be at least

650mm above the maintop.” Ensure that a power and gas supply

are nearby. The Cooker should be located carefully so that the

heat produced by it has plenty of space to escape. The diagram

below shows an ideal configuration.

“If the cooker is being fitted next to cupboards or adjoing wall

surfaces, which are within 200mm from the edge of the hob

burner and of a suitable non-combustible material as specified

min.100 mm

min.

 650 mm

min.

 400 mm

 "0" mm

 "0" mm

Clearances to combustible materials

No part of any adjoining wall surface can be made of  combustible

materials. The protection of combustible materials

required by Clause 5.12.1.1 of AS5601-2004 is the fixing of 5 mm

thick  ceramic  tiles  to  the  surface  or  attaching  fire  resistant

material to the surface and covering with sheet metal with a minimum

thickness of 0.4 mm.

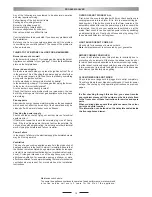
Clearances to non- combustible materials

min.

 650 mm

 "0" mm

 "0" mm

min "60" mm

min "60" mm

min "60" mm

non-

 combustible materials

non-

 combustible materials

in  AS5601, then ensure that a distance of at least 6cm is left

between  the  edge  of  the  cooker  and  the  non-combustible

material. This  gap  is  to  allow  plenty  of  space  for  the  heat

produced by the cooker to escape on each side of the cooker.

min.10 

mm

Note:

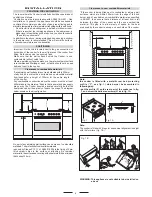
the  cooker  is  fitted  with  a  metallic  rear  hob  protecting

profile  (”F”,  see  fig.  1)  which  must  be  assembled  in

following way:

- put the profile (F) on the rear part of the cooker as in fig.

1, and screw the delivered screws (V) as in fig. 1A.
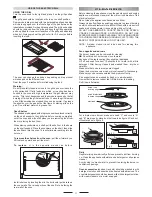
Note:

The cooker is fitted with 4 legs for an eventual alignment in height

with the furniture ( fig. 1 B ).

WARNING: This appliance is not suitable to be installed on

                    a base

Fig. 1 B

F

OK

NO

1

2

Содержание OMFFS9010

Страница 1: ...cooking collection Instructions for use and warranty details Free Standing Oven Model No OMFFS9010...

Страница 2: ...ur new appliance Correct installation will avoid delays and unnecessary service call costs Once installation is complete please read this entire instruction manual carefully and get to know the contro...

Страница 3: ...it will provide all the advice needed to allow you to obtain the best results from the very first day ATTENTION Before using the appliance do not forget to remove the plastic protective film from part...

Страница 4: ...ooker must be at least 650mm above the maintop Ensure that a power and gas supply are nearby The Cooker should be located carefully so that the heat produced by it has plenty of space to escape The di...

Страница 5: ...specified in AS5601 table 3 1 or with a Plumbezy Flexible hose AGA Approval number 6196 10mm ID class D and between 1 1 2m long in accordance with AS5601 for a high level connection Ensure that the ch...

Страница 6: ...not go out turning quickly from the max flow to the minimum flow Refit the knob again ELECTRICAL CONNECTION In order to avoid hazard any electrical work performed on this equipment or its associated...

Страница 7: ...use with end time setting Press the end time button 3 The time of day appears on the display Set the cooking end time with 6 button The AUTO and cooking time symbols light up continuously The relay co...

Страница 8: ...programme will automatically cancel on completion Always use pans with a flat base diameter which are well balanced and stable in use a pan which overhangs the hotplate should not be used Avoid using...

Страница 9: ...pper heating elements operate together This is the traditional cooking very good for roasting joints ideal for biscuits baked apples and crisping food You obtain very good results when cooking on a sh...

Страница 10: ...ts may be impaired Food Thermostat Shelf Position Cooking Time setting C CountedfromBottom Small cakes 12 on tray 195 3 20 30 mins Victoria sandwich 190 3 25 35 mins 2x7 180mm Swiss roll or whisked sp...

Страница 11: ...ons provided A wire grid is supplied The grill pan handles should be removed from the grill pan during the grilling operation and only fitted for removal or insertion of the grill pan particularly whe...

Страница 12: ...oks A inwardsbefore you shut the oven door fig 9E The interior glass of the oven The interior glass of the oven door can be removed with the door in a semi open position remove the screws A and B and...

Страница 13: ...ufacturer before purchasing Avoid using unstable and misshapen pans which may tilt easily and pans with a very small base diameter e g milk pans single egg poachers The minimum pan diameter recommende...

Страница 14: ...heat and moisture in the room in which it is installed Ensure that the kitchen is well ventilated keep natural ventilation holes open or install a mechanical ventilation device mechanical extractor h...

Страница 15: ...must pay for the cost of transporting the appliance to and from the Agent or the Agent s travel cost to and from the purchaser s home What these warranties do not cover Compass Capital Services tradin...

Страница 16: ...Square Sydney NSW 2000 E help kmaid com au www kleenmaid appliances com au Other products available in the Kleenmaid range of appliances Washing machines Clothes dryers Dishwashers Ovens Cooktops Stea...

Отзывы: