background image

Washing Pump


Theory of parts

-

>


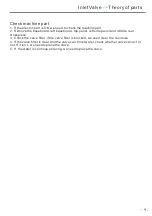
Check the machine part

1. If the electric part is OK, we need to check the machine part.
2. Remove bottom board. 
3. Check the pump assembly, if the bracket is loose, it will bring the noise, we need to 
tighten it. 
4. If the wash pump cannot start  and the machine hasn’t been used too long, maybe the 
seal element is bond.
5. If the drain pump is working, but no water out or just a little. We should check the vane 
wheel.

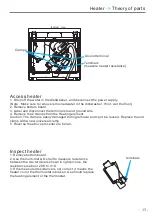
Access Washing Pump

1. Disconnect power.  
2. Remove bottom board.
3. Label and disconnect the 2 terminals to the capacitor. 
4. Label and disconnect the 2 terminals to the motor wire connector. 
5. Remove the clamp fastening the interconnect hose to the sump. 
Caution: The clamp is easily damaged during removal and can’t be reused. Replace the old 
clamp with a new universal clamp (Dia-31.0mm)
6. Remove the clamp fastening interconnect hose to the lower nozzle .
7. Remove the clamp fastening interconnect hose to heater.
8. Remove the screw and disconnect the ground wire from the wash pump motor assembly.
Note: Do not attempt to remove the bolt and locknut connecting the motor mount to the 
dishwasher frame.
9. Remove the motor pump assembly from the dishwasher.
10. Reverse the above procedure to install.

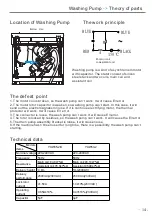
Inspect


Washing Pump

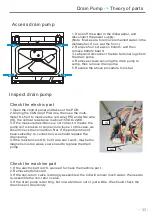
Check the electric part

1.Open the control panel and take out PCB;
2.Unplug the CON4 and P4 wires, then use the multi-
meter Ω shelf to test resistance between two white wire 
(ML and IS), the normal resistance is about 78Ω to 100  
Ω.
3. I f the resistance is not correct, it means the pump coil 
is broken or the connector is loose, In this case, we 
should check the connection first. If the problem hasn’t 
been solved by re-connection, we would replace the 
washing pump. 
4.If the resistance is OK but it cannot work, it maybe the 
capacitor weakly, we need to replace the capacitor.

IS

ML

15 -

Содержание KCDW6010S

Страница 1: ...ocation 4 PCB 5 6 Inlet valve 7 9 Drain pump 10 11 Heater 12 13 Washing pump 14 15 Procedure 24 Error code 25 27 Water circuit 3 Pressure switch 16 NTC 17 18 Flowmeter 19 20 Safety Hose 21 22 Troubles...

Страница 2: ...e basic operation instructions please refer to the instruction manual attached with each unit Electrical supply 220 240V 50Hz Supply water pressure 0 04MPa 1 0MPa Supply water temperature below 60 2 M...

Страница 3: ...Water circuit scheme Water Circuit Function Description 3...

Страница 4: ...r Heat Proof Micro switch Dispenser Sump Water inlet Pressure switch 83 63 only for models whose water filling be controlled by pressure switch Pressure switch 140 120 Please Note Exploded view and pa...

Страница 5: ...o the door 2 The control panel will drop down and be free of the door But the wiring will still connected to the control panel S 08 1 2 on Off Access PCB 3 Disconnect the connector form PCB 4 Remove t...

Страница 6: ...of inlet valve RE Thermister ML Washing Pump PS Drain Pump D ED Dispenser EV1 Inlet valve EV2 Softener EV3 Halfload Valve ISS Salt detect ISB Rinse detect IAQS Overflow detect FM Flowmeter FAN Fan Not...

Страница 7: ...er enter into machine when it receive the order given by controller to air breaker connect to inlet water hose terminals electric coil inside The defeat point 1 The valve coil is broken so the valve c...

Страница 8: ...r valve 7 Reverse the above procedure to install 1 Open the control panel and take out the PCB 2 Unplug the CON3 and P4 wires then use the multi meter shelf to measure resistance between the blue wire...

Страница 9: ...board top panel left side panel and middle rear crosspiece 3 Check the valve filter if the valve filter is blocked we need clear the residues 4 If the valve filter is clear and the valve can t inlet w...

Страница 10: ...or will be very easy to start The defeat point 1 The motor coil is broken so the drain pump can t work It will cause the E2 E4 or E1 error 2 The magnetism of motor rotor is weak so drain pump cannot w...

Страница 11: ...bel and disconnect the two terminal lugs from the drain pump 4 Remove screws securing the drain pump to sump then remove drain pump 5 Reverse the above procedure to install Access drain pump Inspect d...

Страница 12: ...e heater cannot work It will cause the E3 error 3 The connector is loose so the heater cannot work It will cause the E3 error Heater Theory of parts Bottom View The work principle Technical data Locat...

Страница 13: ...arts Bottom View Access heater 1 Drain off the water in the dishwasher and disconnect the power supply Note Make sure to remove remained water in the dishwasher If not wet the floor 2 Remove bottom bo...

Страница 14: ...or will work It will cause E3 error 3 The connector is loose the wash pump can t work It will cause E3 error 4 The rotor is locked by residues so the wash pump can t work It will cause the E3 error 5...

Страница 15: ...a 31 0mm 6 Remove the clamp fastening interconnect hose to the lower nozzle 7 Remove the clamp fastening interconnect hose to heater 8 Remove the screw and disconnect the ground wire from the wash pum...

Страница 16: ...trol the level of water in appliances May also provide flood protection In our production the pressure switch is to control the water level in appliance like 83 63 serial May also provide flood protec...

Страница 17: ...e Temperature Coefficient Thermistor is integrated into sump which is used for measuring temperature of water in the tub Access Washing Pump 1 Remove bottom board 2 Remove two screws securing the NTC...

Страница 18: ...he RE connector shown in below picture then use the multi meter shelf to test resistance between two blue wire the normal resistance is shown in below table 3 I f the resistance is not correct it mean...

Страница 19: ...red in appliance it consists of impeller tongue tube and terminal etc When water pass through the flowmeter moving water can rotate magnetic impeller the tongue tube can sense the impeller s magnetic...

Страница 20: ...send sound In this case it means something wrong with flowmeter circuit We should check the connection first If the problem hasn t been solved by re connection we should replace the air breaker Acces...

Страница 21: ...r space between two layers the foaming material will expand and lock the hose In this situation the machine might set off E1 alarm Electronic Aquastop safety hose also has two layers But the differenc...

Страница 22: ...ce just as universal water inlet hose 1 Open the control panel and take out the PCB 2 Unplug the CON3 and P4 wires then use the multi meter shelf to measure resistance between the blue wire EV1 and wh...

Страница 23: ...ress 3 in 1 button to jump into next step except inlet valve step Note The way to activate test program is slightly different between different models How to activate Test Program In order to check th...

Страница 24: ...Pause for 15s Open inlet valve and feeds with 3 6L water The fan will work in this step Description Power on stand by Open inlet valve and feeds with 3 6L water Buzz one sound stop and stand by Dispen...

Страница 25: ...ain Rinse and Drying indicators would flash simultaneously Other error alarms can be deduced from this The corresponding relation between indicator and error code shown in above figure Notice the majo...

Страница 26: ...nd continue draining for 60 seconds For the models controlling water filling by pressure switch If the drain pump has been running for 4 minutes but the water level pressure switch hasn t reset E2 wou...

Страница 27: ...if the model with the pressure switch 83 63 drain pump would run till the pressure switch reset and continue draining for 60 seconds and all the other components will be stopped immediately At the sam...

Страница 28: ...till wrong Replace the Inlet Valve to solve problem Check whether the Pressure Switch 83 63 circuit is correct or not Make a check of Inlet Hose solve the problem Inlet Hose is blocked or kinked OK Fa...

Страница 29: ...of Drain Pump circuit and check again OK Still wrong Replace the Drain pump to solve problem Make a check of Drain Hose solve the problem Drain Hose is blocked or kinked OK Failure Failure When there...

Страница 30: ...he wire of Heater circuit and check again OK Still wrong Replace the Inlet Valve to solve problem Check whether the Washing Pump circuit is correct or not mentioned in section 4 Reconnect the wire of...

Страница 31: ...ollows Remove two side panels Remove the water from the bottom board and make sure there is no water at the bottom board Restart the dishwasher with a strong or standard wash program as a leakage coul...

Страница 32: ...ilure of thermistor Check whether the NTC circuit is correct or not mentioned in section 4 Reconnect the wire of Flowmeter circuit and check again Not solve the problem OK Replace the NTC to solve pro...

Страница 33: ...Troubleshooting 33...

Страница 34: ...Troubleshooting 34...

Страница 35: ...Troubleshooting 35...

Страница 36: ...Troubleshooting 36...

Страница 37: ...Troubleshooting 37...

Отзывы: