


60
ES
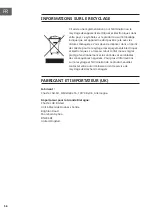
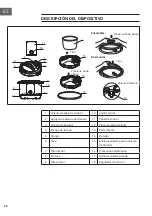
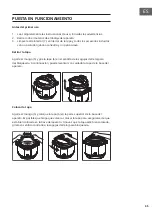
DESCRIPCIÓN DEL DISPOSITIVO
14
12
10
9
13
8
6
4
5
2
1
3
11
17
18
15
16
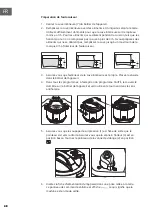
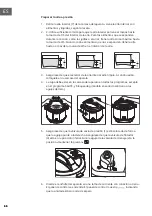
Pull
Press
Down
Pull
Assemble:
Press
Down
Disassemble:
Float Valve
1
Válvula de alivio de presión
10
Anillo central
2
Aguja de la válvula de drenaje
11
Panel de control
3
Válvula de flotador
12
Placa de calentamiento
4
Mango de la tapa
13
Parte inferior
5
Mango
14
Flotador
6
Tapa
15
Anillo de sellado para la válvula
de flotador
7
Olla interior
16
Protección antibloqueo
8
Carcasa
17
Anillo de sellado grande
9
Olla central
18
Regulador de control
Ensamblar:
Desmontar:
Tirar
Presione hacia abajo
Tirar
Válvula flotadora
Presione hacia
abajo


