background image

48

•  Non esporre il frigorifero alla luce diretta del sole e non collocarlo nelle vicinanze di fonti di calore come 

termosifoni, forni o fornelli. La luce diretta del sole può danneggiare il rivestimento esterno mentre le basse 
temperature possono influenzare negativamente le prestazioni del frigorifero.

•  Collocare il frigorifero in modo che la spina sia facilmente accessibile. 
•  Per evitare il surriscaldamento del dispositivo, il luogo di installazione deve essere ben arieggiato. Non ost-

ruire le fessure di areazione.

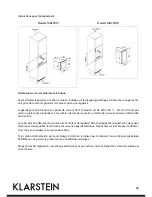
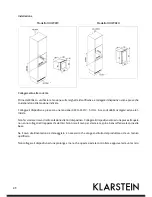
Indicazioni per incassare il frigorifero:

La guarnizione dello sportello del frigorifero sigilla quasi completamente il dispositivo. Pertanto è necessario 
che ci sia una fessura di aereazione nel mobile da incasso. L’aria calda deve fuoriuscire verso l’alto tramite un 
condotto di aereazione posto sulla parte posteriore del mobile da incasso. I canali di aereazione devono misu-
rare almeno 200 centimetri quadrati.

1.  Rimuovere la guarnizione dello sportello sul lato dove si intende installare l’impugnatura. Sono visibili due 

fori per l’installazione dell’impugnatura.

2. Fissare l’impugnatura utilizzando due viti, rondelle elastiche e rondelle.

IMPORTANTE

: affinché il dispositivo funzioni al meglio, non ostruire mai le fessure di areazione.

•  Conservare all’interno del frigorifero solo bottiglie sigillate.
•  Non sovraccaricare il frigorifero.
•  Aprire lo sportello il meno possibile.
•  Non coprire i ripiani con fogli in alluminio o simili affinché l’aria possa circolare.
•  In caso di inutilizzo del frigorifero, staccare la spina dalla presa, pulirlo e lasciare lo sportello aperto per evi-

tare la formazione di muffa. 

•  Se necessario, cambiare la guarnizione dello sportello.

Incassare il frigorifero

•  Il frigorifero può essere incassato in mobili da cucina dotati di piedi di appoggio regolabili e con una profon-

dità di 600 mm.

•  Non coprire l’apertura di aereazione sulla parte anteriore.
•  Non collocare il dispositivo in luoghi umidi. 

Содержание 10029819

Страница 1: ...10029819 10029820 Weink hlschrank...

Страница 2: ...N he von offenem Feuer Falls es besch digt wird k nnte ein Funke ber springen und das Ger t entz nden Falls das passiert ziehen sie umgehend den Stecker und l ften Sie den Raum in dem sich das Ger t...

Страница 3: ...wird die Gefahr einer Fehlfunktion des K hlsystems verringert Wischen Sie das Ger t innen mit lauwarmem Wasser und einem Lappen aus Die T r kann von links oder rechts ge ffnet werden Von Werk aus ist...

Страница 4: ...den Handgriff installieren wollen sie sehen zwei L cher zur Installation des Griffs 2 Befestigen Sie den Griff mit zwei Schrauben Federringe und Unterlegscheiben WICHTIG Um die einwandfreie Funktion d...

Страница 5: ...ziehen Sie einen Elektriker oder Ihren Stromanbieter zu Rate Das Kabel sollte sicher hinter dem Ger t verlaufen Schlie en Sie das Ger t nur an Steckdosen an an die keine weiteren Elektroger te angesch...

Страница 6: ...en 9 l sen Dre hen Sie sie um und setzen Sie sie auf der gegen berliegenden Seite ein Abbildung 2 5 Drehen Sie die Glast r um 180 und schie ben Sie den Scharnierstift 3 und 8 durch die obere 6 und unt...

Страница 7: ...sich die Temperatur mit jedem Tastendruck um 1 C F Wenn sie auf die RUNTER Taste dr cken verringert sich die Temperatur mit jedem Tastendruck um 1 C F Um sich die eingestellte Temperatur anzeigen zu l...

Страница 8: ...n sie auf die RUNTER Taste dr cken verringert sich die Temperatur mit jedem Tastendruck um 1 C F Um sich die eingestellte Temperatur anzeigen zu lassen dr cken Sie w hrend des Betriebs einmal auf die...

Страница 9: ...Sie zur Reinigung keine Scheuer oder L semittel Reinigen Sie die Regale mit einem feuchten Lappen und trocknen Sie sie danach mit einem Handtuch ab Falls Sie das Ger t erstmalig benutzen kann ein Geru...

Страница 10: ...mit einem weichen Lappen ab Urlaubszeit Falls Sie in einen Kurzurlaub gehen lassen Sie das Ger t in Betrieb sofern Sie nicht l nger als 3 Wochen weg sind Falls Sie l nger abwesend sind entnehmen Sie a...

Страница 11: ...ichtung dichtet nicht richtig Das Licht funktioniert nicht Das Ger t ist nicht eingesteckt Die Sicherung ist raus oder kaputt Die Birne ist kaputt Der Lichtschalter ist auf aus gestellt Vibrationen be...

Страница 12: ...scher Ger tschaften Richten Sie sich nach den rtlichen Regelungen und entsorgen Sie Altger te nicht ber den Hausm ll Durch die regelkonforme Entsorgung der Altger te werden Umwelt und die Gesundheit i...

Страница 13: ...oom in which the appliance is located for several minutes Notify Customer Service for necessary action and advice It is hazardous for anyone other than an Authorised Service Person to carry out servic...

Страница 14: ...lity of a malfunction in the cooling system caused by handling during transportation Clean the interior surface with lukewarm water using a soft cloth The door on this appliance can be opened from eit...

Страница 15: ...ls should measure at least 200 square centimeters in cross section 1 Remove the door gasket on the side you wish to install the handle you can see two designated holes for handle installation 2 Instal...

Страница 16: ...ance requires a standard 220 240 Volt AC 50Hz electrical ground outlet Have the wall outlet and circuit checked by a qualified electrician to make sure the outlet is properly grounded The cord should...

Страница 17: ...plate 7 into the door Make sure that the spacers which the hinge pins sit on are correctly positioned 6 Leveling the door by adjusting the screws that are used to fix the top hinge plate and lower hin...

Страница 18: ...12 C 54 F The temperature will increase 1 C 1 F if you press the UP button once or the temperature will decrease 1 C 1 F if you press the DOWN button once To view the set temperature at any time press...

Страница 19: ...d temperature for the LOWER ZONE The temperature will increase 1 C or 1 F if you touch the UP mark once or the temperature will decrease 1 C or 1 F if you touch the DOWN mark once To view the set temp...

Страница 20: ...g Do not use solvents or abrasive products Clean the shelves with a gentle detergent then dry with a soft dry cloth At the moment of the first use some odours can persist In this case make functioning...

Страница 21: ...e cabinet with warm water and mild liquid detergent Rinse well and wipe dry with a clean soft cloth Vacation Time Short holidays Leave the Wine Cooler in operation for holidays of less than three week...

Страница 22: ...rectly The door gasket does not seal properly The light does not work Not plugged in The circuit breaker tripped or a blown fuse The bulb is out of order The light button is OFF Vibrations Check to as...

Страница 23: ...ct is disposed of correctly you will help prevent potential negative consequences for the environment and human health which could otherwise be caused by inappropriate waste handling of this product F...

Страница 24: ...y da ar sus ojos No coloque el aparato cerca de fuentes de ignici n En caso de da os podr a generarse una chispa y el apa rato podr a entrar en combusti n En ese caso desconecte el enchufe inmediatame...

Страница 25: ...el riesgo de un fallo en el funcionamiento del sistema de refrigeraci n Limpie el aparato con agua tibia y un pa o La puerta puede abrirse desde la izquierda o desde la derecha La puerta est instalad...

Страница 26: ...etros en secci n transversal 1 Retire la junta de la puerta del lado en que desea instalar el asa ver dos agujeros para atornillar el asa 2 Fije el asa con dos tornillos arandelas grower y arandelas I...

Страница 27: ...exiones cumplan con estos requisitos contacte con un electricista o con su proveedor el ctrico El cable debe colocarse tras el aparato Conecte el aparato solamente a tomas de corriente en donde no se...

Страница 28: ...llos 9 G rela y col quela en el lado contrario Ilustraci n 2 5 Gire la puerta de cristal 180 y deslice la sujeci n de la bisagra 3 y 8 sobre las pla cas superior 6 e inferior 7 en la puerta Aseg rese...

Страница 29: ...1 C F cada vez que pulse el bot n Si pulsa el bot n ABAJO la temperatura descender 1 C F cada vez que pulse el bot n Para mostrar la temperatura seleccionada pulse una vez ARRIBA o ABAJO durante el fu...

Страница 30: ...tura seleccionada pulse una vez ARRIBA o ABAJO durante el funcionamiento de la vinoteca La temperatura seleccionada parpadea durante 5 segundos en el display Pulse el bot n SET para mostrar la tempera...

Страница 31: ...ductos abrasivos ni disolventes para limpiar el aparato Limpie las baldas con un pa o h medo y s quelas con un pa o Si utiliza el aparato por primera vez es posible que se generen olores Seleccione la...

Страница 32: ...pa o suave Ausencia prolongada Si va a ausentarse de su vivienda puede dejar el aparato en marcha siempre que este periodo no exceda las tres semanas Si se ausenta por un periodo superior retire toda...

Страница 33: ...sella correctamente La luz no funciona El aparato no est enchufado El fusible se ha extra do o est averiado La bombilla se ha fundido El interruptor est en la posici n off Vibraciones Compruebe si el...

Страница 34: ...lectr nicos Respete las leyes territoriales y no arroje aparatos viejos al cubo de la basura dom stica Una retirada de aparatos con forme a las leyes contribuye a proteger el medio ambiente y a las pe...

Страница 35: ...pas installer l appareil proximit d un feu S il est endommag des flamm ches peuvent s chapper et l enflammer en l atteignant Si tel est le cas d brancher imm diatement l appareil et ventiler la pi ce...

Страница 36: ...s risques de dysfonctionnement du syst me de r frig ration Nettoyer l int rieur de l appareil avec de l eau ti de et une ponge Il est possible d ouvrir la porte de la gauche ou de la droite Par d faut...

Страница 37: ...ueur 1 Enlever la jointure de porte sur le c t o l on veut installer la poign e les deux trous visibles servent l installation de la poign e 2 Fixer la poign e avec deux vis des rondelles lastiques et...

Страница 38: ...es demander conseil un lectricien ou au fournisseur d lectricit du domicile Le c ble doit tre d roul convenablement l arri re de l appareil Brancher l appareil uniquement des prises lectriques sur les...

Страница 39: ...n 2 5 Retourne la porte en verre 180 et int roduire les goupilles de charni re 3 et 8 dans les plaques d articulation du haut 6 et du bas 7 puis dans la porte S assurer que les pi ces d cartement sur...

Страница 40: ...ur augmenter la temp rature par paliers de 1 C F Appuyer sur la touche BAS pour diminuer la temp rature par paliers de 1 C F Pour afficher la temp rature s lectionn e appuyer simultan ment sur les tou...

Страница 41: ...ur diminuer la temp rature par paliers de 1 C F Pour afficher la temp rature s lectionn e appuyer simultan ment sur les touches HAUT et BAS pendant le fonctionnement de l appareil La temp rature s lec...

Страница 42: ...brasif ou de solvant pour le nettoyage Nettoyer les tag res avec une ponge humide puis s cher avec un chiffon Lors de la premi re utilisation de l appareil une odeur est susceptible de se d gager S le...

Страница 43: ...c une ponge douce Pendant les vacances En cas de d part en vacances laisser l appareil fonctionner si le temps d absence n exc de pas 3 semaines En cas d absence plus longue sortir toutes les bouteill...

Страница 44: ...ffisamment herm tique L clairage ne fonctionne pas L appareil n est pas branch Le disjoncteur a saut L ampoule est grill e L interrupteur pour l clairage est sur la position teinte Vibrations V rifier...

Страница 45: ...s par e des appareils lectriques et lectroniques Respectez les et ne jetez pas les ap pareils usag s avec les ordures m nag res La mise au rebut correcte du produit usag per met de pr server l enviro...

Страница 46: ...dere fuoco e causare danni agli occhi Non collocare il dispositivo vicino a fiamme vive Se il dispositivo danneggiato potrebbe prendere fuoco Se ci accade staccare immediatamente la spina dalla presa...

Страница 47: ...e per 2 ore prima di metterlo in funzione In questo modo si riduce il rischio di un malfunzionamento del sistema refrigerante Lavare la parte interna del dispositivo con acqua saponata Utilizzare un p...

Страница 48: ...i di aereazione devono misu rare almeno 200 centimetri quadrati 1 Rimuovere la guarnizione dello sportello sul lato dove si intende installare l impugnatura Sono visibili due fori per l installazione...

Страница 49: ...so di dubbi rivolgersi ad un elet tricista Non far scorrere il cavo di alimentazione dietro il dispositivo Collegare il dispositivo solo ad una presa alla quale non sono collegati altri apparecchi ele...

Страница 50: ...opposto Figura 2 5 Ruotare lo sportello di 180 e inserire i per ni del cardine 3 e 8 attraverso la piastri na superiore e inferiore del cardine 6 e 7 Assicurarsi che i distanziatori sui quali sono col...

Страница 51: ...menta ad ogni pressione di tasto di 1 C F Se si preme il tasto GIU la temperatura diminuisce di 1 C F Per visualizzare la temperatura impostata premere una volta il tasto SU oppure GIU mentre il dispo...

Страница 52: ...to SU si aumenta la temperatura di 1 C 1 F ad ogni pressione di tasto Premendo il tasto GIU si diminuisce la temperatura di 1 C 1 F ad ogni pressione di tasto Per visualizzare la temperatura impostata...

Страница 53: ...are abrasivi o solventi Lavare i ripiani con un panno umido e asciugarli con cura Al primo utilizzo possibile si sentano degli odori insoliti Per eliminare gli odori impostare una temperatura pi bassa...

Страница 54: ...un panno morbido In caso di assenza In caso di assenza inferiore alle 3 settimane lasciare il dispositivo in funzione In caso di assenza superiore alle 3 settimane rimuovere tutte le bottiglie spegner...

Страница 55: ...nizione dello sportello non sigilla correttamente La luce non funziona Il dispositivo non collegato alla corrente Il fusibile rotto oppure saltato l interruttore automatico La lampadina guasta L inter...

Страница 56: ...ositivi elettrici ed elettronici Non smaltire i vecchi dispositivi con i rifiuti domestici Grazie al corretto smaltimento dei vecchi dispositivi si proteggono il pianeta e la salute delle per sone da...

Отзывы: