background image

31

Table of content

Overview

EN

1.  Product overview
2.  Cooking with induction
3.  Before using your new hob
4.  Using the Touch controls
5.  Choosing the right cookware 

5.1 Measurements

6.  Using the induction hob 

6.1 Start cooking 

6.2 After cooking


6.3 The booster function 

7.  Using the timer 

7.1 Setting the timer to turn one or more  

       cooking zones off


7.2 The „Anti-Forget“ feature

8.  Locking the controls
9.  Cooking guidelines
10. Heat settings
11. Care & Cleaning
12. Hints and Tipps
13. 

Technical Specification

14. Installation
15. Connecting the hob to the mains power supply

6
7
7
7


14 


17
18
18
19
20
21
21
24

Содержание IND7705FZ

Страница 1: ...Bedienungsanleitung für Ihr SUPERKERAMIK Induktionskochfeld Version 2 0 170629 EN DE Modell IND7705FZ IND7705FZ ED ...

Страница 2: ...feldoberfläche nicht berühren Um Gefahren zu vermeiden las sen Sie den Herd nie eingeschal tet wenn nicht gekocht wird Luftdichtverschlossene Gerichte wie fertige Dosengerichte sollten Sie nicht auf der Herdplatte erwärmen Dies könnte zu einer Explosion führen Falls das Anschlusskabel defekt ist unterbrechen Sie unverzüg lich die Nutzung des Geräts Der Austausch des Kabels hat ausschließlich durch...

Страница 3: ... etc zerkratzt wird Verwenden Sie daher nur Töpfe und Pfannen mit ebenem Boden die keine Ränder und Grate auf weisen Beachten Sie die Hinweise zur Pflege und Reinigung der Glas keramik Bei unsachgemäßer Behandlung übernehmen wir keine Haftung Falls Zucker oder zuckerhaltige Speisen auf das Kochfeld gelan gen müssen diese sofort mög lichst noch in heißem Zustand entfernt werden damit keine chemisch...

Страница 4: ...ewahren Sie diese Anlei tung für die Zukunft zum Nachlesen auf Personen mit Herzschrittmacher sollten vor Nutzung von Indukti onskochfeldern einen Facharzt konsultieren um zu klären ob der Herzschrittmacher für Induktion freigegeben ist Bedienungsanleitung Induktionskochfeld Modell IND7705FZ IND7705FZ ED Version 2 0 Warnung Bitte beachten Sie dass wir unsere Handbuchdokumentationen stetig aktualis...

Страница 5: ...nktion 7 Verwendung des Timers 7 1 Einstellung des Timers um eine oder mehrere Kochzonen auszuschalten 7 2 Aktivieren der Anti Vergessen Funktion 8 Tastensperre und Kindersicherung 9 Richtlinien für das Kochen 10 Heizstufen 11 Pflege und Reinigung 12 Tipps und Tricks 13 Technische Daten 14 Installation 15 Kochfeld an das Stromnetz anschließen 16 Gewährleistung 6 7 7 7 8 9 14 17 18 18 19 20 21 21 2...

Страница 6: ...d Draufsicht Auswahlsteuerung der Kochzonen Booster aktivieren Flex Zone aktivieren Timer aktivieren deaktivieren Tastensperre Kindersicherung Bedienfeld zum Ein und Ausschalten Bedienfeld zur Regulierung der Leistung und Timerzeit Slider 1 2 3 4 5 ...

Страница 7: ...me direkt in der Pfanne nicht indirekt durch Er hitzen der Glasoberfläche Die Bedienelemente reagieren auf Be rührung so dass Sie keinen größeren Druck auszuüben brauchen Benutzen Sie den Fingerballen nicht die Kuppe s Abb rechts Jedes mal wenn eine Berührung registriert wird ertönt ein Sig nalton Achten Sie darauf dass die Kontrollfelder immer sauber und trocken sind und kein Objekt z B ein Gefäß...

Страница 8: ...ol für Induktions eignung Als Merkformel gilt Magnetisches Kochge schirr ist auch für Induktion geeignet Stellen Sie sicher dass der Boden Ihres Kochgeschirrs glatt ist flach auf dem Glas sitzt und die gleiche Größe wie die Kochzone hat Zentrieren Sie das Geschirr immer auf der Kochzone Heben Sie das Geschirr immer von dem Kochfeld Rutschen bzw schieben Sie es nicht hin und her Das Glas könnte dad...

Страница 9: ...rücken Sie die ON OFF Taste Nach dem Einschalten ertönt ein Piep Signal die Timer Anzeige 00 und die Kochzonen Auswahltasten zeigen oder oder was bedeutet dass das Kochfeld nun im Standby Modus ist 2 Stellen Sie ein geeignetes Geschirr auf die zu verwendende Kochzone Stellen Sie sicher dass die Oberfläche der Kochzone und der Boden des Geschirrs sauber und trocken sind 6 Benutzung Ihres Kochfeldes...

Страница 10: ...htet kann dies folgendes bedeuten mehr Leistung weniger Leistung 3 Berühren Sie die jeweilige Auswahlsteuerung um das ge wünschte Kochfeld einzuschalten Eine digitale Anzeige im Touch Feld wird aufleuchten Sie haben das Kochgeschirr nicht auf der ausgewählten Kochfläche platziert Sie verwenden kein für die Induktionsnutzung geeignetes Kochgeschirr Sie haben das Kochgeschirr nicht in der Mitte der ...

Страница 11: ...ung schaltet auf das Maximum um Aktivieren der Boostfunktion Abbrechen der Boost Funktion 3 Schalten Sie das Kochfeld durch Berühren des Ein und Ausschalt Bedienfeldes ab 2 Schalten Sie die Kochzone ab indem Sie den Slider auf 0 schieben Alternativ können Sie auch direkt auf die Nullstellung tippen Stellen Sie sicher dass das Display 0 anzeigt 6 2 Nach dem Kochen 6 3 Die Booster Funktion 4 Warnung...

Страница 12: ...tungsverteilungstechnischen Gründen in drei Gruppen unter teilt Beide Zonen einer gleichen Gruppe gilt für Gruppe a und b mit dem Booster zu betreiben ist von daher nicht möglich Hier schaltet das Kochfeld automatisch in die maximal höchste Kochstufe Netz Sicherheitsbeschränkungen der Boost Funktion ...

Страница 13: ...lex Zonen Piktogramm 6 5 Verwenden als große Zone Flex Zone oder einzeln Die obere und untere linke Kochzone können sowohl als eine große Kochzone oder zwei separate Kochzonen betrieben werden Eine Flex Zone besteht aus zwei Flächeninduktions Zonen die zusammen geschaltet werden können Wenn die Kochzone als Einzelzone betrieben wird so schaltet sich die zweite Induktionszone nach einer Minute wied...

Страница 14: ...chneller bearbeiten möchten langes Betätigen der Tasten führt zur Änderung in 10er Schritten 7 1 Einstellung des Timers um eine oder mehrere Kochzonen auszuschalten Einstellen des Timers auf einer Kochzone 1 Wählen Sie zunächst die Kochzone aus bei der Sie den Timer aktivieren wollen Berühren des Kochzonen Kontrollfeldes 3 Stellen Sie die Zeit mit den Plus und Minustasten ein 2 Betätigen Sie die T...

Страница 15: ...imer bleiben weiterhin in Betrieb 7 Wenn die Zeit abgelaufen ist wird die Kochzonenanzeige 00 abbilden und die ausgewählte Kochzone automatisch ausschalten Einstellen des Timers auf mehreren Kochzonen 1 Wenn bei mehreren Kochzonen der Timer aktiviert wird ist immer die Kochzone zurn Programmierung bereit bei der die rote Kontrolleucht blinkt Beispiel 2 Sobald der Countdown abgelaufen ist wird die ...

Страница 16: ...eßend wird das Zeitdisplay blinken und PU Pause Unit zeigen Wenn diese Funktion gesetzt ist wird das Kochfeld nach 10 Minuten automatisch in den Pause Modus geschaltet Alle Kochzonen befin den sich danach im Stand By Betrieb Kochzonendisplay blinkt Um den Betrieb fortzusetzen drücken Sie die jew Kochzone Danach wird sie im nächsten 10 Min Countdown Modus laufen Um die Anti Vergessen Funktion zu be...

Страница 17: ...auter Temperatursensor die Temperatur im Inneren des Kochfeldes Sollte eine zu hohe Temperatur erreicht werden schaltet sich das Kochfeld automatisch ab Magnetüberwachung Sollten kleine nicht konforme oder nicht magnetische Ge genstände auf der Kochfläche abgelegt werden schaltet sich das Kochfeld automatisch nach einer Minute ab Das Kochfeld bleibt noch für eine Minute aktiv Auto Abschaltung Ein ...

Страница 18: ... und sparen Energie durch Beibehaltung der Hitze Verringern Sie die Menge von Flüssigkeit oder Fett um die Kochzeit zu verkürzen Beginnen Sie das Kochen mit hoher Leistung und schalten Sie anschließend herunter wenn die Speise erhitzt ist Heizstufe Eignung 1 2 Leichte Erwärmung kleinerer Mengen Lebensmittel Schmelzen von Schokolade Butte und leicht brennbaren Lebensmitteln Schonendes Garen Langsam...

Страница 19: ...mme einige Nylonschwämme und raue Scheuermittel zerkratzen das Glas Lesen Sie immer das Etikett um zu überprüfen ob Ihr Reiniger sich dafür eignet Lassen Sie niemals Reini gungsrückstände auf dem Kochfeld Das Glas könnte beizen Überkochen Schmelzen ausgelaufene Flüssigkeiten auf dem Glas Entfernen Sie diese sofort mit einem Pfannenwender Spachtel oder Schaber für Glaskeramik Kochfelder aber Vorsic...

Страница 20: ...hfeld wieder einschalten 13 Tipps und Tricks Die oben genannten Maßnahmen sind ein Auszug aus möglichen Ursachen Nehmen Sie nie selbstständig Veränderungen vor oder demontieren Sie das Feld um Verletzungen oder Unfällen vorzu beugen Fehlercode Mögliche Ursachen Mögliche Lösung F3 F4 Fehler des Temperaturfühlers Bitte Ihren Händler KKT KOLBE Kundenservice kontaktieren F9 FA Temperatursensor des IGB...

Страница 21: ...n behalten wir uns vor Spezifikationen und Design ohne vorherige Ankündigung zu ändern Schneiden Sie die Arbeitsfläche nach den Größen wie in der Zeich nung dargestellt zu Für die Zwecke der Installation und Verwendung müssen mindestens 5 cm Platz um das Loch bewahrt werden Die Dicke der Arbeitsfläche muss mindestens 30mm betragen Bit te wählen Sie hitzebeständiges Arbeitsflächenmaterial um größer...

Страница 22: ...t nicht blockiert sind Stellen Sie optimale Bedingungen für die Arbeit mit dem Kochfeld her siehe nachfolgende Abb Die Arbeitsplatte ist eben und horizontal und es ragt nichts in den Arbeitsraum hinein Der Untergrund Arbeitsplatte besteht aus einem hitzebestädigen Material Falls über einem Ofen installiert muß der Ofen über einen eigenen Lüfter verfügen A mm B mm C mm D E 760 50 min 20 min Luftans...

Страница 23: ...ld sollte bestenfalls durch einen Fachmann instal liert werden Das Glaskeramikkochfeld sollte nicht auf Kühlanlagen Geschirrspülern oder Trommeltrocknern installiert werden Das Glaskeramikkochfeld ist so einzubauen dass eine bessere Wärme abstrahlung gewährleistet werden kann um seine Zuverlässigkeit zu verbessern Die Wand und Heizzone oberhalb der Arbeitsfläche sollte hitzebeständig sein Hitzebes...

Страница 24: ...n Das Kabel muss regelmäßig überprüft werden Es darf nur durch einen Fachmann bzw eine qualifizierte Person ersetzt werden Bedeutung des Symbols Mülltonne Schonen Sie unsere Umwelt Elektrogeräte gehören nicht in den Hausmüll Nutzen Sie die für die Entsorgung von Elektrogeräten vorgesehenen Sammelstellen und geben dort Ihre Elektrogeräte ab die Sie nicht mehr benutzen werden Sie helfen damit die po...

Страница 25: ...e Teile gehen in unser Eigentum über 4 Über Ort Art und Umfang der durchzuführenden Reparatur oder über einen Austausch des Gerätes ent scheidet KKT KOLBE nach Ermessen Soweit nicht anders vereinbart ist unsere Kundendienstzentrale zu benachrichtigen Die Reparatur wird in der Regel am Aufstellungsort ausnahmsweise in der Kundendienst werkstatt durchgeführt Zur Reparatur anstehende Geräte sind so z...

Страница 26: ...Vielen Dank fürs Lesen Wir wünschen Ihnen viel Spaß beim Kochen Thanks for reading We wish you much fun while cooking ...

Страница 27: ...27 Instruction and Installation Manual for your SUPERKERAMIK induction hob Version 2 0 170629 EN Model IND7705FZ IND7705FZ ED ...

Страница 28: ... should be connected to a circuit which incorporates an isolating switch providing full disconnection from the power supply Failure to install the appliance correctly could invalidate any warranty or liability claims Operation and maintenance Electrical Shock Hazard Do not cook on a broken or cracked cooktop If the cooktop surface should break or crack switch the appliance off immediately at the m...

Страница 29: ... Induction glass surface as this can scratch the glass Do not use scourers or any other harsh abrasive cleaning agents to clean your cooktop as these can scratch the Induc tion glass If the power supply cable is damaged it must only be replaced by a qualified technician This appliance is intended to be used in household and similar applications such as staff kitchen areas in shops offices and othe...

Страница 30: ...ation Manual in order to fully understand how to install correctly and operate it For installation please read the installation section Read all the safety instructions carefully before use and keep this Instruction Installation Manual for future reference People with a heart pace maker should consult a doctor before using this unit Caution ...

Страница 31: ...n hob 6 1 Start cooking 6 2 After cooking 6 3 The booster function 7 Using the timer 7 1 Setting the timer to turn one or more cooking zones off 7 2 The Anti Forget feature 8 Locking the controls 9 Cooking guidelines 10 Heat settings 11 Care Cleaning 12 Hints and Tipps 13 Technical Specification 14 Installation 15 Connecting the hob to the mains power supply 6 7 7 7 8 9 14 17 18 18 19 20 21 21 24 ...

Страница 32: ...trol Panel Top view Selection control of cooking zones Activate Booster Activate Flex Zone Activate Deactivate Timer Child lock Control panel for switching on and off Slider for adjusting the heating intensity time 1 2 3 4 5 ...

Страница 33: ...eventually warms it up Read this guide taking special note of the Safety War nings section Remove any protective film that may still be on your ceramic hob The controls respond to touch so you don t need to apply any pressure Use the ball of your finger not its tip You will hear a beep each time a touch is registered Make sure the controls are always clean dry and that there is no object e g a ute...

Страница 34: ...ookware with a base suitable for induc tion cooking Look for the induction symbol on the packaging or on the bottom of the pan 5 1 Pan dimensions The cooking zones are up to a limit automatically adapted to the diameter of the pan Howe ver the bottom of this pan must have a minimum of diameter according to the corresponding cooking zone To obtain the best efficiency of your hob please place the pa...

Страница 35: ...e slide control power up power down 1 Touch the ON OFF control After power on the buzzer beeps once timer control shows 00 heating zone selection controls show or or indicating that the induction hob has entered the state of standby mode 2 Place a suitable pan on the cooking zone that you wish to use Make sure the bottom of the pan and the surface Of the cooking zone are clean and dry 3 Touching t...

Страница 36: ...ly centred on the cooking zone No heating takes place unless there is a suitable pan on the cooking zone The display will automatically turn off after 1 minute if no suitable pan is placed on it 1 Touching the heating zone selection control that you wish to switch off 3 Turn the whole cooktop off by touching the ON OFF control 2 Turn the cooking zone off by touching the slider to the left Make sur...

Страница 37: ...ctivate the boost function Cancel the boost function 6 3 The booster function 4 Beware of hot surfaces An H appears on the display which means that the button is too hot to touch It will disappear when the surface has cooled down to a safe temperature It can also be used as an energy saving function if you want to heat further pans use the hot plate which is still hot EN Important note about the b...

Страница 38: ... hob is divided into three groups of power distribution technical reasons Boosting both zones in one group for group a and b at the same time is not possibe due to this reason Here the appliance switches automatically to the hightest possible power level Safety restrictions for the boost function ...

Страница 39: ...ible area is made of two independent inductors that can be controlled separately When working as a single zone a cookware is moved from one zone to the other one within the flexible area keeping the same power level of the zone where the cookware originally was placed and the part that is not covered by cookwa re is automatically switched off Important Make sure to place the cookwares centered on ...

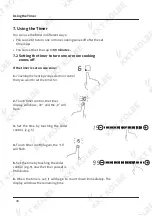
Страница 40: ...ng the slider control e g 9 now the timer you set is 95 minutes 6 When the time is set it will begin to count down immediately The display will show the remaining time 7 2 Setting the timer to turn one or more cooking zones off If the timer is set on one zone 1 Touching the heating zone selection control that you want to set the timer for 3 Set the time by touching the slider control e g 5 2 Touch...

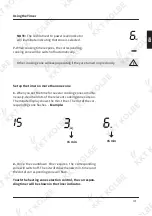
Страница 41: ... on more than one zone 1 When you set the time for several cooking zones simulta neously decimal dots of the relevant cooking zones are on The minute display shows the min timer The dot of the cor responding zone flashes Example 2 Once the countdown timer expires the corresponding zone will switch off Then it will show the new min timer and the dot of corresponding zone will flash Touch the heatin...

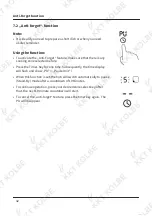
Страница 42: ...ress the Timer Key for one time Subsequently the time display will flash and show PU Pause Unit When this function is set the hob will switch automatically to pause Stand By mode after a countdown of 10 Minutes To continue operation press your desired zone select key After that the next 10 minute countdown will start To cancel the anti forget feature press the timer key again The PU will disappear...

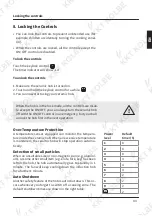
Страница 43: ...ature is monitored the ceramic hob will stop operation automa tically Detection of small particles When an unsuitable size or non magnetic pan e g alumini um or some other small item e g knife fork key has been left on the hob the hob automatically goes to standby in 1 minute The fan will keep cooling down the induction hob for a further 1 minute Auto Shutdown Another safety feature of the hob is ...

Страница 44: ...ing times and save energy by retaining the heat Minimise the amount of liquid or fat to reduce cooking times Start cooking on a high setting and reduce the setting when the food has heated through Heat setting Suitability 1 2 delicate warming for small amounts of food melting chocolate butter and foods that burn quickly gentle simmering slow warming 3 4 reheating rapid simmering cooking rice 5 6 p...

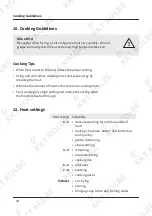
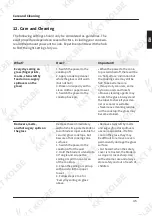
Страница 45: ...aning agents may scratch the glass Always read the label to check if your clea ner or scourer is suitable Never leave cleaning residue on the cooktop the glass may become stained Boilovers melts and hot sugary spills on the glass Remove these immediately with a fish slice palette knife or razor blade scraper suitable for ceramic glass cooktops but beware of hot cooking zone surfaces 1 Switch the p...

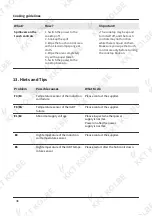
Страница 46: ... them Make sure you wipe the touch control area dry before turning the cooktop back on 13 Hints and Tips Problem Possible causes What to do F3 F4 Temperature sensor of the induction coil failure Please contact the supplier F9 FA Temperature sensor of the IGBT failure Please contact the supplier E1 E2 Abnormal supply voltage Please inspect whether power supply is normal Power on after the power sup...

Страница 47: ...e to improve our products we may change specifications and designs without prior notice Cut out the work surface according to the sizes shown in the drawing For the purpose of installation and use a minimum of 50mm space shall be preserved around the hole Be sure the thickness of the work surface is at least 30mm Please select heat resistant work surface material to avoid larger deforma tion cause...

Страница 48: ... 5mm The work surface is square and level and no structural members interfere with space requirements The work surface is made of a heat resistant material If the hob is installed above an oven the oven has a built in cooling fan The installation will comply with all clearance requirements and applicable standards and regulations A suitable isolating switch providing full disconnection from the ma...

Страница 49: ...vide a 3 mm air gap contact separation in all poles or in all active phase conductors if the local wiring rules allow for this variation of the requirements The isolating switch will be easily accessible to the customer with the hob ins talled You consult local building authorities and by laws if in doubt regarding installa tion You use heat resistant and easy to clean finishes such as ceramic til...

Страница 50: ...out alterations Any alterations must only be made by a qualified electrician The power supply should be connected in compliance with the relevant stan dard or a single pole circuit breaker the method of connection is shown below If the cable is damaged or needs replacing this should be done by an after sales technici an using the proper tools so as to avoid any accidents If the appliance is being ...

Страница 51: ...tion point for the recycling of electrical and electronic goods This appliance requires specialist waste disposal For further information regarding the treatment recover and recycling of this product please contact your local council your household waste disposal service or the shop where you purchased it For more detailed information about treatment recovery and recycling of this product please c...

Страница 52: ...Version 2 0 170629 Vielen Dank fürs Lesen Wir wünschen Ihnen viel Spaß beim Kochen Thanks for reading We wish you much fun while cooking ...

Отзывы: