background image

4

INSTALLATION INSTRUCTIONS

Unpack the Ice Maker

Removing Packaging Materials

Remove tape and glue from your ice maker before using.

To remove any remaining tape or glue from the exterior of the 
ice maker, rub the area briskly with your thumb. Tape or glue 
residue can also be easily removed by rubbing a small 
amount of liquid dish soap over the adhesive with your 
fingers. Wipe with warm water and dry.

Do not use sharp instruments, rubbing alcohol, flammable 
fluids, or abrasive cleaners to remove tape or glue. Do not 
use chlorine bleach on the stainless steel surfaces of the ice 
maker. These products can damage the surface of your ice 
maker. 

Cleaning Before Use

After you remove all of the packaging materials, clean the inside 
of your ice maker before using it. See the cleaning instructions in 
the “Ice Maker Care” section.

Location Requirements

To ensure proper ventilation for your ice maker, the front side 
must be completely unobstructed. The ice maker may be 
closed-in on the top and three sides, but the installation 
should allow the ice maker to be pulled forward for servicing 
if necessary.

Installation of the ice maker requires a cold water supply inlet 
of 

¹⁄₄

" (6.35 mm) OD soft copper tubing with a shutoff valve 

and either a gravity-drain system or condensate pump to 
carry the water to an existing drain.

Choose a well ventilated area with temperatures above 55°F 
(13°C) and below 100°F (38°C). Best results are obtained 
between 70°F (21°C) and 90°F (32°C).

This ice maker must be installed in an area sheltered from the 
elements, such as wind, rain, water spray or drips.

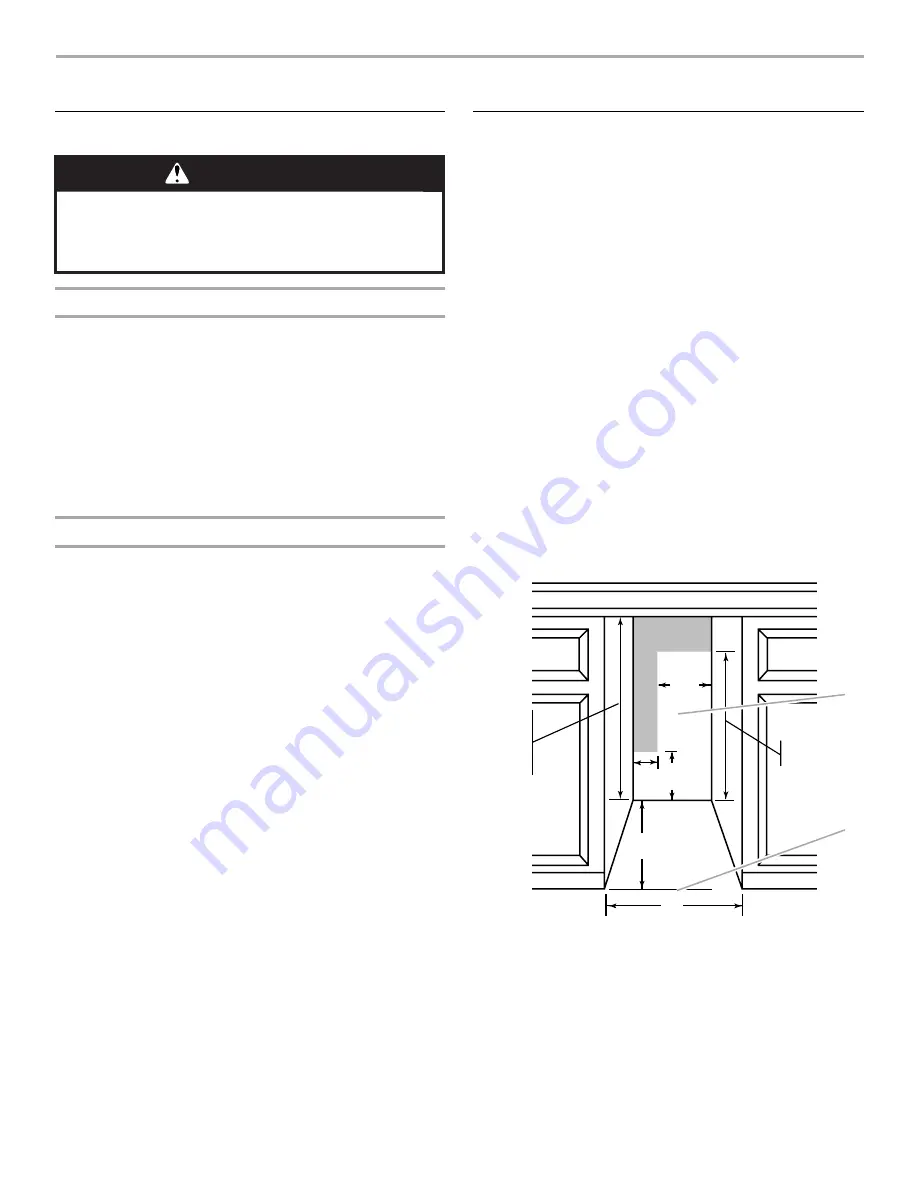
When installing the ice maker under a counter, follow the 
recommended opening dimensions shown. Place electrical 
and plumbing fixtures in the recommended location as 
shown.

NOTES: 

Be sure the power supply cord is not pinched between 
the ice maker and the cabinet.

Be sure the water supply line is not pinched between the 
ice maker and the cabinet. 

Be sure the drain line (on some models) is not pinched 
between the ice maker and the cabinet.

Choose a location where the floor is even. It is important for 
the ice maker to be level in order to work properly. If needed, 
you can adjust the height of the ice maker by changing the 
height of the leveling legs. See the “Leveling” section.

WARNING

Excessive Weight Hazard

Use two or more people to move and install ice maker.

Failure to do so can result in back or other injury.

A. Recommended location for 

electrical and plumbing fixtures 

B. Floor level

14

¹⁄₂

"

(36.8 cm)

18"

(45.7 cm)

24"

(60.1 cm)

9"
(22.9 cm)

28

¹⁄₂

"

(72.4 cm)

34"

(86.4 cm)

Min.

34

¹⁄₂

"

(87.6 cm)

Max.

3

¹⁄₂

"

(8.9 cm)

B

A

Содержание KUIC18PNTS

Страница 1: ...w kitchenaid com In Canada for assistance installation and service call 1 800 807 6777 or visit our website at www KitchenAid ca MACHINE ÀGLAÇONS Guided utilisationetd entretien Au Canada pour assistance installation ou service composez le 1 800 807 6777 ou visitez notre site Web à www KitchenAid ca Table of Contents Table des matières 2 W10206425A ...

Страница 2: ...BLE DES MATIÈRES SÉCURITÉ DE LA MACHINE À GLAÇONS 17 INSTRUCTIONS D INSTALLATION 18 Déballage de la machine à glaçons 18 Emplacement d installation 18 Spécifications électriques 19 Spécifications de l alimentation en eau 19 Nivellement 19 Raccordement à la canalisation d eau 20 Raccordement au conduit d évacuation 21 Sons normaux 22 UTILISATION DE LA MACHINE À GLAÇONS 23 Fonctionnement de la machi...

Страница 3: ...safety alert symbol This symbol alerts you to potential hazards that can kill or hurt you and others All safety messages will follow the safety alert symbol and either the word DANGER or WARNING These words mean follow instructions instructions DANGER WARNING IMPORTANT SAFETY INSTRUCTIONS WARNING To reduce the risk of fire electric shock or injury when using your ice maker follow these basic preca...

Страница 4: ... soft copper tubing with a shutoff valve and either a gravity drain system or condensate pump to carry the water to an existing drain Choose a well ventilated area with temperatures above 55 F 13 C and below 100 F 38 C Best results are obtained between 70 F 21 C and 90 F 32 C This ice maker must be installed in an area sheltered from the elements such as wind rain water spray or drips When install...

Страница 5: ... osmosis system is desired only a whole house capacity reverse osmosis system capable of maintaining the steady water supply required by the ice maker is recommended Faucet capacity reverse osmosis systems are not able to maintain the steady water supply required by the ice maker If the water pressure to the reverse osmosis system is less than 40 to 60 psi 276 to 414 kPa Check to see whether the s...

Страница 6: ...ut onto outlet end with adjustable wrench Do not overtighten 4 Place the free end of the tubing into a container or sink and turn on main water supply and flush out tubing until water is clear Turn off shutoff valve on the water pipe NOTE Always drain the water line before making the final connection to the inlet of the water valve to avoid possible water valve malfunction 5 Bend the copper tubing...

Страница 7: ...rain hose becomes twisted and water cannot drain your ice maker will not work Connecting the Drain After ensuring that the drain system is adequate follow these steps to properly place the ice maker 1 Plug into a grounded 3 prong outlet 2 Style 1 For gravity drain system push the ice maker into position so that the ice maker drain tube is positioned over the PVC drain reducer Style 2 For drain pum...

Страница 8: ...ks When you first start your ice maker the water pan will fill and the system will rinse itself before starting to make ice The rinsing process takes about 5 minutes Under normal operating conditions the ice maker will cycle at preset temperatures The ice level sensor located in the ice storage bin will monitor the ice levels IMPORTANT If the water supply to the ice maker is turned off be sure to ...

Страница 9: ...and mild soap or detergent Wipe and dry Regular use of a good household appliance cleaner and wax will help maintain the finish Do not use abrasive cleaners on enamel surfaces as they may scratch the finish For products with a stainless steel exterior use a clean sponge or soft cloth and a mild detergent in warm water Do not use abrasive or harsh cleaners Do not use chlorine bleach on the stainles...

Страница 10: ...ower access panel 4 Remove dirt and lint from the condenser fins and the unit compartment with a brush attachment on a vacuum cleaner 5 Replace the lower access panel using the four screws 6 Plug in ice maker or reconnect power Interior Components 1 Unplug ice maker or disconnect power 2 Open the storage bin door and remove any ice that is in the bin 3 Remove the drain cap from the water pan and d...

Страница 11: ...l sensor harness 14 Replace the cutter grid cover 15 Gently wipe the control panel with a soft clean dishcloth using warm water and a mild liquid dish detergent 16 Plug in ice maker or reconnect power 17 After cleaning make sure that all controls are set properly and that no control indicators are flashing VacationandMovingCare To shut down the ice maker 1 Unplug ice maker or disconnect power 2 Re...

Страница 12: ...cycle Is the water in the reservoir overflowing This is normal This overflow helps to purge minerals that were removed from the water during the ice making process Is there a whooshing sound Check the following things Make sure that the water supply is hooked up and turned on Make sure that the drain cap is tight and the water drain pan pump is securely attached to the water pan Is there ice betwe...

Страница 13: ...iltered or treated Is there mineral scale buildup Clean your ice maker See Ice Maker System in the Cleaning section Are there food items stored in the ice bin Do not store any foods in the ice bin Were all the packaging materials removed Make sure that all packaging materials were removed at the time of installation Thin soft or clumps of ice Is there unusually high mineral content in the water su...

Страница 14: ...alers repair parts distributors and service companies KitchenAid designated service technicians are trained to fulfill the product warranty and provide after warranty service anywhere in the United States To locate the KitchenAid designated service company in your area you can also look in your telephone directory Yellow Pages For further assistance If you need further assistance you can write to ...

Страница 15: ...authorized modifications made to the appliance 9 Expenses for travel and transportation for product service if your major appliance is located in a remote area where service by an authorized KitchenAid servicer is not available 10 The removal and reinstallation of your major appliance if it is installed in an inaccessible location or is not installed in accordance with KitchenAid s published insta...

Страница 16: ...16 Notes ...

Страница 17: ...alerte de sécurité vous signale les dangers potentiels de décès et de blessures graves à vous et à d autres Tous les messages de sécurité suivront le symbole d alerte de sécurité et le mot DANGER ou AVERTISSEMENT Ces mots signifient IMPORTANTES INSTRUCTIONS DE SÉCURITÉ AVERTISSEMENT Pour réduire le risque d incendie de choc électrique ou de blessures lors de l utilisation de la machine à glaçons i...

Страница 18: ...et d arrêt et un système de vidange par gravité ou une pompe à condensat pour pousser l eau vers un drain existant Choisir un endroit bien aéré où la température est supérieure à 55 F 13 C et inférieure à 100 F 38 C Pour tirer le meilleur rendement de l appareil la température ambiante doit se situer entre 70 F 21 C et 90 F 32 C La machine à glaçons doit être installée à un endroit protégé contre ...

Страница 19: ... eau provenant d un système d osmose inverse allant au robinet d arrivée d eau de la machine à glaçons doit être comprise entre 30 et 120 lb po 207 et 827 kPa Si un système de filtration de l eau par osmose inverse est raccordé à votre approvisionnement en eau froide la pression de l eau au système d osmose inverse doit être de 40 à 60 lb po2 276 à 414 kPa minimum REMARQUE Le système par osmose in...

Страница 20: ... de REMARQUE Ne pas utiliser de robinet d arrêt de type perforant ou à étrier de 4 76 mm qui réduit le débit d eau et qui se bouche plus facilement Raccordement du tuyau d eau 1 Couper l alimentation principale en eau Ouvrir le robinet le plus proche assez longtemps pour vider l eau du tuyau 2 À l aide d un tuyau d alimentation en cuivre de avec une valve d arrêt tournée de un quart de tour ou l é...

Страница 21: ... intérieur Les tuyaux de vidange doivent avoir une pente de 1 pour chaque 48 2 54 cm pour chaque 122 cm de longueur ou une pente de pour chaque 12 6 35 mm 30 48 cm et ne comporter aucun point bas où l eau pourrait stagner Les drains de vidange de plancher doivent être suffisamment grands pour recevoir l eau de vidange provenant de toutes sources L installation idéale a un tuyau de rejet à l égout ...

Страница 22: ...suivantes indiquent les genres de bruits qui peuvent être nouveaux pour vous et leur cause possible Vous entendrez un bourdonnement lorsque le robinet d eau s ouvre pour remplir le réservoir d eau pour chaque programme Des vibrations sonores peuvent provenir de l écoulement du réfrigérant de la canalisation d eau ou d articles placés sur la machine à glaçons Le compresseur à haute efficacité peut ...

Страница 23: ... l eau fraîche s infiltre de nouveau dans la machine en vue du prochain programme de fabrication de glaçons 5 Les glaçons tombent dans le bac d entreposage La machine à glaçons s arrête automatiquement dès que le bac est plein et elle se remet en marche lorsqu il faut plus de glaçons Le bac à glaçons n est pas réfrigéré et la glace fondra un peu Le degré de fonte dépend de la température de la piè...

Страница 24: ...ns gal 4 à 5 grains litre vous devrez faire des nettoyages probablement tous les six mois REMARQUE Utiliser une bouteille de 16 oz 473 mL de produit de nettoyage approuvé pour la machine à glaçons Pour le commander composer le 1 800 442 9991 et demander le numéro de pièce 4396808 Au Canada composer le 1 800 807 6777 1 Appuyer sur le sélecteur pour le placer en position OFF 2 Attendre de 5 à 10 min...

Страница 25: ...s écoulera du bac à eau et la glace sera mince ou il n y aura pas de glace 4 Ôter les deux vis qui maintiennent le couvercle de la grille de coupe en place et retirer le couvercle de la grille de coupe 5 Débrancher le faisceau de câblage du côté gauche de la grille de coupe 6 Débrancher le détecteur de niveau de glaçons du côté droit de la grille de coupe Tirer le détecteur de niveau de glaçons ve...

Страница 26: ...eau et la glace sera mince ou il n y aura pas de glace Le tuyau provenant du bac à eau est inséré dans l ouverture de vidange du bac d entreposage 13 Glisser la grille de coupe en place et la fixer en remettant la vis du côté droit et la cale d espacement en plastique Serrer ensuite la vis du côté gauche Reconnecter les faisceaux de la grille de coupe et du détecteur de niveau de glaçons 14 Réinst...

Страница 27: ...de la pièce doit être supérieure à 55 F 13 C Sinon le thermostat du bac peut détecter une température de la pièce basse et s arrêter même si le bac n est pas plein de glaçons Il est possible que la machine à glaçons ne puisse pas se remettre en marche une fois éteinte Le témoin vert s allume t il lorsque le bouton Clean nettoyage est enfoncé La machine à glaçons est sous tension mais nécessite peu...

Страница 28: ... Voir la section Composants intérieurs de Nettoyage pour les instructions de dépose de la grille de coupe Qualitédesglaçons Goût odeur ou couleur grise des glaçons Y a t il une teneur en minéraux anormalement élevée dans l alimentation en eau L eau peut avoir besoin d être filtrée ou traitée Y a t il une accumulation de tartre Nettoyer la machine à glaçons Voir Système de la machine à glaçons dans...

Страница 29: ...KITCHENAID Pour localiser des pièces spécifiées par l usine dans votre région téléphoner au centre de service désigné le plus proche Téléphoner sans frais au Centre pour l eXpérience de la clientèle de KitchenAid Canada LP au 1 800 807 6777 Nos consultants fournissent l assistance pour Procédés d utilisation et d entretien Vente d accessoires et de pièces de rechange Les références aux concessionn...

Страница 30: ...ommage subi par le fini du gros appareil ménager à moins que ces dommages ne résultent de vices de matériaux ou de fabrication et ne soient signalés à KitchenAid dans les 30 jours suivant la date d achat 6 Toute perte d aliments ou de médicaments due à une défaillance du réfrigérateur ou du congélateur 7 Le ramassage et la livraison Ce gros appareil ménager est conçu pour être réparé à domicile 8 ...

Страница 31: ...us devrez connaître le numéro de modèle et le numéro de série au complet Vous trouverez ces renseignements sur la plaque signalétique située sur le produit Nom du marchand ______________________________________________ Adresse ________________________________________________________ Numéro de téléphone ___________________________________________ Numéro de modèle____________________________________...

Страница 32: ...s réservés Registered Trademark TM Trademark of KitchenAid U S A KitchenAid Canada licensee in Canada Marque déposée TM Marque de commerce de KitchenAid U S A Emploi sous licence par KitchenAid Canada au Canada 4 09 Printed in U S A Imprimé aux É U ...

Отзывы: