background image

ENGLISH

3

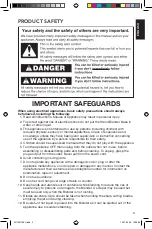
PRODUCT SAFETY

IMPORTANT SAFEGUARDS

When using electrical appliances, basic safety precautions should always  

be followed, including the following:

1.  Read all instructions. Misuse of appliance may result in personal injury.
2.  To protect against risk of electrical shock do not put the Stand Blender Base in 

water or other liquid.

3.  This appliance is not intended for use by persons (including children) with 

reduced physical, sensory or mental capabilities, or lack of experience and 

knowledge, unless they have been given supervision or instruction concerning 

use of the appliance by a person responsible for their safety.

4.  Children should be supervised to ensure that they do not play with the appliance.
5.  Turn the appliance OFF, then unplug from the outlet when not in use, before 

assembling or disassembling parts and before cleaning. To unplug, grasp the 

plug and pull from the outlet. Never pull from the power cord.

6.  Avoid contacting moving parts.
7.  Do not operate any appliance with a damaged cord or plug or after the 

appliance malfunctions, or is dropped or damaged in any manner. Contact the 

manufacturer at their customer service telephone number for information on 

examination, repair or adjustment.

8.  Do not use outdoors.
9.  Do not let cord hang over edge of table or counter.

10.  Keep hands and utensils out of container while blending to reduce the risk of 

severe injury to persons or damage to the Blender. A scraper may be used but 

must be used only when the Blender is not running.

11.  Blades are sharp. Care should be taken when handling the sharp cutting blades, 

emptying the jar and during cleaning.

12.  Be careful if hot liquid is poured into the Blender as it can be ejected out of the 

appliance due to sudden steaming.

W11461763A.indb   3

W11461763A.indb   3

14-07-2020   10:36:50

14-07-2020   10:36:50

Содержание K400

Страница 1: ...Liquidificador K400 KSB4027 KUA35A W11461763A indb 1 W11461763A indb 1 14 07 2020 10 36 46 14 07 2020 10 36 46 ...

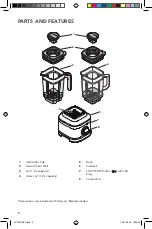
Страница 2: ...ar 1 6 L capacity 4 Glass Jar 1 4 L capacity 5 Base 6 Interlock 7 START STOP Button with LED Ring 8 Control Dial PARTS AND FEATURES 48 oz OUNCES 8oz 1 Cup 44 oz 40 oz 36 oz 32 oz 28 oz 24 oz 20 oz 16 oz 12 oz 3 5 8 7 1 2 4 6 W11461763A indb 2 W11461763A indb 2 14 07 2020 10 36 48 14 07 2020 10 36 48 ...

Страница 3: ...assembling parts and before cleaning To unplug grasp the plug and pull from the outlet Never pull from the power cord 6 Avoid contacting moving parts 7 Do not operate any appliance with a damaged cord or plug or after the appliance malfunctions or is dropped or damaged in any manner Contact the manufacturer at their customer service telephone number for information on examination repair or adjustm...

Страница 4: ...id opening Always start on lowest speed and slowly ramp to desired speed when blending hot liquids or ingredients 17 The use of attachments including canning jars not recommended or sold by the manufacturer may cause a risk of injury to persons 18 This appliance is intended to be used in household and similar applications such as staff kitchen areas in shops offices or other working environments f...

Страница 5: ...re the mechanical power of motors Our 1 5 peak horsepower HP motor reference reflects the horsepower output of the motor itself and not the Blender s horsepower output in the Blender Jar As with any Blender the power output in the Jar is not the same as the horsepower of the motor itself PRODUCT SAFETY ELECTRICAL EQUIPMENT WASTE DISPOSAL Scrapping the product This appliance is marked in compliance...

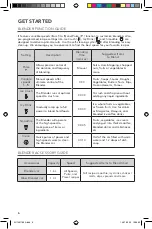
Страница 6: ... Crush The Blender runs at optimal speed to crush ice 00 30 To crush and chop ice without adding any liquid ingredients Icy Drink Gradually ramp up to full power to blend hard foods 00 30 Ice whole fruits or vegetables or frozen fruits Use for drinks as Margaritas Daiquiris and blended ice coffee drinks Smoothie The Blender will operate at the high speed to make puree of items or ingredients 00 45...

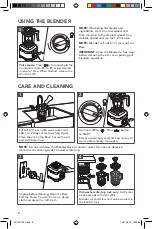
Страница 7: ... 1 6 L 1 4 L Add ingredients into Jar max 1 6 L or max 1 4 L for Glass Jar Secure the Lid and Lid Center Cap 1 Place and align the Jar with the Slot to fit inside the jar pad facing Jar handle towards Control Dial Plug the Blender into earthed outlet 2 Slot USING THE BLENDER 0 1 2 3 4 5 P Turn Dial from O to desired speed or preset recipe program Press to START See Blender Function Guide for more ...

Страница 8: ...z 28 oz 24 oz 20 oz 16 oz 12 oz Unplug before cleaning Wipe the Base and the Power Cord with a warm damp cloth and dry with a soft cloth Dishwasher safe top rack only Lid Center Caps and Lids with Vent Well Blender Jar and Glass Jar can be washed in the bottom rack NOTE Do not immerse the Blender Base or cord in water Do not use abrasive cleansers or scouring pads to avoid scratching Fill half of ...

Страница 9: ...he white LED ring flashes rapidly An error is detected in the Blender Contact an authorized service center for assistance Please see the Warranty and Service sections If the white LED ring is off 10 minutes of no activity will make the Blender go into Sleep mode To wake up the Blender press button If the problem cannot be corrected See the Warranty and Service section Do not return the Blender to ...

Страница 10: ...W11461763A indb 10 W11461763A indb 10 14 07 2020 10 36 56 14 07 2020 10 36 56 ...

Страница 11: ...entilação 3 Copo 1 6 L de capacidade 4 Copo de vidro 1 4 L de capacidade 5 Base 6 Travamento 7 Botão START STOP INICIAR PARAR com anel de LED 8 Botão de controle PEÇAS E FUNCIONALIDADES 48 oz OUNCES 8oz 1 Cup 44 oz 40 oz 36 oz 32 oz 28 oz 24 oz 20 oz 16 oz 12 oz 3 5 8 7 1 2 4 6 W11461763A indb 11 W11461763A indb 11 14 07 2020 10 36 57 14 07 2020 10 36 57 ...

Страница 12: ...ão deve ser usado por pessoas incluindo crianças com capacidades físicas sensoriais ou mentais limitadas ou sem experiência e conhecimento a menos que as mesmas recebam supervisão e instruções de uso do aparelho de uma pessoa responsável por sua segurança 4 As crianças devem ser supervisionadas para garantir que não brinquem com o aparelho 5 Desligue o equipamento e o desconecte da tomada quando e...

Страница 13: ...os em lojas escritórios ou outros ambientes de trabalho casas de fazenda por clientes em hotéis motéis e outros ambientes de tipo residencial ambientes do tipo alojamento pousada LEMBRE SE DESTAS INSTRUÇÕES REQUISITOS ELÉTRICOS Perigo de choque elétrico Conecte a uma tomada aterrada Não remova o ponto de aterramento Não utilize um adaptador Não utilize uma extensão A não observação destas instruçõ...

Страница 14: ...gulamentos locais para a eliminação de desperdícios Descarte do produto Este aparelho está marcado em conformidade com a Diretiva Europeia 2012 19 EU Resíduos de Equipamentos Elétricos e Eletrônicos REEE Ao garantir que este produto seja descartado de forma adequada você ajuda a prevenir as consequências potencialmente negativas para saúde da humanidade e meio ambiente que podem de outra forma ser...

Страница 15: ...unciona na velocidade ideal para triturar gelo 00 30 Para triturar e picar gelo sem adicionar nenhum ingrediente líquido Bebidas geladas Frozen drinks Gradualmente sobe até a potência máxima para misturar alimentos duros 00 30 Gelo frutas ou vegetais inteiros ou frutas congeladas Use para bebidas como Margaritas Daiquiris e bebidas com café gelado Vitaminas Smoothies O liquidificador irá operar em...

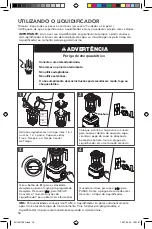
Страница 16: ...a o Copo de vidro Fixe a Tampa e a o Tampo Central da Tampa 1 Coloque e alinhe o Copo com a ranhura para encaixar dentro do apoio do copo virando a pega do copo na direção do botão de controle Insira o plugue do Liquidificador em uma tomada aterrada 2 Ranhura UTILIZANDO O LIQUIDIFICADOR 0 1 2 3 4 5 P Gire o botão de O para a velocidade desejada ou para a função pré programada desejada Pressione pa...

Страница 17: ... Extraia o plugue da tomada antes da limpeza Limpe a Base e o Fio Elétrico com um pano quente e úmido e seque com um pano macio Peças que podem ser lavadas na máquina de lavar louça somente na prateleira superior Tampo central da tampa e tampa com aberturas de ventilação O Copo do Liquidificador e o Copo de vidro do liquidificador podem ser lavados na prateleira inferior OBS Não mergulhe a base do...

Страница 18: ...dificador parar de misturar e o anel LED branco piscar rapidamente Um erro é detectado no Liquidificador Entre em contato com o centro de assistência autorizado para obter assistência Por favor consulte as seções Termo De Garantia Se o anel de LED branco estiver apagado 10 minutos sem atividade farão o Liquidificador entrar no modo de suspensão Para ativar de novo o Liquidificador pressione o botã...

Страница 19: ... Manual do Consumidor do produto Tenha ocorrido mau uso uso inadequado ou se o produto tiver sofrido alterações ou modificações estéticas e ou funcionais bem como tiver sido realizado conserto por pessoas ou entidades não credenciadas pela Whirlpool S A Houver sinais de violação do produto remoção e ou adulteração do número de série ou da etiqueta de identificação do produto As garantias legal e o...

Страница 20: ...cionamento e finalidade de utilização Produtos ou peças que tenham sido danificados em conseqüência de remoção manuseio quedas ou atos e efeitos decorrentes da natureza tais como relâmpago chuva inundação etc A garantia especial não cobre Todo e qualquer vício de fabricação aparente e de fácil constatação Somente a garantia de 90 dias cobre vicio de fabricação aparente Peças sujeitas ao desgaste n...

Страница 21: ...W11461763A indb 21 W11461763A indb 21 14 07 2020 10 37 04 14 07 2020 10 37 04 ...

Страница 22: ...W11461763A indb 22 W11461763A indb 22 14 07 2020 10 37 04 14 07 2020 10 37 04 ...

Страница 23: ...W11461763A indb 23 W11461763A indb 23 14 07 2020 10 37 04 14 07 2020 10 37 04 ...

Страница 24: ...W11461763A 07 20 2020 All rights reserved Todos os direitos reservados W11461763A indb 24 W11461763A indb 24 14 07 2020 10 37 04 14 07 2020 10 37 04 ...
Отзывы: