background image

11

English

®

Attachments and Accessories 

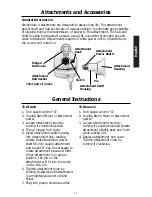
To Attach

1. Turn speed control “O”.
2. Unplug Stand Mixer or disconnect

power.

3. Loosen attachment knob by

turning it counterclockwise.

4. Flip up hinged hub cover.
5. Insert attachment shaft housing

into attachment hub, making
certain that attachment power
shaft fits into square attachment
hub socket. It may be necessary to
rotate attachment back and forth.
When attachment is in proper
position, the pin on the
attachment will fit into the notch
on the hub rim.

6. Tighten attachment knob by

turning clockwise until attachment
is completely secured to Stand
Mixer.

7. Plug into proper electrical outlet. 

To Remove

1. Turn speed control “O”.
2. Unplug Stand Mixer or disconnect

power.

3. Loosen attachment knob by

turning it counterclockwise. Rotate
attachment slightly back and forth
while pulling out.

4. Replace attachment hub cover.

Tighten attachment knob by
turning it clockwise.

General Information

KitchenAid

®

Attachments are designed to assure long life. The attachment

power shaft and hub socket are of a square design, to eliminate any possibility
of slipping during the transmission of power to the attachment. The hub and
shaft housing are tapered to assure a snug fit, even after prolonged use and
wear. KitchenAid

®

Attachments require no extra power unit to operate them;

the power unit is built-in.

‡Not part of mixer.

General Instructions

Attachment
Hub Socket

Attachment
Knob

Notch

Pin

Attachment Shaft
Housing

Attachment
Power Shaft‡

Hinged 
Hub Cover

Attachment
Housing 

Содержание Bowl-Lift Mixer

Страница 1: ...I KÜCHENMASCHINEN ANWEISUNGEN MIXER ISTRUZIONI INSTRUCCIONES DE BATIDORA BRUKSANVISNING KÖKSMASKIN BRUKSANVISNING KJOKKENMASKINER YLEISKONEEN KÄYTTÖOHJEET BRUGSANVISNING KØKKENMASKINE INSTRUÇÕES DA BATEDEIRA MULTIFUNÇÕES Ο ΗΓΙΕΣ ΧΡΗΣΗΣ BOWL LIFT MIXERS 2 1 O 4 6 8 1O ...

Страница 2: ...red if you don t follow instructions All safety messages will tell you what the potential hazard is tell you how to reduce the chance of injury and tell you what can happen if the instructions are not followed DANGER WARNING Table of Contents Important Safeguards 1 Electrical Requirements 1 Bowl Lift Mixer Features 2 Assembling Your Bowl Lift Mixer 3 Assembling Your Pouring Shield 4 Using Your Kit...

Страница 3: ...nded or sold by KitchenAid may cause fire electrical shock or injury 8 Do not use the Stand Mixer outdoors 9 Do not let the cord hang over edge of table or counter 10 Remove flat beater wire whip or dough hook from Stand Mixer before washing 11 The appliance is not intended for use by young children or infirm persons without supervision 12 Young children should be supervised to ensure that they do...

Страница 4: ... Height Adjustment Screw Bowl Lift Handle not shown Attachment Knob Attachment Hub see page 11 Locating Pins Wire Whip Flat Beater PowerKnead Spiral Dough Hook Speed Control Knob Bowl Support Beater Shaft Stainless Steel Bowl Bowl Handle Spring Latch and Bowl Pin not shown ...

Страница 5: ... 2 Unplug Stand Mixer or disconnect power 3 Slip flat beater on beater shaft 4 Turn beater to left hooking beater over the pin on shaft 5 Plug into proper electrical outlet To Remove Flat Beater Wire Whip or Dough Hook 1 Turn speed control O 2 Unplug Stand Mixer or disconnect power 3 Press beater upward and turn right 4 Pull beater from beater shaft Stand Mixer Speed Control The Soft Start feature...

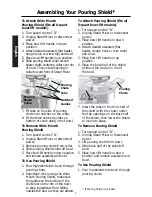
Страница 6: ... Wide Mouth Pouring Shield make sure the guides on the bottom of the chute rest on the rim of the bowl to keep ingredients from falling outside the bowl as they are added To Attach Pouring Shield fits all 5 quart bowl lift models 1 Turn speed control O 2 Unplug Stand Mixer or disconnect power 3 Place bowl lift handle in down position 4 Attach desired accessory flat beater dough hook or wire whip a...

Страница 7: ... can correct the clearance easily 1 Unplug Stand Mixer 2 Place bowl lift handle in down position 3 Attach flat beater 4 Adjust so flat beater just clears bottom surface of bowl when in lifted position by turning screw A counterclockwise to raise the bowl and clockwise to lower the bowl Just a slight turn is all that is required the screw will not rotate more than 1 4 turn 90 degrees in either dire...

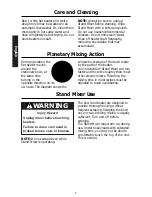
Страница 8: ... shows the complete coverage of the bowl made by the path of the beater Your KitchenAid Stand Mixer will mix faster and more thoroughly than most other electric mixers Therefore the mixing time in most recipes must be adjusted to avoid overbeating Planetary Mixing Action Stand Mixer Use NOTE Do not scrape bowl while Stand Mixer is operating The bowl and beater are designed to provide thorough mixi...

Страница 9: ...ener attachment 4 MIXING For mixing semi heavy batters such as BEATING cookies Use to combine sugar and shortening and to add sugar to egg whites for meringues Medium speed for cake mixes Use with Food Grinder Rotor Slicer Shredder Pasta Roller and Fruit Vegetable Strainer 6 BEATING For medium fast beating creaming or CREAMING whipping Use to finish mixing cake doughnut and other batters High spee...

Страница 10: ...e beater is not far enough into the bowl See Beater to Bowl Clearance page 5 Cake Mixes When preparing packaged cake mixes use Speed 4 for medium speed and Speed 6 for high speed For best results mix for the time stated on the package directions Adding Nuts Raisins or Candied Fruits Solid materials should be folded in the last few seconds of mixing on Speed 1 STIR The batter should be thick enough...

Страница 11: ...k and slow down mixing process 4 Continuing on Speed 2 gently add remaining flour 1 2 cup 60 gr at a time as needed Mix until dough starts to clean sides of bowl about 2 minutes 5 Knead on Speed 2 for 2 more minutes or until dough is smooth and elastic 6 Lower bowl on Stand Mixer and remove dough from the bowl and PowerKnead Spiral Dough Hook NOTE These instructions illustrate bread making with th...

Страница 12: ...oved Whites are uniform in color and glisten Stiff and Dry Sharp stiff peaks form when wire whip is removed Whites are speckled and dull in appearance Whipped Cream Pour cold whipping cream into chilled bowl Attach bowl and wire whip To avoid splashing gradually turn to designated speed and whip to desired stage See chart below AMOUNT SPEED 59 ml 1 4 cup GRADUALLY to 10 118 ml 1 2 cup GRADUALLY to...

Страница 13: ...rn speed control O 2 Unplug Stand Mixer or disconnect power 3 Loosen attachment knob by turning it counterclockwise Rotate attachment slightly back and forth while pulling out 4 Replace attachment hub cover Tighten attachment knob by turning it clockwise General Information KitchenAid Attachments are designed to assure long life The attachment power shaft and hub socket are of a square design to e...

Страница 14: ... Mixer plugged in Is the fuse in the circuit to the Stand Mixer in working order If you have a circuit breaker box be sure the circuit is closed Turn the Stand Mixer off for 10 15 seconds then turn it back on If the mixer still does not start allow it to cool for 30 minutes before turning it back on If the problem is not due to one of the above items see Service Centers SERVICE CENTERS All service...

Страница 15: ...er than normal food preparation B Damage resulting from accident alterations misuse abuse or installation operation not in accordance with local electrical codes KITCHENAID DOES NOT ASSUME ANY RESPONSIBILITY FOR INCIDENTAL OR CONSEQUENTIAL DAMAGES Bowl Lift Mixers Warranty 9708309 3807dZw1204 FOR THE WAY IT S MADE Registered Trademark Trademark of KitchenAid U S A 2004 All rights reserved Specific...

Страница 16: ...14 English 9708309 3807dZw1204 FOR THE WAY IT S MADE Registered Trademark Trademark of KitchenAid U S A 2004 All rights reserved Specifications subject to change without notice ...

Отзывы: