background image

10

4. Use saber or keyhole saw to cut the circular vent opening.

Install Vent System

1. Install vent through the vent opening in upper cabinet or wall. 

Complete venting system according to the selected venting 
method. See “Venting Requirements” section. 

2. Use caulking to seal exterior wall or roof opening around the 

cap.

Install Range Hood

1. Remove the grease filters. See the “Range Hood Care” 

section.

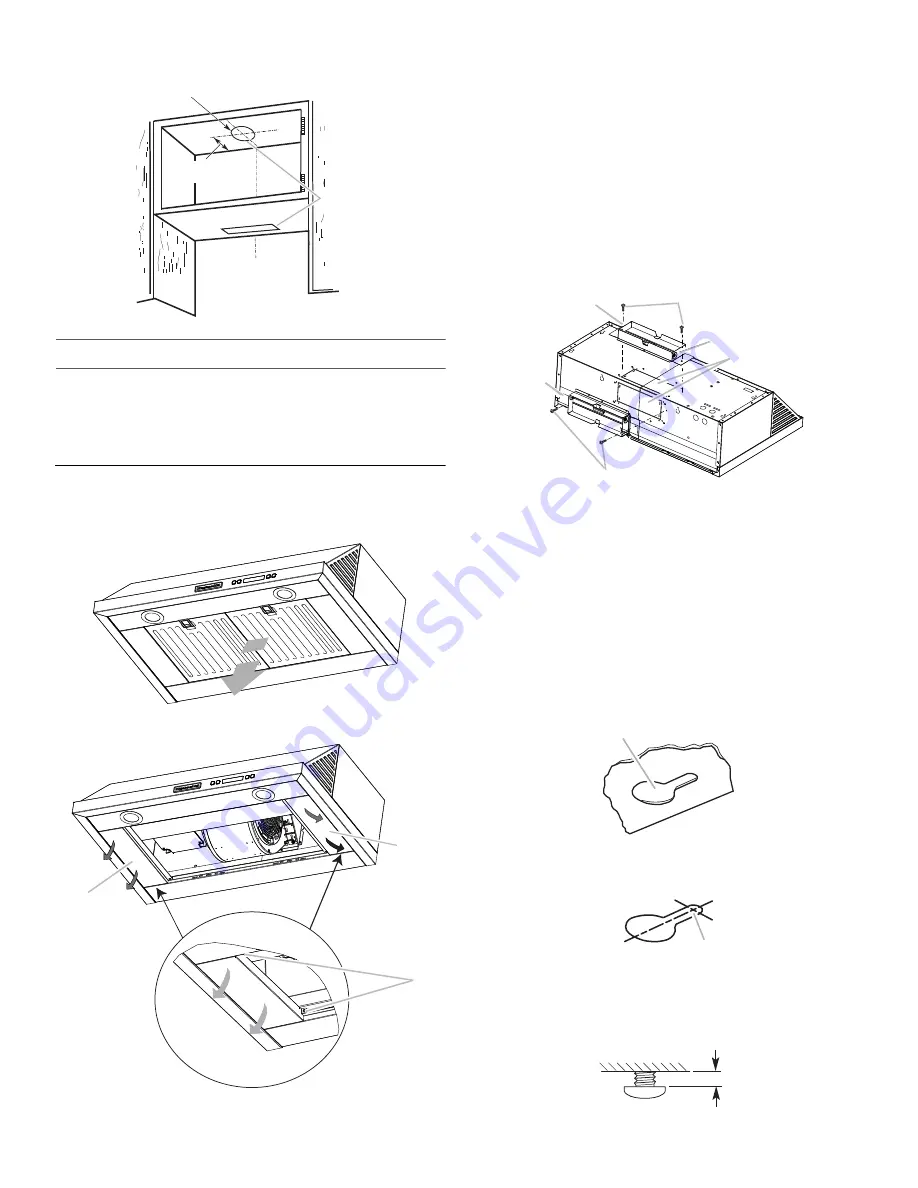
2. Remove mounting screws and lateral supports.

For vented installations:

Depending on your installation, remove either top or rear 
rectangular vent knockout.

NOTE: Do not remove rectangular knockouts if 
installation of range hood is to be non-venting 
(recirculating).

Make sure damper pivot is nearest to top/back edge of 
range hood. 

Remove tape from damper flap.

NOTE: The exhaust adapter/damper can be installed up 
to 1" (2.5 cm) on either side of the hood center to 
accommodate off-center ductwork.

If using rectangular vent, attach rectangular damper/vent 
connectors to the range hood using sheet metal screws.

If using round vent, attach vent transition piece 
(purchased separately) to range hood top using sheet 
metal screws.

NOTE: If the wall cap is directly behind the vent 
connector, the dampers in the connector and wall cap 
must not interfere with each other. Remove the vent 
connector damper if they interfere.

3. Lift the range hood up under cabinet and determine final 

location by centering beneath cabinet. Mark on the underside 
of cabinet the location of the 4 keyhole mounting slots on the 
range hood. Set range hood aside on a covered surface.

4. Use 

¹⁄₈

" (3 mm) drill bit and drill 4 pilot holes as shown.

5. Install the 4 - 4.5 x 13 mm mounting screws in pilot holes. 

Leave about 

¹⁄₄

" (6.4 mm) space between screw heads and 

cabinet to slide range hood into place.

A. Lateral supports
B. Mounting screws

Circular vent opening

Cabinet 

cutouts

*From wall, not

 cabinet frame

*5" 

(12.7 cm)

B

A

A

A. Vertical vent
B. Sheet metal screws

C. Hinge pin
D. Vent knockouts

E. Horizontal vent

A. Keyhole slot

A. Drill pilot hole

C

E

B

A

B

D

A

A

¹⁄₄

"

(6.4 mm)

Содержание 30" (76.2 CM) RANGE HOOD

Страница 1: ... kitchenaid com or www kitchenaid ca HOTTE DE CUISINIÈRE 30 76 2 CM ET 36 91 4 CM Instructionsd installationetGuided utilisationetd entretien Au Canada pour assistance installation ou service composez le 1 800 807 6777 ou visitez notre site web à www kitchenaid ca Table of Contents Table des matières 2 LI3ZGC W10320581E IMPORTANT READ AND SAVE THESE INSTRUCTIONS FOR RESIDENTIAL USE ONLY IMPORTANT ...

Страница 2: ...7 In the U S A 17 In Canada 17 Accessories 17 WARRANTY 18 TABLE DES MATIÈRES SÉCURITÉ DE LA HOTTE DE CUISINIÈRE 19 EXIGENCES D INSTALLATION 21 Outils et pièces 21 Exigences d emplacement 21 Exigences concernant l évacuation 22 Spécifications électriques 24 INSTRUCTIONS D INSTALLATION 25 Préparation de l emplacement 25 Installation de la hotte 27 Raccordement électrique 29 Achever l installation 29...

Страница 3: ...his manual and on your appliance Always read and obey all safety messages This is the safety alert symbol This symbol alerts you to potential hazards that can kill or hurt you and others All safety messages will follow the safety alert symbol and either the word DANGER or WARNING These words mean follow instructions instructions DANGER WARNING State of California Proposition 65 Warnings WARNING Th...

Страница 4: ...zardous or explosive materials and vapors CAUTION To reduce risk of fire and to properly exhaust air be sure to duct air outside do not vent exhaust air into spaces within walls or ceilings attics or into crawl spaces or garages WARNING TO REDUCE THE RISK OF FIRE USE ONLY METAL DUCTWORK WARNING TO REDUCE THE RISK OF A RANGE TOP GREASE FIRE Never leave surface units unattended at high settings Boil...

Страница 5: ...ensions 4 flat head wood screws or machine screws with washers and nuts to attach filler strips Location Requirements IMPORTANT Observe all governing codes and ordinances It is the installer s responsibility to comply with installation clearances specified on the model serial rating plate The model serial rating plate is located inside the range hood on the left wall Range hood location should be ...

Страница 6: ...ems when using ventilation systems greater than specified CFM of air movement The specified CFM varies from locale to locale Consult your HVAC professional for specific requirements in your area Venting Methods Vent system can terminate either through the roof or wall Use 3 x 10 8 3 x 25 4 cm with a maximum vent length of 35 ft 10 7 m or 6 15 2 cm or larger round vent with a maximum length of 50 f...

Страница 7: ...x 25 4 cm to 6 15 2 cm or larger 90 elbow 5 0 ft 1 5 m Maximum Recommended Length 50 ft 15 2 m 1 90 elbow 5 0 ft 1 5 m 1 wall cap 0 0 ft 0 0 m 8 ft 2 4 m straight 8 0 ft 2 4 m Length of 7 17 8 cm system 13 0 ft 3 9 m Wall cap 90 elbow 2 ft 0 6 m 6 ft 1 8 m Vent Piece 3 x 10 8 3 cm x 25 4 cm 90 elbow 5 0 ft 1 5 m 3 x 10 8 3 cm x 25 4 cm flat elbow 12 0 ft 3 7 m 3 x 10 8 3 cm x 25 4 cm wall cap 0 0 ...

Страница 8: ...cated behind the filter on the rear wall of the range hood Wire sizes must conform to the requirements of the National Electrical Code ANSI NFPA 70 latest edition or CSA Standards C22 1 94 Canadian Electrical Code Part 1 and C22 2 No 0 M91 latest edition and all local codes and ordinances INSTALLATION INSTRUCTIONS Prepare Location NOTE For vented installations it is recommended that the vent syste...

Страница 9: ...n the back wall 2 Mark lines 5 13 3 cm to the right and left of the centerline on the wall 3 Use saber or keyhole saw to cut a rectangular opening in the wall for the vent Style 2 Cut Openings for 3 x 10 8 3 x 25 4 cm Rectangular Vent to Round Vent Transition Roof Venting To make a 4 x 10 10 8 cm x 26 7 cm rectangular cutout on the underside of cabinet bottom 1 Mark lines 1 3 cm and 4 12 1 cm from...

Страница 10: ...tangular vent attach rectangular damper vent connectors to the range hood using sheet metal screws If using round vent attach vent transition piece purchased separately to range hood top using sheet metal screws NOTE If the wall cap is directly behind the vent connector the dampers in the connector and wall cap must not interfere with each other Remove the vent connector damper if they interfere 3...

Страница 11: ...stall a UL listed or CSA approved strain relief 7 Using 2 people lift range hood into final location Feed enough electrical wire through the strain relief to make connections in the terminal box Tighten the strain relief screws 8 Position the range hood so that the large end of the keyhole slots are over the mounting screws Then push the hood toward the wall so that the screws are in the neck of t...

Страница 12: ...Care section 2 Check the operation of the range hood fan and light See Range Hood Use section If range hood does not operate check to see whether a circuit breaker has tripped or a household fuse has blown Disconnect power and check wiring connections NOTE To get the most efficient use from your new range hood read the Range Hood Use section A White wires B Black wires C UL listed wire connectors ...

Страница 13: ...ivated the Snd symbol will appear on the display for 3 seconds Charcoal Filter Recirculation Accessory Inclusion and Exclusion When the charcoal filter is in use recirculating mode press and hold the Power Decrease and Power Increase buttons at the same time for 5 seconds Able will appear in the display for 3 seconds If the charcoal filter is not used vented mode press and hold the Power Decrease ...

Страница 14: ...lower fan off after 10 minutes Press and hold the Timer button for 5 seconds to activate The fan icon will flash and 10 00 10 minutes will show in the display The time will start counting down after 3 seconds RANGE HOOD CARE Cleaning IMPORTANT Clean the hood and grease filters frequently according to the following instructions Replace grease filters before operating hood Exterior Surfaces To avoid...

Страница 15: ... 1 2 on the other filter Replacing a Halogen Lamp Turn off the range hood and allow the halogen lamp to cool To avoid damage or decreasing the life of the new lamp do not touch lamp with bare fingers Replace lamp using tissue or wearing cotton gloves to handle lamp If new lights do not operate make sure the lamps are inserted correctly before calling service 1 Disconnect power 2 Use a flat blade s...

Страница 16: ... 1 2 3 4 5 1 2 3 4 5 6 GY S4 P9 SE124A BU Y Y Y Y Y Y BU BK W Y Y Y Y BU Electronic User Interface Electronic Power Board Motor Specifications Power supply Frequency Power absorption Current 120 VAC 60 Hz 450 W 3 7 A Motor Resistance Ohms Blue Red 18 Blue Gray 14 3 Blue Black 9 8 Blue White 21 6 Room temp 73 4 F 23 C 4 Lamps only on Island Versions ...

Страница 17: ...o locate the KitchenAid designated service company in your area you can also look in your telephone directory Yellow Pages For further assistance If you need further assistance you can write to KitchenAid with any questions or concerns at KitchenAid Brand Home Appliances Customer eXperience Center 553 Benson Road Benton Harbor MI 49022 2692 Please include a daytime phone number in your corresponde...

Страница 18: ...id servicer is not available 9 The removal and reinstallation of your major appliance if it is installed in an inaccessible location or is not installed in accordance with published installation instructions 10 Major appliances with original model serial numbers that have been removed altered or cannot be easily determined This warranty is void if the factory applied serial number has been altered...

Страница 19: ...areil ménager Assurez vous de toujours lire tous les messages de sécurité et de vous y conformer AVERTISSEMENT DANGER Voici le symbole d alerte de sécurité Ce symbole d alerte de sécurité vous signale les dangers potentiels de décès et de blessures graves à vous et à d autres Tous les messages de sécurité suivront le symbole d alerte de sécurité et le mot DANGER ou AVERTISSEMENT Ces mots signifien...

Страница 20: ...die et évacuer adéquatement les gaz veiller à acheminer l air aspiré par un conduit jusqu à l extérieur ne pas décharger l air aspiré dans un espace vide du bâtiment comme une cavité murale un plafond un grenier un vide sanitaire ou un garage AVERTISSEMENT POUR RÉDUIRE LE RISQUE D INCENDIE UTILISER UNIQUEMENT DES CONDUITS MÉTALLIQUES AVERTISSEMENT POUR MINIMISER LE RISQUE D UN FEU DE GRAISSE SUR L...

Страница 21: ...ncastrement Quatre vis à bois à tête plate ou vis à métaux avec rondelles et écrous pour la fixation des tringles d appui Exigences d emplacement IMPORTANT Observer les dispositions de tous les codes et règlements en vigueur C est à l installateur qu incombe la responsabilité de respecter les distances de séparation spécifiées sur la plaque signalétique de l appareil La plaque signalétique est sit...

Страница 22: ...de la bouche de décharge à l extérieur par un mur ou par le toit assurer l étanchéité avec un produit de calfeutrage Installations pour régions à climat froid On doit installer un clapet anti reflux additionnel à l arrière pour minimiser le reflux d air froid et incorporer un élément d isolation thermique pour minimiser la conduction de chaleur par l intermédiaire du conduit d évacuation de l inté...

Страница 23: ... achat séparé C Conduit rond Utiliser un raccord de transition de 3 x 10 8 3 x 25 4 cm sur 6 15 2 cm ou de plus grande taille achat séparé D 24 61 cm 30 76 2 cm au dessus de la surface de cuisson électrique 27 68 6 cm 30 76 2 cm au dessus de la surface de cuisson au gaz E Bouche de décharge sur toit A Conduit de diamètre 6 15 2 cm ou plus ou conduit rectangulaire de 3 x 10 8 3 x 25 4 cm à travers ...

Страница 24: ...hon 2 Connecter le câblage en aluminium à la section ajoutée de câblage en cuivre en utilisant des connecteurs et ou des outils spécialement conçus et homologués UL pour fixer le cuivre à l aluminium Appliquer la procédure recommandée par le fabricant des connecteurs électriques La connexion aluminium cuivre doit être conforme aux codes locaux et aux pratiques de câblage acceptées par l industrie ...

Страница 25: ...age Voir l étape 2 pour des instructions sur l emplacement du trou de passage du câblage 1 Déterminer et tracer clairement l axe central vertical sur le mur et le placard dans la zone où le passage du conduit d évacuation sera réalisé 2 Câblage à travers le sommet du placard Tracer une ligne de distance A à gauche de l axe central sur la face inférieure du placard Sur cette ligne marquer le point ...

Страница 26: ...m sur raccord de transition rond Décharge à travers le toit Découpage d une ouverture rectangulaire de 4 x 10 10 8 cm x 26 7 cm sur la face inférieure du bas du placard 1 Tracer des lignes à 1 3 cm et 4 12 1 cm du mur arrière sur l axe central de la face inférieure du placard 2 Tracer des lignes à 5 13 3 cm de part et d autre de l axe central sur la face inférieure du placard 3 Utiliser une scie s...

Страница 27: ... pour pouvoir installer les conduits décentrés Si l on utilise un conduit rectangulaire fixer les connecteurs rectangulaires du clapet conduit à la hotte à l aide de vis de tôlerie En cas d utilisation d un conduit circulaire fixer le raccord de transition achat séparé au sommet de la hotte à l aide de vis de tôlerie REMARQUE Si la bouche de décharge murale est située directement derrière le conne...

Страница 28: ...ué UL ou CSA 7 À l aide de deux personnes soulever la hotte et la placer à son emplacement final Insérer suffisamment de câble électrique dans le serre câble pour pouvoir établir les connexions dans la boîte de connexion Serrer les vis du serre câble 8 Positionner la partie large des trous allongés de la hotte par dessus la tête des vis de montage Puis pousser la hotte vers le mur pour engager la ...

Страница 29: ...tien de la hotte 2 Contrôler le fonctionnement du ventilateur de la hotte et de la lampe Voir la section Utilisation de la hotte Si la hotte ne fonctionne pas déterminer si un disjoncteur s est ouvert ou si un fusible du domicile est grillé Déconnecter la source de courant électrique et inspecter les connections du câblage REMARQUE Pour pouvoir tirer le plus grand parti de la nouvelle hotte de cui...

Страница 30: ...puyant sur le bouton Light éclairage pendant 5 secondes Si le signal sonore a été activé un signal sonore retentit et le symbole Snd son apparaît sur l affichage pendant 3 secondes Si le signal sonore a été désactivé le symbole Snd son apparaît sur l affichage pendant 3 secondes Inclusion et exclusion du filtre à charbon accessoire de recyclage Lorsque le filtre à charbon est en cours d utilisatio...

Страница 31: ... nouveau sur le bouton de la minuterie REMARQUE Pendant le réglage de la minuterie les boutons Power Decrease and Power Increase sont réservés à la minuterie Après la mise en route de la minuterie les boutons Power Decrease et Power Increase peuvent être utilisés pour d autres fonctions Vitesse du ventilateur Power Increase On augmentation de la puissance activé Ce bouton sert à mettre en marche l...

Страница 32: ...s le haut et relâcher la poignée pour l emboîter 6 Répéter les étapes 1 à 5 pour l autre filtre Filtres d installation sans décharge à l extérieur recyclage Le filtre à charbon n est pas lavable Celui ci devrait durer pendant six mois maximum dans des conditions d utilisation normales Remplacer par l ensemble de filtre à charbon numéro W10272068 Remplacement du filtre à charbon 1 Placer le filtre ...

Страница 33: ...A BU JA JA JA JA JA JA BU N BL JA JA JA JA BU Interface utilisateur électronique Carte des circuits d alimentation électronique Caractéristiques de moteur 120 VCA 60 Hz 450 W 3 7 A Résistance moteur Ohms 18 14 3 9 8 21 6 73 4 F 23 C 4 lampes uniquement sur les versions en îlot GRIS Alimentation électrique Fréquence Puissance absorbée Courant Bleu Rouge Bleu Gris Bleu Noir Bleu Blanc Temp ambiante ...

Страница 34: ...neront sur les sujets suivants Caractéristiques et spécifications sur toute notre gamme d appareils électroménagers Consignes d utilisation et d entretien Vente d accessoires et de pièces de rechange Références aux marchands locaux aux distributeurs de pièces de rechange et aux compagnies de service Les techniciens de service désignés par KitchenAid Canada sont formés pour remplir la garantie des ...

Страница 35: ...sponible 9 La dépose et la réinstallation de votre gros appareil si celui ci est installé dans un endroit inaccessible ou n est pas installé conformément aux instructions d installation fournies 10 Les gros appareils ménagers dont les numéros de série et de modèle originaux ont été enlevés modifiés ou qui ne peuvent pas être facilement identifiés La présente garantie est nulle si le numéro de séri...

Страница 36: ...W10320581E 2013 KitchenAid Used under license in Canada All rights reserved Utilisé sous licence au Canada Tous droits réservés 4 13 Printed in Mexico Imprimé au Mexique ...

Отзывы: