background image

20

Thermomax Installation Manual

1.    Open manifold lid by peeling back 

the front seal strip from the lid 
section only,

2.   Place tube in tube clips on both 

support rails.

3.    Slide tube into manifold 

connection while slightly rotating 
tube until washer on bellow sits 
flush against manifold fitting. Do 
not apply force, if any problems 
are experienced, check alignment 
of support rails to manifold.

4.    Insert tube retaining clip to 

secure tube to manifold and 
rotate clip 360˚ to ensure a good 
connection.

5.    Gently pull on tube to ensure 

secure assembly.

6.   Close tube retaining rubber on 

both support rails. Repeat steps 2 
to 6 for all tubes.

7.   Close manifold lid ensuring 

proper engagement of front seal 
strip over whole length and on 
end caps.

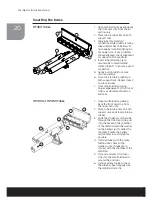
Inserting the tubes 

HP400 or HP450 Tubes 

1.    Open manifold lid by peeling 

back the front seal strip from 
the lid section only.

2.    Place tube in tube clips on both 

support rails and close retaining 
rubber.

3.    Slide the condenser of the tube 

through the front seal strip and 
into the pocket in the chamber 
of the manifold until the washer 
on the bellows just touches the 
chamber. Ensure the bellow 
section remains as straight as 
possible.

4.    Install all tubes with the same 

method and check all the 
washers of each tube are in 
contact with the chamber of the 
manifold.

5.    Close lid and press front seal 

strip into the manifold lid and 
around the end caps.

6.   Gently pull each tube to check 

the tube has been engaged by 
the manifold correctly.

DF400 Tubes

5

1

3

2

6

4

4

1

2

5

3

5

3

7

Содержание thermomax df400

Страница 1: ...THERMOMAX HP400 DF400 INSTALLATION MANUAL SolarThermalEnergy T 44 0 28 3836 4520 www kingspanthermomax com ...

Страница 2: ...it 0 and 90 Vertical 12 Standing Seam Metal Roof Kit 13 Connection Information Connection Kit and other connections 15 Pump Station 17 Safety vessel connections 18 Interconnection Kit 19 Inserting the tubes 20 Wiring the solar control panel 21 Commissioning the system 23 Decommissioning the system 24 Construction materials 25 Servicing and maintenance 26 Maintenance schedule record 27 Technical In...

Страница 3: ...ent scratches or sudden shocks to the glass Do not use sharp objects to open the tube boxes Installation Guidance Unpack and install tubes only after the manifold and pipe work has been installed With the HP400 and HP450 only tubes may be installed after the system has been filled pressure tested and is ready for operation Do not leave the solar collector exposed to solar radiation when the solar l...

Страница 4: ...ation Manual Standard Kit Components Dual Stream Pump Station SC400 Controller Roof Kit with Brackets Flexi Connections Cooling Vessel DF400 only Expansion Vessel Solar Antifreeze Fluid Connection Kit Manifold Tube Holders ...

Страница 5: ...Flow Rate Ltr hr DF400 mbar HP400 mbar Pipe Diameter Copper External mm 2 120 15 8 54 4 11 3 180 15 12 57 10 47 4 240 15 17 08 8 22 5 300 22 21 11 14 58 6 360 22 25 14 20 94 8 480 22 33 68 25 05 Model Collector Area System Volume Static Height Vessel Size m2 Ltrs HP400 2 17 5 18 3 17 5 18 4 18 5 18 5 19 5 18 DF400 2 19 5 18 3 20 5 25 4 22 5 25 5 24 5 35 Expansion Vessel Sizing Cooling Vessel Sizin...

Страница 6: ... back into the system In this instance the air separator will prevent air from circulating Metal Roof Fixings Kingspan also supply roof fixing kits for metal and other commercial roofs Two options available utilise appropriate clamps so the fabric of the metal roof is not penetrated Note the minimum and maximum distances on each fixing kit The distance between the vertical rails on each fixing kit sh...

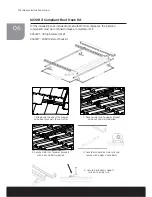
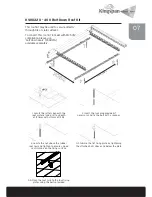
Страница 7: ... minimum and 1700mm maximum should be observed between the top of the lower brackets and the top of the upper brackets KSK0217 400 Sloping Roof Kit 1 Slide back tile and attach lower brackets to roof rafter 5 Locate manifold on side rails and secure with upper clamp bolts 2 Secure side rails to lower bracket with the pre drilled holes to the bottom 1400 1700mm 600 1100mm 20 800 1400mm 30 6 Locate ...

Страница 8: ... plate roof kit KSK0317 MCS012 tile roof hook kit MCS012 Compliant Roof Hook Kit 1 Slide back tile and attach lower and upper brackets to roof rafter 2 Secure side rails to upper bracket using nut and bolt supplied 3 Secure side rails to lower brackets with nut and bolt supplied 7 4 Locate manifold on side rails and secure with upper clamp bolts 5 Locate horizontal support rails on the side rails ...

Страница 9: ...se use bolt down seals KSK0315 available separately 1 Locate the rafters beneath the roof material and drill to a depth of 120mm with a 12mm drill bit 3 Locate the nut above the rubber roof seal and tighten to ensure a good seal is made on the fixing surface 2 Insert the rawl plug provided if necessary and fix the bolt with a spanner 4 Stabilise the flat fixing plate by tightening the attached nuts ab...

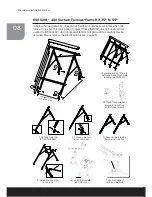
Страница 10: ... to side rail 1400m m 600 1100mm 20 800 1400mm 30 1 Attach front and rear brackets to surface at distance shown In high wind load areas e g at excessive heights or very exposed areas when the force acting upon the solar panel is greater than 2 5kN m2 an additional vertical support rail KSK0230 400 Single Leg Flat Roof Kit Extra Wind Loading may be obtained Please refer to the wind loading table pa...

Страница 11: ... hinge brackets to roof brackets at distance shown over 6 Attach and secure rear brace 4 Secure rear strut to upper bracket 8 Locate support rails on side rails 3 Secure side rail to lower bracket 7 Locate manifold on side rails 5 Adjust and secure side brace 1800mm 1550 2050mm 600 1100mm 20 800 1400mm 30 ...

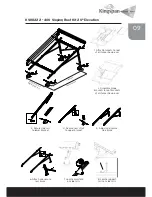
Страница 12: ...f Kit Horizontal 4 Tighten support rail clamps to prevent slippage 5 Locate manifold on side rails 6 Locate support rails on side rails 1 Attach brackets to roof at distance shown 2 Secure side rails to brackets at both ends 3 Locate locking pins on the manifold and drill holes 9 0 0 1 1 0 0 m m 2 0 1 2 0 0 1 4 0 0 m m 3 0 700 1400mm ...

Страница 13: ...pport rails on side rails and tighten the support rail camps 2 Attach side rails to brackets using bolts provided 5 Locate manifold on side rails 3 Locate locking pin position on manifold and drill holes 6 Secure all clamps 600 1100mm 20 800 1400mm 30 1850mm t if ld Note Only the DF400 can be mounted in this horizontal position ...

Страница 14: ...zontal or vertical position KSK0219 400 Ground Facade Fixing Kit Vertical Configuration 3 Locate manifold on side rails 4 Secure all clamps 600 1100mm 20 800 1400mm 30 1850mm 1 Attach brackets to surface at distance shown above 2 Attach side rails to brackets using bolts provided ...

Страница 15: ... connections The roof type will determine the clamp required KSK0221 400 Joint Plate Roof Kit Standing Seam Metal Roof Kit Option KSK0025 Bulb Standing Seam Clamps KSK0026 Double Folded Standing Seam Clamps The following metal roof clamps are for use with the joint plate kit KSK0221 KSK0025 Bulb standing seam KSK0026 Double folded standing seam 600 1100mm 20 800 1400mm 30 1400 1700mm ...

Страница 16: ...e standing seam clamps at the appropriate distances indicated and attach the joint plate to the standing seam clamp as shown 2 Attach the side rails to the joint plate as shown Standing Seam Metal Roof Kit 3 Locate manifold on side rails 4 Secure all clamps ...

Страница 17: ...ollector The following illustration shows the connections to the manifold 1 Tighten compression fitting to connection fitting flow and return 2 Tighten compression fitting to pipe work flow and return 3 Attach assembled fittings to manifold 4 Push clip all the way down until connection is fully retained 5 Pull gently on assembly to ensure proper engagement and retention Connection Information Return con...

Страница 18: ...ng fabric and allow flexibility in connecting to the internal pipe work Flexible stainless steel pipes are available in both a 15mm and 22mm diameter If connecting one diameter pipe to another a suitable reducer compression fitting is recommended to make the connection Insulation All pipe work on the solar loop should be insulated with high temperature insulation such as HT Armaflex from Armacell Gmb...

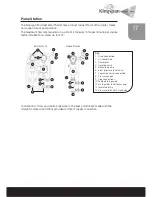
Страница 19: ...p station are made with the straight compression fittings provided for direct copper connection Pump Station Key 1 Drain connection 2 Fill connection 3 Flow meter 4 Isolating valve 5 Motorised pump 6 6 bar pressure relief valve 7 Expansion vessel connection 8 Pressure gauge 9 Pipe connections 10 Temperature gauge 11 Air separator dual stream only 12 Insulated fascia 13 Pressure relief discharge poi...

Страница 20: ...ansion vessel supplied includes an appropriate corrugated hose and threaded connection to join the vessel to the pump station Temperature Reducing Vessel TRV Also known as a cooling vessel or stratification vessel the TRV is highly recommended with the Thermomax DF400 Due to high temperatures which can be experienced within the solar loop the TRV allows for additional expansion and reduces the temp...

Страница 21: ...ries before connecting in parallel is shown in the table below 1 Insert screws into plate ensuring screws do not protrude to upper side 2 Slide plate approximately half way into channel at bottom of manifold that is fixed to side rails 3 Tighten up screws to force plate against bottom of manifold do not overtighten 4 Slide channel of next manifold on plate 5 Push clip all the way down until connect...

Страница 22: ...nsuring proper engagement of front seal strip over whole length and on end caps Inserting the tubes HP400 or HP450 Tubes 1 Open manifold lid by peeling back the front seal strip from the lid section only 2 Place tube in tube clips on both support rails and close retaining rubber 3 Slide the condenser of the tube through the front seal strip and into the pocket in the chamber of the manifold until ...

Страница 23: ...he normal operation of the control panel it should be located at least 100 mm from insulated pipes which may become hot during operation Control panels use PT1000 sensors containing twin core copper cable with a 0 75mm cross section The sensors supplied are 1 5 metres in length Sensor cables can be extended with twin core copper cable of 0 75mm diameter up to 50 metres and 1 50mm diameter between ...

Страница 24: ...ock 1 4 4 x sensor input Pt1000 temperature sensor 5 1 x sensor input Pt1000 temperature sensor or pulse water meter input RS 1 x signal output potential free relay contact for safety extra low voltage PWM R1 2 x control output for PWM controlled high efficiency pumps PWM R2 7 x mass connection common mass for sensor inputs and control outputs 4 Pin strip for internal use only 5 Cable openings on t...

Страница 25: ... the Solar Antifreeze Fluid for approximately 30 minutes For East West systems flush and fill each collector for approx 30 minutes 5 Open and close the isolating valve intermittently to circulate air bubbles which may accumulate in the sight glass 6 Return isolating valve to closed position 7 When the solar loop has been purged of air close the bottom drain connection the fill centre will begin to pr...

Страница 26: ...or loop at drain valve Contain the heat transfer fluid for appropriate disposal Disconnect pipes from the manifold 3 Collector Beware of high temperatures Remove rubber retainer to release manifold lid Unclip tube Remove the rubber support retainers from around glass tube Remove tube manifold clip Remove tubes from manifold Remove lid and separate materials Remove Manifold and support rails and sep...

Страница 27: ...5 2 5 2 2 1 Aluminium 2 EPDM 3 Brass 4 Bronze 5 Stainless Steel 6 PA66 30 GF 7 Melamine 8 Glass 9 Copper 1 Aluminium 2 EPDM 3 Brass 4 Bronze 5 Stainless Steel 6 PA66 30 GF 7 Melamine 8 Glass 9 Copper 3 5 9 7 1 6 5 2 3 5 2 5 5 6 1 7 1 1 2 5 3 2 6 5 2 5 4 5 9 2 6 9 7 9 9 8 5 9 ...

Страница 28: ...ly pressing the SET button on the fascia once will display the upper and lower collector temperatures since the control panel was last reset If the collector temperatures have been excessively high i e over 170 C it is recommended that the antifreeze level be checked using a refractometer by a qualified engineer A sample of the Solar Antifreeze Fluid can be extracted from the pump station at the pu...

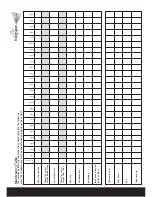
Страница 29: ...g before filling System pressure Expansion vessel setting after filling Flow rate Antifreeze level pH reading Inspection of barium getter on tubes Engineer details Print name Sign Telephone No Upon Commissioning Year 1 Year 2 Year 3 Year 4 Year 5 Year 6 Year 7 Year 8 Year 9 Year 10 Year 11 Year 12 Year 13 Year 14 Year 15 Year 16 Year 17 Year 18 Year 19 Year 20 Year 21 Year 22 Year 23 Year 24 Year 25...

Страница 30: ...Guidance for the Republic of Ireland Solar installations in the Republic of Ireland must be installed in accordance with the Irish Agrément Board certificate No 10 0345 which takes precedence over this installation document NSAI Agrément Irish Agrément Board is designated by Government to issue European Technical Approvals NSAI Agrément Certificates establish proof that the certified products are pro...

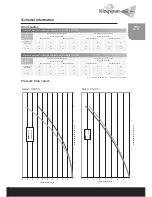
Страница 31: ...DIN 1055 Prevention of Collector Slippage Prevention of Collector Lifting Weight Per Foot kg A 102 177 B 171 287 A 156 266 B 155 269 B 256 430 A 73 137 B 73 137 A 41 80 A 111 206 B 100 191 B 111 206 8 8 to 20 20 Tube Collector Height Above Ground m 30 Tube Collector 20 Tube Collector 30 Tube Collector Weight Per Foot kg 45 Wind Loading A Front feet B Back feet See page 8 for diagram 0 10 20 30 40 ...

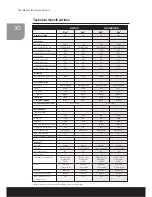
Страница 32: ...Nos 011 7S1946 R 011 751793R Operating Data Flow Rate ltr h Rated 160 240 160 240 Minimum 120 180 120 180 Maximum 300 480 300 480 Maximum Operating Pressure 8 Bar 8 Bar 10 Bar 10 Bar Stagnation Temperature C 313 313 167 167 Heat Transfer Fluid Water Glycol Water Glycol Water Glycol Water Glycol Max Field Size m2 12 15 15 15 Max Load kN m2 DIN 1055 5 2 5 2 5 Materials Absorber Copper Copper Copper ...

Страница 33: ...he cost to the Buyer in the cheapest available market of similar goods to replace those not delivered over the Price of the Goods 4 The Buyer shall examine all delivered Goods forthwith Any claim based on any defect in the quality or condition of the Goods or their failure to correspond with specification shall be notified to Kingspan Environmental within 7 days from the delivery date or where the d...

Страница 34: ......

Страница 35: ......

Страница 36: ... the specification as shown in this literature REF KSK0069C Thermomax Manual ENG AUG 16 This brochure is printed on environmentally friendly paper Kingspan Environmental Ltd 180 Gilford Road Portadown Co Armagh BT63 5LF United Kingdom Tel 44 0 28 3836 4520 solar kingspan com www kingspanthermomax com ...

Отзывы: